
Instructions / Assembly


ASSEMBLY INSTRUCTIONS
Page 14 of 14
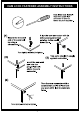
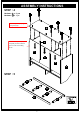
STEP : 12
For safety reason, this item has been
supplied with wall straps. We highly
recommend securing the item to the
wall using the supplied hardware
and straps to prevent tip-over
resulting in damages and/or injuries.
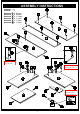
ASSEMBLY IS COMPLETED
Make sure the unit is rested on a flat
surface and does not feel loose or
wobbly. If it does, double check all
bolts/screws are secured and properly
tightened.
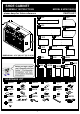
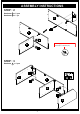
STEP : 13
Hardware 16 x 8 sets
Hardware 18 x 2 sets
F
11
J
J
11
Hardware 11 x 12 pcs
11
11
11
11
11
11
1) Align hinges (#12) to the
holes of the product as shown
in the picture, then secure by
using screws (#11).
2) Align hinges (#9) to the holes fo the panels (#J,K),
then secure by using screws (#11).