ASSEMBLY INSTRUCTIONS TOOLS REQUIRED en Philips Screwdriver {hen neared 2 People Recommended ASSEMBLY RATING 000 EASY me. DIFFICULT The Assembly Ratings a G-print system showing the {elev df effort headed wn assemble a specific product.
CHECK BEFORE STARTING Are you missing anything? Double-check all parts, hardware and accessories listed on Page 6 are accounted for. Should we send any replacements? Are there any irregularities or flaws in the pairs? We can send replacements! Check out our Quick Tips! We recommend reviewing the per-assembly handouts. Even experts need a refresher now and then Prep Time! Please review the assembly instructions and all diagrams prior to assembling.
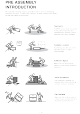
PRE ASSEMBLY INTRODUCTION We understand building ready-lo-assemble furniture can be a challenging experience for some. To help avoid confusion, we have provided some helpful tips that may speed up the process. Teamwork ALWAYS have ai least two people to help with transporting and assembling the product to avoid potential injury and/or damage Suitable Location Assembling near the area of the intended location is highly recommended.
ASSEMBLY AND CARE ADVICE A FAILURE TO FOLLOW THE GUIDELINES BELOW MAY RESULT IN INJURY AND/OR PROPERTY DAMAGE. Tun clockwise to tighten and only tighten when step is completed or when instructed to do so Position each part correctly and insert screws or bolts into their respective holes. Use the appropriate hand tools or power tools for assembly. Select steps, such as lightening screws and/or bolts, may require hand tools to avoid causing damage during assembly.
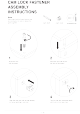
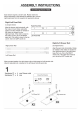
CAM LOCK FASTENER ASSEMBLY INSTRUCTIONS Note : DN : Every cam lock bolt must have a cam 3 lock connector in order to fasten the pairs together. cam bolt cam lock screwdriver 1 Screw the cam Insert the cam bolt info the bolt into panel bolt heel of joint panel. Align the cam lock with its side opening Turn the cam lock clockwise gently {or arrow) pointing to cam bolt. until it will not turn any more.
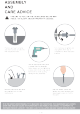
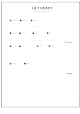
ASSEMBLY INSTRUCTIONS Each drawer requires a castoff 4 rails. Please review the below instructions fo help identify the different rails. Left and right determined from the viewpoint of opening the drawer. Right/Left Panel Rail: C-shaped f (C-shaped frame) Right Panel Rail wt Align the drawer rails horizontally, with a y cry the oval and round holes resting flat against a surface. Rotate as heeded so p the riflers are located on your right-hand side.
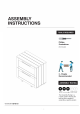
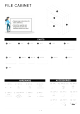
ASSEMBLY INSTRUCTIONS / Bowie | SA (AT Part Part Bx 1 pc Part @@x 1 pc Hardware (2) x 4 pcs o Part @x 1 pc Part @x 1 pc Part x 2 pes Part x 2 pes Hardware (2) x 4 pos Accessorize 8 pcs delighted institution bole (¥1) nie
ASSEMBLY INSTRUCTIONS 6 Hardware (1) x 2 pes Hardware (4) x 4 pcs (8x30) Hardware ©) x 4 pcs panel rail Hardware (7) x 8 pcs Pabst ial Directions @ ¥ Right B Panel Rita Drawer Rail Part Px 1 pc rng 1 pe Part Part Hardware 3) x 2 pos — Towed hate 12/18
ASSEMBLY INSTRUCTIONS 10 Part @dx 1 pc Hardware (2) x 4 pcs {ii For safatyiolense uns fe pres Stradivari te Analysis oto he wll: 14116
ASSEMBLY INSTRUCTIONS Wall Mounting and Fixing == EXPANSION WALL ANCHOR Our provided expansion wall anchors are only suitable for masonry walls, such as drywall, plaster or concrete, and are best for holding lightweight rems ar for anti-tip prevention. if you are unsure of the correct wall anchor to use with the product, please request professional guidance. liability for product damage or failure due to using the incorrect anchors will fall on the installer.