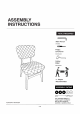
ASSEMBLY INSTRUCTIONS VERSION # 19-10-24 TOOLS REQUIRED Allen Wrench (included) CE were Phillips Screwdriver {Mot Included) = Rubber Mallet {Nat Included) 2 Peale Recommended EASY: DIFFICULT The Assembly Rating is a S-point system showing the level of effort needed to assemble a specific product.
CHECK BEFORE STARTING Are you missing anything? Double-check all parts, hardware and accessories sifted on Page 6 are accounted for, Should we send any replacements? Are there any irregularities or flaws in the parts? We can send replacements! Check out our Quick Tips! We recommend reviewing the per-assembly handouts. Even experts need a refresher now and then! Prep Time! Please review the assembly instructions and aff diagrams prior to assembling.
PRE ASSEMBLY INTRODUCTION ‘We understand building ready-oi-assembie furniture can be a challenging experience for some. To help avoid confusion, we have provided some helpful tips that may speed up the process. Teamwork ALWAYS have at least two people to help with transporting and assembling the product to avoid potential injury and/or damage. Suitable Location Assembling near the area of the intended location is highly recommended.
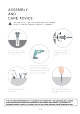
ASSEMBLY AND CARE ADVICE FAILURE TO FOLLOW THE GUIDELINES BELOW MAY RESULT IN INJURY AND/OR PROPERTY DAMAGE. Turn clockwise to tighten and only tighten when step is completed or when instructed io do so. Position each part correctly and Insert screws or bolls into their respective holes. Use the appropriate hand {loos or power tools for assembly. Select steps, such as lightening screws and/or bolts, may require hand fools to avoid causing damage during assembly.
SIDE CHAIR + Please keep instructions for future reference.
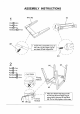
ASSEMBLY INSTRUCTIONS Part@ expos Part@ x1pc Part@ pct Hardware) X10pcs Insert PVC Dowel #H to top of the Left Leg #4, Right Leg and both of Rail Support Part@ capos Part@ xp Part@ ripe Hardware re) apexes Hardware) PCs to Left Leg #4 and Right Leg #5 using Nylon Washer #D and Bolt 86/8
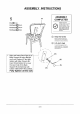
ASSEMBLY INSTRUCTIONS 3 Part@ ripe Hardware(#) apexes oT rr 2. Align and fasten the Both Leg #4 & itr #5 to Eater #2 by using the CSK 1. Align and insert PVC Dowel} Screw #1 and fully tighten with #H to bottom of Eater #2. J L screwdriver (NOT INCLUDED). J — 4 Part@ execs Hardware) dopes Hardware) apes Hardware) PCs 1. Align and fasten Back Support #6 to Eater #2 using Bolt #E and Lock Washer #F and Flat Washer #G and do not fully tighten with Allen Wrench #L.
ASSEMBLY INSTRUCTIONS ASSEMBLY 5 COMPLETED ripe Please ensure the on ann Ee on produce intaglios of fools Hardware) rives om ges Hardware) apes pore ugh and (2) Keep this handy! Plows aia His faction snail and amy correlated information Tor future reference, (2) Lift, don't drag! Tis snake gaming ber graduate please hiya LIFT Hi prods wham misreporting ol Austin th: place 1 1. Align and fasten Bac .