ASSEMBLY INSTRUCTIONS VERSION # 19-07-17 TOOLS REQUIRED Allen Wrench {Included Persons Recommended EASY mmm DIFFICULT The Assembly Rating is a 5-point system showing the level of effort needed to assemble a specific product,
CHECK BEFORE STARTING Are you missing anything? Double-check all parts, hardware ang accessories listed on Page 8 are accounted for. Should we send any replacements? Are there any regularities or flaws in the parts? We can send replacements! Check out our Quick Tips! We recommend reviewing the per-assembly handouts. Even experts need a refresher no wand then Prep Time! Please review the assembly instructions and all diagrams prior io assembling. Set up your work.
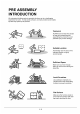
PRE ASSEMBLY INTRODUCTION We understand building ready-to-assemble furniture van be a challenging experience for seem. Td help avid confusion, we Have provided some helpful tips'that may speed up the process. Es Kin) Oo Fe Vie od o Q Flat Surface . Make sure the furniture rests on * d flat and level surface with gate leg evenly touching the floor.
ASSEMBLY AND CARE ADVICE FAILURE TO FOLLOW THE GUIDELINES BELOW MAY RESULT IN INJURY AND/OR PROPERTY DAMAGE. Position each part correctly and insert screws or bolts into their respective holes. Tum clockwise to tighten and only tighten when step is completed or when instructed to do so. Use the appropriate hand tools or power tools for assembly. Select steps, such as tightening screws and/or bolts, may require hand tools to avoid causing damage during assembly.
BUFFET ~ Please keep constitutions for fitter cleanser, = Kapok the quarterly god regulatory of pats and faradize bettors coir slat @D 1pc 1pc @PCs @)1pc Te Glass Top Shelf Stand @ pc @ 1pe @ 1pc — pr Pres aS Center Support Stand Stand Support A Stand Support B ats @® PCs PCs a] pests 1pc PCs Enos Bolt Lock Washer 1/4" Flat Washer 1/4" Allen Wrench M4 L-Bracket ~~ Threaded Stud © Specs PCs pes @) pc pcs GD apes Bolt Lock Washer 5/16” Flat Washer 5116” Allen Wrench M5 Spacer Bolt 5/8
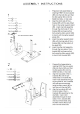
ASSEMBLY INSTRUCTIONS 1 Part@ x1pc Part@) x1pc Hardware apexes Hardware@8) PCs Hardware PCs Hardware@E) pipe ¢ Turn right {clockwise) fo tighten Part PCs Hardware) gapes Hardware@s) PCs Hardware) xgpcs Hardware) Apexes i HL I’ Prepare 2 bolt assemblies by insisting FIRST the lock washer (#8) onion the bolt #4) and then the flat washer (#C} onto the SAME belt (A), In that order Aligned shot side of the = bracket! (HE) with the per-drilled hive on the center support stand Insert one bolt assembly through the
ASSEMBLY INSTRUCTIONS 3 Part @ x1pc Hardware) PCs Hardware @) SPCA I. Align the base (#4) with the prevailed holes on the stands (#3) and the center support stand Prepare 5 bolt assemblies by inserting FIRST the lock washer (#H) onto the bolt (#G) and then the flat washer onto the SAME bolt in that order. lll.
5 ASSEMBLY INSTRUCTIONS Hardware? PCs Hardware@ PCs Part G) x1pc With the help of another person, carefully place and center the glass top (#1) over the spacers Make sure the table is rested on a flat surface and does not feel loose or wobbly. If it does, double check that the setscrews are secured and properly tightened.