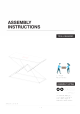
ASSEMBLY INSTRUCTIONS TOOLS REQUIRED Re Fut 2 People Recommended 000 EASY mmm [HEF CULT The Assembly Rating is a B-point system showing the fee! of effort needed to assemble a specific product.
CHECK BEFORE STARTING Are you missing anything? Double-check all parts, hardware and accessories sifted on Page 6 are accounted for. Should we send any replacements? Are there any irregularities or flaws in the pairs? We can send replacements! Check out our Quick Tips! We recommendation reviewing the per-assembly handouts, Even experts need a refresher now and then! Prep Time! Please review the assembly instructions and all diagrams prior to a piling.
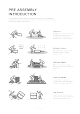
PRE ASSEMBLY INTRODUCTION We understand building ready-to-brasserie furniture can be a challenging experience for some. To help avoid confusion, we have provided some helpful dips that may speed up the process. Teamwork ALWAYS have at least two people to help with transporting and assembling the product to avoid potential injury and/or damage.
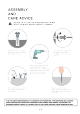
ASSEMBLY AND CARE ADVICE A FAILURE TO FOLLOW THE GUIDELINES BELOW MAY RESULT IN INJURY AND/OR PROPERTY DAMAGE. \ Turn clockwise to tighten and only tighten when step is completed or when instructed to do so. Position each part correctly and insert screws or bolts into their respective holes Use the appropriate hand tools or power tools for assembly. Select steps, such as tightening screws and for bolts, may require hand tools to avoid causing damage during assembly.
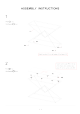
ASSEMBLY INSTRUCTIONS 1 Part@ xp Almach levelers (#A) (0 the bottom of the frame 2 Attach suction cups (#B) to the top of the frame, then carefully place glass (#2) to the suction cubs Part @xiii Hardware{Exspcs 8/8
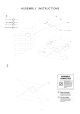
3 Hardware@Expos Hardware@ apes Hardworking ASSEMBLY INSTRUCTIONS ASSEMBLY COMPLETED foreskin os 16 ann Re Le Ie tis or ito, den: Bok ls Sink fee igi wid {4 Keep this handy! Sir ss a Seized sor Noes loin Li font drag! intact SER a] SRY ena
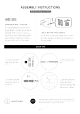
ASSEMBLY INSTRUCTIONS Wall Mounting and Fixing == EXPANSION WALL ANCHOR Our provided expansion wall anchors are only suitable for masonry walls, such as drywall, plaster or concrete, and are best for holding lightweight items or for anti-tip prevention. if you are unsure of the correct wall anchor to use with the product, please request professional guidance. liability for product damage or failure due io using the incorrect anchors will fall on the installer. QUICK TIPS ‘1.