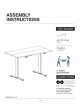
ASSEMBLY INSTRUCTIONS TOOLS REQUIRED Allen Wrench Ms {deluded) Screwdriver {Nat in chided) 2 People Recommended ASSEMBLY RATING EAS Frm DIFFICULT Tha Assembly Rating Isa Point system showing the level of effort needed to assemble a specific product, VERSION # 21-4-21
CHECK BEFORE STARTING Are you missing anything? Double-check all parts, hardware and accessories cited on Page 8 are accounted for. Should we send any replacements? Are there any regularities or flaws in the pairs? We can send replacements! Checkout our Quick Tips! We recommend viewing the per-assembly handouts, Ben experts need a refresher now and then! Prep Time! Please review the assembly instructions and all diagrams prior to assembling.
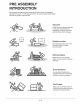
PRE ASSEMBLY INTRODUCTION We understand building ready-to-assemble furniture van bea challenging experience for some. To help avoid confusion, we have provided some helpful tips that may spied up the process. O Teamwork ALWAYS have at least two people to help with wan sporting and assembling {He product to avoid potential injury. and/or damage. Suitable Location Assembling near the area nf the intended location is highly recommended.
ASSEMBLY AND CARE ADVICE FAILURE TO FOLLOW THE GUIDELINES BELOW MAY RESULT IN INJURY ANDORRAN PROPERTY DAMAGE. AE Position each: patiently and giro strews or bollocking their respective files. Turn clockwise fo tighten and ony Higher when step bs completed or when Instructed 10 de gn. Use the appropriate footstools or power dials for assembly. Select steps, such as Brightening screws: andiron bolts, may require fraud's fools to avoid causing dressage during assembly.
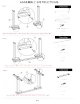
ASSEMBLY INSTRUCTIONS pa et C-short beam M-MBx15 Screw x4 5 P-M& Checklist Step 2 Step 3 E Foot x2 MM8x15 Screw x8 Align feet (HE) to the column then secure by using screws 6/8
Step 4 Ri Checklist 8 K Table board 172 Connecting hoard $74.
Step 6 Q Screw x17 Secure struts (#D) and long beam (#8) to the table board (#K) by screws Connect all plugs Step 7 onto the control box using screws 1) Align control box (#5) to table ‘ol i board, then secure by using Checklist G-Control box x1 [TE Adapter x1 H-Handset x1 Screw x2 oP wf N-8T4x12 Screw x3 37 Align handset (#H) 10) the table board, then secure by using screws (HN). Align and attach adapter (H)] «.cabin cip 8 0 the control box then secure the connecting wire by using cable clip (HK).