ASSEMBLY INSTRUCTIONS VERSION # 19-07-29 TOOLS REQUIRED Allen Wrench (included) Phillips Screwdriver (Not included) 2 Persons Recommended EASY e DIFFICULT The Assembly Rating is a 5-point system showing the lever of effort needed to assemble a specific product.
CHECK BEFORE STARTING Are you missing anything? Double-check all parts, hardware and accessories listed on Page 6 are accounted for. Should we send any replacements? Are there any irregularities or flaws in the parts? We can send replacements! Check out our Quick Tips! We recommend reviewing the per-assembly handouts. Even experts need a refresher now and then! Prep Time! Please review the assembly instructions and all diagrams prior to assembling.
PRE ASSEMBLY INTRODUCTION We understand building ready-to-assemble furniture can be a challenging experience far some. To help avoid confusion, we have provided some helpful tips that may speed up the process. Teamwork ALWAYS have at least two people to help with transporting and assembling the product to avoid potential injury and/or damage. Suitable Location Assembling near the area of the intended location is highly recommended.
ASSEMBLY AND CARE ADVICE FAILURE TO FOLLOW THE GUIDELINES BELOW MAY RESULT IN INJURY AND/OR PROPERTY DAMAGE. Position sate part correctly and insert screws or boils into their respective holes. Tum clockwise to tighten and only frighten when pies is completed or when instructed o do so. Use the appropriate hand tools or power tools for assembly. Select steps, such as tightening screws and/or bolts, may require hand tools to avoid causing damage during assembly.
+ Fleoseiwepinsiuoions T Ttys el + Uik e ity el opportunity ol parkland hardcore: hetero tine sitar: e @1pc @1pc @1pc & N T Front Frame Back Frame Top Panel 1 pc @chs S SO Bottom Panel Shelf Panels @ PCs PCs @Z Sets @ B O Bolt @1/4" x 1/2" Shelf Pins Anti-Tip Kits 5710
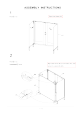
ASSEMBLY INSTRUCTIONS 1 Part @ ripe Open front frame (#1) 2 Part# xiii Hardware dopes Align back frame (#2) to front frame then secure by using bolts 7410
ASSEMBLY INSTRUCTIONS 3 Part @ ripe Place bottom panel (#4) to the bottom of frame.
ASSEMBLY INSTRUCTIONS S Hardware#B} PCs Attach shelf pins (#8) to the holes in the frame, then place shelves (#5) onto shelf pins Hardware apexes Hardware@ tsetse O e this Randy BRI RSO TORS AR i engine e e by a/10
ASSEMBLY INSTRUCTIONS == EXPANSION WALL ANCHOR Our provided expansion wall anchors are only suitable for masonry walls, such as drywall, plaster or concrete, and are best for holding lightweight items or for anti-lip prevention. I you are unsure of the correct wall anchor to use with the product, please request professional guidance. Ability for product damage or failure due 1o using the incorrect anchors will fall on the installer.