
Instructions / Assembly


Page 5 of 5
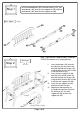
Step 4
Step 3
I. Align the bench cushion (#4)
onto the assembled parts.
Insert 3 bolts (#B) onto the
rear support rail (#5) and
using an Allen wrench (#E)
to lock them down with the
bench cushion (#4).
II. Insert a bolt (#B) onto the left
arm (#2) and using an Allen
wrench (#E) to lock it down
with the bench cushion (#4).
Repeat the same for the right
arm (#3).
ASSEMBLY IS COMPLETED
I. Insert 6 screws (#C) onto the brackets of the rear support rail (#5)
AND the front support rail (#6) and using a Phillips screwdriver to
secure them down with the bench cushion (#4).
II. Insert 2 screws (#C) onto the left arm (#2) and using a Phillips
screwdriver to secure them down with the bench cushion (#4).
III. Repeat process II to secure the right arm (#3) onto the bench cushion
(#4).
Enlarged
Turn right (clockwise) to tighten
#B x 5 pcs
#5
#4
#3
#2
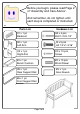
Carefully turn the completed
table upright. Make sure
the table is rested on a flat
surface and it does not feel
loose or wobbly. If it does,
double check that the bolts
are secured and properly
tighten.
#5
#6
#2
#3