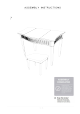
ASSEMBLY INSTRUCTIONS sis aoe sp (included) seals ee EASY mmm DIFFICULT e Assembly Rating is a 5-point stern showing the level
CHECK BEFORE STARTING Are you missing anything? Double-check all parts, hardware and accessories sifted on Page 6 are accounted for, Should we send any replacements? Are there any irregularities or flaws in the parts? We can send replacements! Check out our Quick Tips! We recommend reviewing the per-assembly handouts. Even experts need a refresher now and then! Prep Time! Please review the assembly instructions and aff diagrams prior to assembling.
PRE ASSEMBLY INTRODUCTION ‘We understand building ready-oi-assembie furniture can be a challenging experience for some. To help avoid confusion, we have provided some helpful tips that may speed up the process. Teamwork ALWAYS have at least two people to help with transporting and assembling the product to avoid potential injury and/or damage. Suitable Location Assembling near the area of the intended location is highly recommended.
ASSEMBLY AND CARE ADVICE FAILURE TO FOLLOW THE GUIDELINES BELOW MAY RESULT IN INJURY AND/OR PROPERTY DAMAGE. J : \ Turn clockwise to tighten and only tighten when step is completed or when instructed io do so. Position each part correctly and Insert screws or bolls into their respective holes. Use the appropriate hand {loos or power tools for assembly. Select steps, such as lightening screws and/or bolts, may require hand fools to avoid causing damage during assembly.
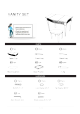
VANITY SET + Fleoyeiwep insinuations fr Tutti Efe Cuba ths dearly and rpg iol parkland hardware hole yin sin. PARTS @ 1pc @PCs = Table Top Front Leg @1pc @1pc T&S Stool Cushion Seat Frame etas @ PCs PCs @ S Bolt @1/4" x 2" Lock Washer 1/4" 1pc PCs e— Gum Wood screws #3.
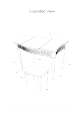
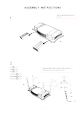
ASSEMBLY INSTRUCTIONS Pull out the drawers from the top 2 Part @) xiii Part@® apexes Part @ apexes Hardware) apexes Hardware) apexes Hardware C) PCs Align legs to the top then secure by using bolts (#A) with washers 7/10
ASSEMBLY INSTRUCTIONS Align legs (#8) to the frame then secure by using bolls (#A) 5 with washers Part ® ripe Part @ apexes Hardware) pests Hardware) apexes Hardware) PCs Align seat (#4) to frame, then secure by Part@ x1pc using screws there will be no hardware) “Gps drilled holes on the seat ass