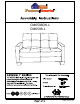
CM6598DK-L CM6598-L Rev: 16-07-27
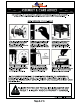
#A x 12pcs #C x 12pcs #D x 12pcs Bolt 5/16" x 2-5/8"
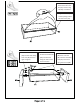
2. Insert a screw (#G) into each end of the crossbar (#3). Secure using a Phillips screwdriver. 1. Align the crossbar (#3) to the opening side of the seat frame (#1). 1. Insert 4 threaded rods (#A) into the holes along each arm (#5) and turn right to tighten. 2. Insert the other ends of those threaded rods (#A) into the holes along the sides of the seat frame (#1). 3. Insert a flat washer (#D) then a hex nut (#C) onto the threaded rods (#A) and secure using the wrench (#B).
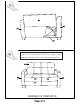
1. Align the legs (#6) to the corners along the bottom. 2. Insert a bolt (#E) into each leg (#6) and secure using the Allen wrench. 1. Insert 4 threaded rods (#A) into the holes along the back frame (#4) and turn right to tighten. #A x 4pcs #C x 4pcs #D x 4pcs 3. Insert a flat washer (#D) then a hex nut (#C) onto the threaded rods (#A) and secure using the wrench (#B). 2. Insert the other ends of those threaded rods (#A) into the holes along the back.
Carefully turn the completed table upright. Make sure the table is rested on a flat surface and does not feel loose or wobbly. If it does, double check that the bolts are secured and properly tightened.