ITEM#:161549 EASY DIFFICULT Page 1 of 16 VERSION:20160507
Page 2 of 16
Page 3 of 16
Unless you are particularly adept at assembling flat-pack/knock-down furniture, we understand building ready-to-assemble furniture can be a frustrating experience for some. To help avoid confusion and to make the assembly process quicker and smoother, we have provided some helpful tips.
Page 5 of 15
Page 6 of 16
Page 7 of 16
Page 8 of 16
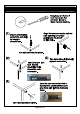
3 a 8 4 a b 9 b Page 9 of 16 3
a b 8 9 3 4 Ex2 Page 10 of 16
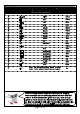
Rx2 6 Fx6 1 Nx4 6 Page 11 of 16
2 1 12 5 Nx4 13 Page 12 of 16
Nx4 2 3 5 4 13 Hx4 Ix4 Kx4 OQx4 Jx1 13 15 5 14 14 Qx1 15 Page 13 of 16 Fx2
Lx30 10 11 13 5 Mx4 23 Gx4 Px4 24 24 24 24 23 24 Gx4 24 23 Page 14 of 16 Px4
1 8 7 2 To adjust the door in or out,loosen this screw and push the door further in or push further out then retighten screws. 17 To adjust the door vertically, loosen the top and bottom screws, push the door up or down as necessary, then retighten screws. 16 To adjust the door left/right, turn this screw clockwise to move this corner of the door toward the frame, or counterclockwise to move door away from the frame. Refer to the last page for more detailed hinge instructions.
Height Adjustment Located at the top and bottom of the hinge are two screws that mount the hinge to the cabinet. Turn these first to make sure the door is secure. If the door is still too high or low, loosen these screws slightly and then lift or lower the door until it is in the position you want. Firmly tighten the screws to secure the door. Remember to support the door as you loosen these screws or it could drop completely out of its initial position.