
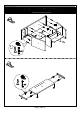
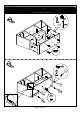
Instructions / Assembly
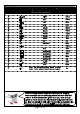


Page 16 of 16
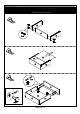
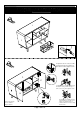
Height Adjustment
Located at the top and bottom of the hinge are two screws that mount
the hinge to the cabinet. Turn these first to make sure the door is
secure. If the door is still too high or low, loosen these screws slightly
and then lift or lower the door until it is in the position you want. Firmly
tighten the screws to secure the door. Remember to support the door
as you loosen these screws or it could drop completely out of its initial
position. Close the cabinet doors to see whether the fit is satisfactory.
Repeat the process if adjustment is still needed.
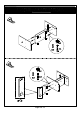
Depth Adjustment
The screw closest to the back of the cabinet is the depth screw and
moves the doors in and out. Use this screw to adjust how far out or in
the doors are in comparison to your cabinet and to the other cabinet
doors and drawers surrounding it. Loosen the screw and manually PUSH
or PULL the door to adjust it to the position you want. Firmly tighten the
screws to secure the door. Close the cabinet doors to see whether the
fit is sati sfactory. Repeat the process if adjustment is still needed. If
possible, avoid maxing out the adjusting screw for it may cause
unwanted problems.
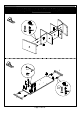
Side-To-Side Adjustment
The screw closest to the cabinet door allows the doors to move from
side to side. Tighten this screw (clockwise) to move this corner of the
door further toward the frame ; loosen it (counterclockwise) to move the
door away from the frame. This adjustment can also be used to correct
a door that is not hanging straight. If the top is further to the left or right
than the bottom, adjust the top and bottom hinges separately to correct
the tilt. Close the cabinet doors to see whether the fit is satisfactory.
Repeat the process if adjustment is still needed. If possible, avoid
maxing out the adjusting screw for it may cause unwanted problems.