
CM4630 3PK


Page 7 of 7
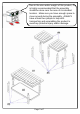
I. Carefully place the end table top (#4) facing down on a protected
surface. Align the legs (#5) with the pre-drilled holes on the
bottom corners of the end table top (#4).
II. Prepare 8 bolt assemblies by inserting FIRST the lock washer
(#B) onto the bolt (#A) and then the flat washer (#C) onto the
SAME bolt (#A), in that order.
III. Insert the bolt assemblies through the pre-drilled holes on the
bottom corners of the end table top (#4) and secure those bolts
using the Allen wrench (#E) to lock them with the legs (#5).
IV. Carefully turn the completed table upright. Make sure the table is
rested on a flat surface and does not feel loose or wobbly. If it
does, double check that the bolts are secured and properly
tightened.
#A x 8 pcs
#B x 8 pcs
#C x 8 pcs
Turn right (clockwise) to tighten
ASSEMBLE EVERYTHING EXACTLY THE SAME FOR THE SECOND END TABLE.