
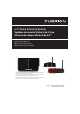
User Manual

10
Installation
»”
Fig. 11
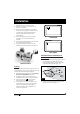
3. Feed the supplied 6-foot camera power
cable through the gasket. Ensure the bare
end of the cable goes into the vehicle and
the flat side faces inward. (Fig. 12)
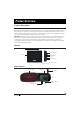
Camera Power
Cable
Bracket
Gasket
Fig. 12
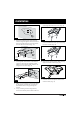
4. Fix the gasket and bracket to the vehicle
using four 3/4” flat self-tapping screws.
Make sure the camera power cable is not
wrapped or extruded. (Fig. 13)
Bracket
Fig. 13
5. Make sure the sealing lip around the edge
of the gasket is seated over the edge of
the bracket before fully tightening the
screws.
6. If only installing the mounting bracket,
secure the camera power cable inside the
mounting and attach the cover. (Fig. 14)
Fig. 14
7. If a doorway camera is to be installed,
remove the Bracket Cover by unscrewing
the four screws. (Fig. 15)
Fig. 15
8. Pull out the camera power cable, leaving
approx 2 inches of slack. (Fig. 16)
Fig. 16
9. Connect the camera power cable to the
camera cable. (Fig. 17)