
User Manual

9
Installation
possible at the rear of the vehicle.
Ɣ Horizontal-center of the vehicle or as
close as is optimal.
Ɣ Mount camera at least 2 inches above
or below running lights. Close proximity
to lights may cause image blooming,
blurring and reduced night vision
performance.
Ɣ The area should be flat with enough
surface area to accommodate the
bracket.
Ɣ The surface area should be clean and dry
for a watertight installation.
Ɣ Ensure that power can be fed to the
installation area from within the vehicle.
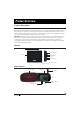
Front/Rear Camera
Doorway Camera
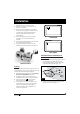
Camera Location
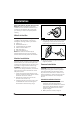
Testing
Prior to permanently mounting the camera, it
is advisable to check if the intended mounting
location will achieve adequate signal.
Ɣ Pair the camera and monitor (see Pairing
the Camera and Monitor section).
Ɣ Temporary secure the camera in the
intended location or as close as possible.
Ɣ Check signal icon
on the monitor.
Ideally there should be 3-4 bars.
Ɣ If the signal is 0-1 bars, reposition the
camera and or monitor. The signal can
also be improved by decreasing the
amount of obstructions between the
camera and monitor.
Good Signal
Poor Signal
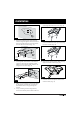
Sharkfin Camera Installation (if
purchased)
1. Select a suitable mounting position where
you are going to install the doorway
camera. Mark a basic outline using the
provided bracket gasket. (Fig. 10)
Fig. 10
2. Drill a ⁄” center hole on the vehicle wall
using a ⁄” hole saw. (Fig. 11)