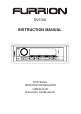
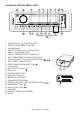
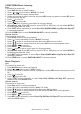
DV5700 INSTRUCTION MANUAL MIC SEL 10 MODE 1 /MUTE 3 2 2 AS/PS 3 INT 6 4 RPT 11 BAND/LOUD 5 RDM 7 20 6 5 19 21 MIC SEL MODE 1 /MUTE 2 AS/PS INT 3 RPT 4 BAND/LOUD RDM 5 6 DVD Stereo 180W/CD/DVD/Radio/MP3 1 8 9 14 15 16 17 18 USB/AUX-IN 4 (1-6) Subwoofer Out/Bluetooth 22 13 12 23
BEFORE YOU BEGIN PRECAUTIONS: CAUTION: USE OF CONTROLS OR ADJUSTMENT OR PERFORMANCE OF PROCEDURES OTHER THAN THOSE SPECIFIED HEREIN MAY RESULT IN HAZARDOUS RADIATION EXPOSURE. THE USE OF OPTICAL INSTRUMENTS WITH THIS PRODUCT WILL INCREASE EYE HAZARD. • • • • Keep this manual handy as a reference for operating procedures and precautions. Always keep the volume low enough so you can hear sounds outside of the car. Protect this product from moisture.
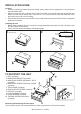
INSTALLATION GUIDE Location • Choose a mounting location away from humid areas, water sources, appliances or any equipment that can radiate heat. • Select an area on a wall or cabinet which is free from cable, fuel or brake lines and ensure that area behind the wall mount stereo has a vent hole or if it is an enclosed box and has adequate room around the rear of the unit for cooling.
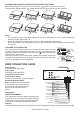
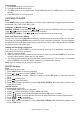
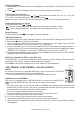
FOLDING DOWN AND DETACHING/ATTACHING THE FRONT PANEL Before detaching the front panel, be sure to press the button to turn OFF the unit first. Then press the Release button detach the panel by pulling it towards you as illustrated. 15° 15° 15° 15° Notes: • Do not press the front panel hard against the unit when attaching it. It can be easily attached by pressing it lightly against the unit. • When you carry the front panel with you, put it in the supplied front panel case.
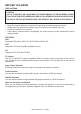
1 /MUTE 2 3 INT 4 RPT 5 RDM 6 Locations of Parts (Main unit) 10 3 2 6 11 7 20 5 19 MIC 21 SEL MODE 1 /MUTE 2 INT MIC SEL MODE AS/PS BAND/LOUD 10 1 /MUTE 2 INT 3 RPT 4 5 RDM 3 2 6 11 6 MIC SEL 1 8 9 14 15 MIC MODE 16 17 1 /MUTE AS/PS 18 2 3 INT BAND/LOUD 23 4 RPT 5 RDM 6 SEL 4 (1-6) MODE 1 /MUTE 10 3 1. POWER ON/OFF ( ) / MUTE BUTTON 2. SELECT FUNCTION BUTTON (SEL) 3. VOLUME KNOB 4. PRESET STATIONS (1,2,3,4,5,6) BUTTON 5.
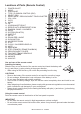
Locations of Parts (Remote Control) 1. POWER ON/OFF 2. MODE 3. PLAY/PAUSE 4. TITLE / PLAYBACK CONTROL (PBC) 5. SELECT (SEL) 6. SEEK+/SEEK- / PREVIOUS/NEXT TRACK/CHAPTER 7. VOL +/VOL8. GOTO 9. AUDIO 16 10. OK 11. UP/DOWN/LEFT/RIGHT 12. REPEAT/AUTO SEEK/PRESET SCAN 18 13. RANDOM / BAND / LOUDNESS 14. INTRO 9 15. SYSTEM (PAL/NTSC) 16. SUBTITLE 22 17. SETUP 18. EQUALIZER / ANGLE 14 19. SLOW MOTION 5 20. A-B REPEAT/ZOOM 21. STOP 22. CLOCK / ON SCREEN DISPLAY 23. MUTE 26 24. MAIN MENU 25.
GENERAL OPERATIONS Turning the unit ON/OFF ( ) Press “ ” button to turn on unit. To turn off, press and hold this button for 2 seconds. Selecting a source (MODE) Press MODE repeatedly to switch between TUNER, DISC, USB, SD, Bluetooth and AV IN mode. Loading a disc Make sure power is turned ON before inserting a disc. 1. Press to open the front panel 2. Insert a disc into the disc slot Ejecting a disc Make sure power is turned ON before ejecting a disc. Press button to eject disc.
Clock Setting 1. Press CLK button on remote control. 2. Press and hold CLK button again. 3. Turn VOL knob on unit to adjust hours. Press CLK button and Turn VOL button on unit to adjust minutes. 4. Press OK button on remote control. LISTENING TO RADIO Band Press BAND button on unit or BD button on remote control repeatedly will toggle cyclically between each band. FM1--FM2--FM3--AM1--AM2. Automatic or Manual tuning ( / ) MANUAL TUNING: Press and hold / button 2 sec. until MANUAL show on the display.
CD/MP3/WMA Music listening: Unit: Files search for stop mode: 1. Press AS/PS button to media seletion. 2. Press / button to select “MUSIC” file listed. 3. Rotate volume knob to select desired folder. 4. Rotate volume knob to select music file and press SEL button to playback or press SEL button to start play from first file. 5. Press for next file. 6. Press for previous file. 7. Press 1 button for pause, press again for resume playback. 8.
Stopping Playback 1. Press STOP on remote control during playback to stop playback. That position is stored in memory. 2. Press to continue. Playback starts from the track at which it was stopped. Fast Forward / Fast Reverse 1. During playback, press and hold or . Unit scans at the speed of x2 - x4 - x8 - x16 - x20. 2. To resume normal playback at a desired point, press . Note: No sound is come out during fast forward/fast reverse at over x2 high speed search.
15° 15° DVD/VCD PLAYBACK Playback 1. Insert a disc. When the disc offers a menu, the menu is displayed. When a disc already inserted, press MODE to switch to disc mode. 2. On DVD and VCD with playback control (PBC), menu screens may appear automatically. If this happens, perform the operation described below to start playback. CAUTION: Make sure that the TV system settings is set correctly according to the disc that is playing. If you are not sure, leave it set to “Auto”.
Searching for particular track using GOTO You can use the GOTO function to search for a desired track number or particular point of a track to play. 1. Press GOTO button on the remote control during playback. Press or button to select Title/ Chapter, Time serach appears. 2. Enter Title/Chapter for currently playback disc. press enter to confirm. 3. If you want to search by time, enter the time, minute and second then press enter to confirm.
STEP (Frame by frame playback) This lets you move ahead one frame at a time during playback. Each time you press step button on remote control, you move ahead on frame. To return to normal playback, press button. PAL / NTSC Press and hold SYS button to switch between PAL, NTSC system. Return / Go Back Press MENU button on remote control to go back one level or return to previous menu. CUSTOMIZING SOUND SETTINGS 1. Press SEL button to enter AUDIO setup. Selected item will be highlighted.
Note: - The default password is ‘0000’. - In case you forgot your password, you can use the master password ‘8888’ to unlock and reset the password. - Master password will only work while SETUP button is press during playback. Supported Video Format File Extension Container Video Codec Audio Codec Resolution .avi .divx AVI DivX 3.xx DivX 4.xx DivX 5.xx DivX 6.xx XviD MPEG-1 Dolby Digital (AC3) WMA/PCM/LPCM MPEG-Audio (MP1/MP2/MP3) 720 x 480 (30fps) .
HOW TO USE BLUETOOTH IN YOUR STEREO Pairing Before your mobile phone can communicate with the stereo, you must first complete the pairing procedure to connect them together. 1. Press MODE button on main unit/remote control until “BT” or “BT AUDIO” is shown on LCD Display. 2.
TECHNICAL SPECIFICATIONS DVD PLAYER SYSTEM Signal to Noise Ratio Channel Separation Frequency Response > 60 dB > 50 dB (1kHz) 20 Hz - 20 kHz FM RADIO Frequency Range Channel Step Sensitivity Stereo Separation Signal to Noise Ratio 87.5-107.9 MHz 200 kHz 2.8 µV 30 dB 50 dB AM RADIO Frequency Range Usable Sensitivity 530-1710 KHz 32 dB AUDIO/VIDEO OUTPUT Output Impedance 750 mV 10k Ohm GENERAL Power Supply Speaker Impedance Output power Fuse 12V DC (10.8-15.