
Users Manual Part 3


1. OPERATIONAL OVERVIEW
1-69
There are two methods for measuring range with the VRMs, using the VRM key and
on-screen menu box operation.
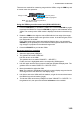
Using the VRM keys on the control unit (RCU-014/RCU-031)
1. Press the VRM ON key to activate the VRM1 box. Press the VRM ON key again
to activate the VRM2 box. Press the VRM ON key again to switch between active
VRMs. The currently active VRM marker is displayed as shown in the above fig-
ure.
2. Rotate the VRM knob to align the active VRM with the inner edge of the target,
then read the distance at the lower right of the screen. In the above figure, the ac-
tive VRM reads "36.44 NM".
Each VRM remains at the same geographical distance when you operate the
RANGE key or the [RANGE] box. This means that the apparent radius of the VRM
ring changes in proportion to the selected range scale.
3. Press the VRM OFF key to hide the VRMs.
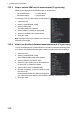
On-screen menu box operation
1. Select the appropriate [VRM] box.
2. The guidance box reads "VRM ON/".
Left-click to turn on the VRM.
The guidance box now reads "VRM SET L = DELETE /".
Further, the box is highlighted and the corresponding VRM appears.
3. Left-click again and the cursor jumps to inside the operational display area. The
guidance box now reads "VRM FIX L = DELETE / EXIT".
4. Move the trackball to adjust the VRM.
Note: The maximum VRM distance is set by the current display range and can be
set as high as twice the distance of the display range.
5. Left-click to anchor the VRM and fix its readout, or right-click to cancel and return
the VRM to its previous location (range).
6. To hide the VRM, left-click the [VRM] box to show "VRM SET L = DELETE /" in
the guidance box, then press and hold the left button on the trackball.
Currently active
VRM is highlighted.
Range to VRM
TTG to VRM
28.11 36.44
NM
VRM1 VRM2
TTG
50:00 60:00
TTG
NM
Note: You can hide the [TTG] indication.
See section 1.32.5.