
Installation Instructions
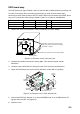

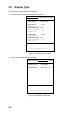
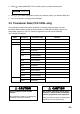
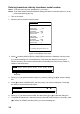

Table Of Contents
- SAFETY INSTRUCTIONS
- SYSTEM CONFIGURATION
- EQUIPMENT LISTS
- 1. MOUNTING
- 2. WIRING
- 3. INITIAL SETTINGS
- 3.1 Language Setting
- 3.2 Display Type
- 3.3 Transducer Data (FCV-1200L only)
- 3.4 Adjustment for Transceiver Unit, Video Sounder, Telesounder, Picture Recorder
- 3.5 Water Temperature Sensor Setting
- 3.6 Net Sonde Setting
- 3.7 Nav Data, Heading Sensor Setting
- 3.8 Stabilization (heaving compensation)
- 3.9 Propagation Velocity
- 3.10 Demonstration Mode
- 3.11 Restoring Default Settings
- 3.12 DIP Switch Setting
- APPENDIX 1 TRANSDUCER 50BL-12/50BL-24H
- APPENDIX 2 NEW BLT TRANSDUCERS
- APPENDIX 3 TRANSDUCER 82B-35R
- PACKING LISTS
- OUTLINE DRAWING
- INTERCONNECTION DIAGRAMS

3-5
MAX 1/2 1/4 1/8 1/16 MIN
8. Press [+] or [-] to select appropriate power, and then press [
] or [ ] to close the dialog box.
Normally set to MAX. MIN means transmission power less than 1W.
9. Follow steps 1-6 to enter model number of other transducer if installed.
Note: For dual-frequency transducer, enter both high and low frequencies and set the same
transducer model number for both high and low frequencies.
10. Confirm settings and turn off the power.
Note: If the system detects frequency mismatch the message “Frequency unmatch error! Press
any key to go to Transducer setting menu.” appears at the next powering of the equipment.
Press any key to go to the transducer setting menu and reenter transducer data.
Entering transducer data by transducer specifications
For new transducer or other make of transducer see FURUNO Information for further
information.
Note 1: If you are continuing from paragraph 3.1 go to step 2.
Note 2: If you have already entered transducer settings and want to reconfirm them turn on the
power while pressing any key.
1. Turn on the power.
2. Press any key.
3. Press [
] to select XDCR SELECT, and then press [+] to show the dialog box below.
TYPE MANUAL
4. Press [+] to select MANUAL, and then press [
] or [ ] to close the dialog box. The display
should now look something like the one below.
XDCR SETTING INSTALLATION DEMO
XDCR SELECT : MANUAL
[HIGH] FREQ : --- kHz
SUPPLY VOLT : --- V
TX POWER : MAX
[LOW] FREQ : --- kHz
SUPPLY VOLT : --- V
TX POWER : MAX
INVERTER FREQ : STD (62/125/188 kHz)
[-/+]: Change setting, Turn OFF to exit
Select how to set XDCR type.
NOTE: Don't select the item which is
within +/- 3kHz of power supply freq.
Figure 3-5 Menu for manual entry of transducer specifications