PC DATA RECORDING SOFTWARE HANDBOOK This software is used for collecting the data from the Navigational Echo Sounder FE-800 and FE-700. The software is capable of storing and outputting dual frequency data, and when connected to a FE-800 unit the software can also store and output echograms. The interconnection between the software installation PC and the FE-700/FE-800 is shown in the figure below.
1. INSTALLATION 1.1 How to Install the Program System requirements This software runs under Windows 7® and Windows 8®. A minimum of 1GB RAM is recommended. Procedure 1. 2. Insert the CD-ROM supplied with the DATA RECORDING SOFTWARE FOR PC into your CD/DVD drive. Double click the CD-ROM drive icon to view the files on the CD-ROM. 3. Double click the DATA RECORDING SOFTWARE FOR PC icon to start the installer. Follow the instructions on the screen to install the software.
1.3 How to set Serial and LAN ports To connect your PC with the software installed, you must set the port (LAN or serial) to which the equipment is connected. Select [Option] from the menu bar, then click [Use port] to open the pop-up window shown right. 172.31.16.121 11000 Serial ports 1. Click the SIO radio box to activate the Serial Port drop-down box. 2. From the Serial Port drop-down box, select the serial port on the PC to which the equipment is connected. 3. Click OK. Lan Ports 1.
2. HOW TO USE THE SOFTWARE NOTE: Opening the system menu screen during the download will cancel any download in progress. 2.1 Downloading Real-time Data To download real-time data (data recorded at one second intervals) from the FE-700 or FE-800, press the Start utility button on the toolbar. You may also select [Start] from the [Download] menu on the menu bar, or press F9 on your keyboard.
2.2 How to Download RAM Data Data accumulated in the RAM of the FE-700 or FE-800 can be downloaded in two methods: • One hour of data, in one second intervals • 24 hours of data, in five second intervals To download the data stored in the RAM, do the following: 1. 2. Click [Download] on the menu bar. Move the cursor over [Loading Option] in the [Download] drop-down menu. 3. Select [1h Data] or [24h Data] as appropriate. A download dialog box similar to the one shown below appears.
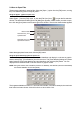
2.3 Setting Options To access and set options, select [Option] on the menu bar, then click [Option] in the drop-down menu. The [Option] window has two tabs, [File] and [Graphic]. To adjust settings as required, click the radio button or the up/down arrow button as appropriate.
Graphic tab settings Group Settings Scale 5m, 10m, 20m, 40m, 100m, 200m, 400m, 800m, 1600m, 2400m Pixels 1, 2, 5, 10 Pixels Mode Line Mark Display Priority Solid Line (Wide) Line (Narrow) On/Off Fore/Aft Color* Line Color(Fore) - Gray, Red, Yellow, Black Line Color(Aft) - Same colors as Fore Back Color - Black, White Set Depth On(*.*m)/Off Color Table Amber, Black, Blue, White Description Sets the view scale for the GRAPH and ECHO modes.
2.4 How to Open Files There are two methods for opening files: Using the [Open...] option from the [File] menu, or using the [Time Selection] option in the [File] menu. Using the [Open...] option to open a file Select [Open...] from the [File] menu, or click the [File Open] icon to open the file selection window. The standard windows [Open File] dialog box appears. Select the file you wish to open, then click the [Open] button at the bottom right of the window. The window shown below appears.
2.5 How to Save Files Data can be saved with any name in Excel format. Select [File] - [Save as CSV-file] from the menu bar, or click the [Save as CSV-file] button . The standard Windows [Save as] dialog box appears. Type a file name, select the location to save and click the [OK] button. 2.6 How to Print Files The software can output data to a connected printer. Select [File] - [Print] from the menu bar, then select one of the following items, depending on your needs.
3. ERROR MESSAGES Below is a list of error messages that may be appear, together with their meanings and possible remedies. Message Initializing error!: COM Communication error! Can not open! Not enough memory to save! Invalid data! Not found the data! Disk Space Under 20Gbyte! Meaning Failed initializing of COM port. For example, another application is using the COM port. Failed communication with the FE-700 or FE-800. Could not read or save data. There was not enough space on the hard disk on the PC.
3. エ ラ ー メ ッ セージ 以下の よ う なエ ラ ー メ ッ セージが画面に表示 さ れます。 意味 対策 Initializing error!: COM メッセージ COM ポートの初期化に失敗しま した。 Communication error! FE-700 または FE-800 との通信 に失敗しました。 Can not open! パソコンの接続ポートと本ソフ トのシリアルポートの設定(1.
2.5 フ ァ イルを保存する デー タ を エ ク セル形式で、 保存す る こ と がで き ます。 メ ニ ュ ーバーの [File] か ら 「Save as CSVfile」 を ク リ ッ ク す る か、 ツールバー上の Save as CSV-file ボ タ ン ( ) を ク リ ッ ク し ます。 [ フ ァ イ ル名を付けて保存 ] ダ イ ア ロ グ ボ ッ ク ス で フ ァ イ ル名を入力 し 、 保存先を設定 し た あ と で、 [ 保存 ] ボ タ ン を ク リ ッ ク し ます。 2.
2.4 フ ァ イルを開 く ファイルの開き方には、次の 2 種類があります。 保存 し てあるデー タ を開 く 1. メ ニ ュ ーバーの [File] か ら [Open...] を ク リ ッ ク (ま たは [Ctrl]+[O]) するか、 ツールバー上の File Open ボ タ ン ( 2. ) を ク リ ッ ク し ます。 [ フ ァ イルを開 く ] ダ イ ア ロ グボ ッ ク ス で開き たいデー タ フ ァ イルを選択 し 、 [ 開 く ] ボ タ ン を ク リ ッ ク し ます。 [Select Data] ダ イ ア ロ グボ ッ ク ス が表示されます。 䈜䈼䈩䈱䊂䊷䉺䉕⺒䉂ㄟ䉃 ᜰቯ䈚䈢ᣣઃ䈮ᒰ䈜䉎 䊂䊷䉺䈱䉂䉕⺒䉂ㄟ䉃 ᜰቯ䈚䈢ᣣᤨ▸࿐ౝ䈱 䊂䊷䉺䈱䉂䉕⺒䉂ㄟ䉃 3. [Select Data] ダ イ ア ロ グボ ッ ク ス で、 指定 し た フ ァ イルのデー タ 範囲を設定 し ます。 4.
[Graphic] タ ブの設定 項目 Scale Pixels Mode Line Mark Display Priority Color* 設定内容 説明 グ ラ フ モー ド と 、 エ コ ーモー ド の水深ス ケールを 設定 し ます (5m、 10m、 20m、 40m、 100m、 200m、 400m、 800m、 1600m、 2400m)。 1 個の受信デー タ に対 し て、 何個の画素数で海底 の輪郭を表示 さ せ る か を設定 し ます (1、 2、 5、 10)。 数字が大 き く な る ほ ど、 グ ラ フは荒 く な り ま す。 海底を塗 り つぶ し で表示 し ます。 海底を幅広い ラ イ ン で表示 し ます。 海底を細い ラ イ ン で表示 し ます。 ラインマーク機能を On/Off します。 BOTH を選択 し てい る と き 、 船首 と 船尾の ど ち ら を画面の上部に表示す る か を設定 し ます。 (Fore : 船首 /Aft : 船尾) 船首方向の海底の色を設定 し ます (Gray: 灰色、 Red: 赤、 Yellow:
[Files] タ ブの設定 項目 File Saving 設定内容 説明 Create new files at 00:00 Create a new file at specific timeperiod (1h - 24h) Not saving Echo Data Saving On/Off Time Interval 1 sec, 5 sec, 10 sec, 30 sec, 1min, 5 min, 10 min, 15 min, 30min, 60 min Log Auto Printing Graphic Off 6 リ アル タ イ ム で連続的にデー タ を ダ ウ ン ロ ー ド す る と き 、 毎日 00 時 00 分ご と に新 し い フ ァ イ ルが自動的に作成 さ れます。 最初の フ ァ イ ル は、 [Start] ボ タ ン を押 し た と き に作成 さ れ ま す。 フ ァ イ ルには、 “yyyymmdd” (年月日) と い う 名前が付け ら れます。 デー タ は、 指定 し た時間分だけ保存 さ れ ます (1 時間~ 24
ダウン ロー ド を中止する 次のいずれかの方法で、FE-700 または FE-800 からのダウンロードを中止することができま す。 ・ ツールバー上の Stop ボ タ ン ( ) を ク リ ッ ク す る 。 ・ メ ニ ュ ーバーの [Download] か ら [Stop] を ク リ ッ ク す る 。 ・ キーボー ド 上の [F10] キーを押す。 2.2 RAM デー タ を ダウン ロー ド する FE-700 ま たは FE-800 内部の RAM に記録 さ れてい る デー タ を、 ダ ウ ン ロ ー ド す る こ と がで き ます。 ・ 1 秒間隔で 1 時間分のデー タ ・ 5 秒間隔で 24 時間分のデー タ 1. メ ニ ュ ーバーの [Download] から 、 [Loading Option] を ク リ ッ ク し ます。 2.
2. ソ フ ト ウ ェ アの使い方 収録デー タ を ダ ウ ン ロ ー ド 中に本 ソ フ ト ウ ェ アの メ ニ ュ ーを開 く と 、 ダ ウ ン ロ ー ド が中断 さ れ ます。 2.
1.3 シ リ アルポー ト または LAN ポー ト を設定する イ ン ス ト ール し た ソ フ ト ウ ェ ア と パ ソ コ ン を接続す る ために、 シ リ アルポー ト ま たは LAN ポー ト を設定 し ます。 ソ フ ト ウ ェ アの メ ニ ュ ーバーか ら [Option] を選び、 [Use port] を ク リ ッ ク し て く だ さ い。 右図の ウ ィ ン ド ウ が表示 さ れます。 シ リ アルポー ト (FE-700 用) 172.31.16.121 1. [Serial Port] を有効にする ために、 [SIO] の ラ ジオボ タ ン を選びます。 2. [Serial Port] の ド ロ ッ プ ダウ ンボ ッ ク スか ら、 FE-700 が接続 さ れてい るパ ソ コ ンのシ リ アルポー ト を選びます。 3. [OK] を ク リ ッ ク し ます。 11000 LAN ポー ト (FE-800 用) 1. [IP Address] お よび [Port No.
1. イ ン ス ト ール 1.1 ソ フ ト ウ ェ ア を イ ン ス ト ールする シ ス テムの必要条件 パ ソ コ ン用デー タ 収録 ソ フ ト ウ ェ アは、 以下の環境で動作 し ます。 ・ OS : Windows 7®/Windows 8® ・ メ モ リ ー : 1GB 以上推奨 手順 1. デー タ 記録 ソ フ ト OP12-2 で支給 さ れる D-ROM を CD ド ラ イ ブに挿入 し ます。 2. [ マ イ コ ン ピ ュ ー タ ] ア イ コ ン を ダ ブル ク リ ッ ク し ます。 3. CD-ROM ド ラ イ ブのア イ コ ン を ダ ブル ク リ ッ ク し ます。 4. 「FE800 DATA RECORDING SYSTEM.msi」 ア イ コ ン を ダ ブル ク リ ッ ク し ます。 インストールが開始されます。 5.
デー タ 収録ソ フ ト ウ ェ ア操作要領書 こ のデー タ 収録 ソ フ ト ウ ェ アは、 音響測深機 FE-700 ま たは FE-800 か ら 以下のデー タ をパ ソ コ ンに収録す る ための も のです。 ・ LAN 接続 (FE-800) : 接続振動子情報、 感度 *、 水深基準、 送信周波数 *、 送受信機 No.、 時差、 GPS、 日時、 水深 *、 緯度、 経度、 対地船速、 進路、 エ コ ー *、 キール距離 * * : 最大で 2 周波分 ・ シ リ アル接続 (FE-700) : 日時、 水深、 緯度、 経度、 対地船速、 進路 以下の よ う に、 FE-700 ま たは FE-800 と パ ソ コ ン を接続 し ます。 䊒䊥䊮䉺 FE-700 FE-800 FE-702 FE-8020 FE-701 FE-8010 = LAN = 注)FE-700 はシリアル接続、FE-800 は LAN 接続のみ使用することができます。 www.furuno.com PUB.No.