
Installation Instructions

3
Installation
Mounting Considerations
• Locate the data converter well away from areas subject to water splash and rain.
• Keep the data converter out of direct sunlight because of heat that can build up inside the
cabinet.
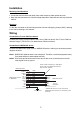
Mounting
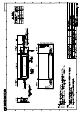
Fix the data converter to the mounting location with two self tapping screws (3x20), referring
to the outline drawing in this manual.
Wiring
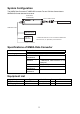
Connection to Furuno CAN bus device
Connect the Furuno CAN bus cable to the Furuno CAN bus device. See “Furuno CAN bus
Network Design” (TIE-00170-x) for details about CAN bus network.
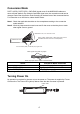
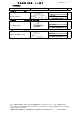
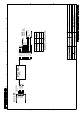
Connection to NMEA0183 device
Connect the NMEA0183 signal cores to NMEA0183 device, referring to the interconnection
diagram as below.
Note1: NMEA0183 cable terminal is not waterproof. Therefore, install the equipment away
from areas subject to water splash and rain.
Note2: Wind vinyl tape around unused cores and fix the cores so that they do not touch
other signal cores or ground.
PORT1
PORT2
GND
TD_A
TD_B
RD-C
RD-H
SD
RD
SG
Drain
PC, etc.
*
(RS-232C)
ORG
PPL
BLK
YEL
GRN
BLU
WHT
RED
BRN
GRY
Drain
RD-H
RD-C
TD-B
TD-A
NMEA Data Converter
IF-NMEA2K2
Ship’s ground
RD
SD
GND
NMEA0183 cable
PORT1 (ORG), PORT2 (PPL), GND (BLK)
signal cores of the NMEA0183 cable are
short-circuited. (default)
NMEA0183 device
*
*
: NMEA0183 cable can not be connected to
NMEA0183 device and PC, etc. (RS-232C) at the
same time.