
Operator's Manual


26
Installation
IND100078-32
Installation Procedures
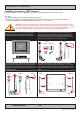
Panel Cutout / Console Mounting Bracket Kit for 24”,26”
You need: Pozidriv tool, 1 pcs of HD CMB SX1-B1 kit (included in delivery).
Procedure suitable for: Display and Panel Computers Series X range. 24 inch used as illustration below, but same
procedure also valid for 26 inch models.
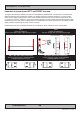
Attention: A suitable pre-cut panel cutout should be made prior to mounting. Do not force the
unit into the panel cutout as it might break the outer glass or scratch the chassis on the unit. Make
sure that the panel cutout is not too tight for the unit. Please disconnect ALL cables before
proceeding. Please re-check the relevant and required panel cutout measurements if unsure.
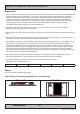
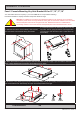
1: Slide the unit into the cutout carefully. User Controls
and Connector Area should be facing downwards.
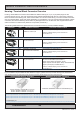
2: Make sure you are aware that brackets should be
mounted on TOP, LEFT, RIGHT and BOTTOM sides.
Note that the [B] bracket is different than the [A]
brackets and mounted near the connectors. See closeup
of details.
[A]
[B]
[A]
[A]
[A]
[B]
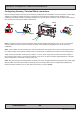
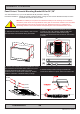
3: Secure each bracket with the provided M5x16 screws
and C-Washers as illustrated below. Make sure you do
it equally and even for all 4 sides. Do not use
excessive force. 2 screws and 2 washers pr. bracket.
Note the orientation of brackets before you begin.
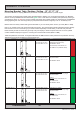
4: Review closeup of the mounting of brackets with
screws and C-Washers in place. Seen from bottom side.
Washer
Washer
Screw
Screw