Emperor L702B Pro Thank you for purchasing this Fusion Emperor L702B Pro charger. We are sure you will be pleased with its performance and features. In order to ensure that you obtain the maximum benefit from its operation, please read the instructions carefully.
CONTENTS Specifications .................................................................................................................2 General Operation .........................................................................................................3 Output Battery Connections ......................................................................................3 Turning On & Setting the Input Power ......................................................................4 The Display ............
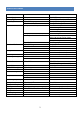
SPECIFICATIONS MODE Power Supply Battery Types Operating Modes Operation function TYPE DC Input NiCd, NiMH LiPo, LiIon, LiFe, Pb Charge (NiCd, NiMH) Charge (LiPo,LiIon,LiFe,Pb) Discharge Number of Cells Charge Current Discharge Current Discharge Voltage Trickle Current Cycle Mode (NiCd/NiMH only) Peak sensitivity Temperature Sensor Max charge capacity (safety timer) Start peak delay timer Memory Safety timer Charge rate limit TCS Capacity TCS END action Store Mode NiCd, NiMH LiPo, LiIon, LiFe Pb NiCd ,
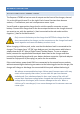
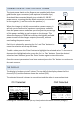
GENERAL OPERATION OUTPUT BATTERY CONNECTIONS The Emperor L702B Pro has two sets of outputs on the front of the charger, channel 1 is on the left and channel 2 on the right. Each channel has two 4mm banana sockets, a 7 cell balance port and a temperature sensor input. You will need an appropriate charge lead to suit the specific connector on your battery.
TURNING ON & SETTING THE INPUT POWER The input power leads on the Emperor are supplied with 4mm gold banana type connectors (with optional crocodile clips) that should be connected directly to a suitable 11-28V DC power source, ensuring that the black connector is connected to the negative (–) and the red to the positive (+).
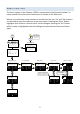
MENU STRUCTURE The menu system in the Emperor L702B is summarized in the flow chart below. To move around the screens press the buttons as shown on the flow chart. Where a line selection arrow is shown on the left of a line, the ‘Inc’ and ‘Dec’ buttons can be used to move the selection arrow up or down. Pressing the ‘Enter’ button highlights each value on a line so that it can be changed. Pressing the ‘Esc’ button whilst a value is highlighted exits the editing and moves back to the line selection again.
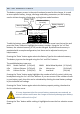
BATTERY MEMORY SCREEN The battery memory screen is the main functional screen for this charger. It is used to store specific battery, charge, discharge and safety parameters, as well as being used to initiate charging, discharging, cycling/store mode functions. Battery Type Number of Cells (in series) Battery Capacity Memory Number 11]LiPo 3S 2200mAh CHG. : 2.1A 4.20V/C DCHG. :10.0A 3.0V/C STORE MODE START 0]NiMH 6S 3300mAh CHG. : 3.3A 5mV/C DCHG. : 5.0A 0.
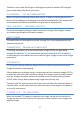
LITHIUM FUNCTIONS AND PARAMETERS When a Lithium type battery is selected, the following functions and parameters are nd rd available. The 2 and 3 pages (shown below) are accessed by moving the line selection down arrow off the bottom of the page. Charge Store Mode Cut-off when x% of capacity is reached. Max Charge Rate TCS (Terminal Capacity Selection) 11]LiPo 3S 2200mAh CHG. : 2.1A 4.20V/C DCHG. :10.0A 3.0V/C STORE MODE START CUT.TEMPER. : 55°C MAX.
Therefore, store mode will charge or discharge your pack to around a 60% charged state to help extend the life of your packs. CUT.TEMPER. - CUT-OFF TEMPERATURE When used with the optional temperature sensor, a safety cut-off temperature can be set, so that charging or discharging is terminated automatically if the temperature sensor detects the battery temperature rising above the selected value. ‘MAX.
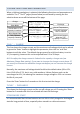
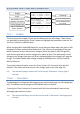
NICD/NIMH FUNCTIONS AND PARAMETERS Charge Cycle Cut-off when x% of capacity is reached. Trickle Charge Rate Cut-off if maximum time is reached 05]NiMH 6S 3000mAh CHG. : 3.0A 8mV/C DCHG. : 3.0A 0.8V/C CYCLE : CD 1x 10m CUT.TEMPER. : 55°C MAX.CAPACITY: 150% PEAK DELAY : 3min TRI CURRENT : 100mA SAFETY TIMER: 120min Page 1 Page 2 Discharge Cut-off Temperature Do not detect peaks for x mins. Page 3 ‘CHG.’ – CHARGE This line shows the charge current and the delta-peak cut-off voltage.
CYCLE The cycle mode allows the user to both charge and discharge a battery a number of times, in order to bring it back to peak performance. Dependant on the final charge state required, you have the options to discharge then charge (D>C) or charge then discharge (C>D) the pack. In addition, the number of cycles and the delay between charging or discharging can be set. n.b. When cycling a battery, the charger will use Automatic charge and discharge currents.
CHARGING With the selection arrow on the CHG line, select the correct charge rate and maximum cell/peak voltage for the battery being charged, then press and hold the CHARGING A LITHIUM PACK In the flow chart below, we have shown an example of how to charge a 2S (7.4V) 2200mAh LiPo pack at 2.2A. Press and hold the Enter button for 2 seconds to start charging. 11]LiPo 2S 2200mAh CHG. : 2.2A 4.20V/C DCHG. : 2.2A 3.0V/C STORE MODE START 0]NiMH 6S 3300mAh CHG. : 3.3A 5mV/C DCHG. : 5.0A 0.
CHARGING A NICD/NIMH PACK In the flow chart below, we have shown an example of how to charge a 6 cell (7.2V) 3000mAh NiMH pack at 4.5 amps using a ‘Normal’ charge type. Press the ‘Inc’ or ‘Dec’ buttons to change the charge type. Press and hold the Enter button for 2 seconds to start. 1]NiMH 6S 3000mAh CHG. : 4.5A 5mV/C DCHG. :10.0A 0.8V/C CYCLE : CD 1x 10m 0]NiMH 6S 3300mAh CHG. : 3.3A 5mV/C DCHG. : 5.0A 0.8V/C CYCLE : CD 1X 10m Press and hold the Enter button for 2 seconds to start the charge.
In this example a ‘Normal’ charge is selected and then the ‘Enter’ button is pressed for 2 seconds to start the charge. As shown in the flow chart, pressing the ‘Mode’ or ‘Esc’ buttons at any stage moves through the different screens giving detailed information about the charge. Pressing the ‘Esc’ button for 2 seconds at any stage will stop the charge. OTHER SCREENS As shown in the flowchart below, the other screens are accessed using the ‘Mode’ and ‘Esc’ buttons. Memory Screen 11]LiPo 3S 2200mAh CHG. : 2.
If the cycle function has been used (NiCd/NiMH only), then pressing the ‘Inc’ button shows the charge and discharge statistics for the previous 10 cycles. BALANCER VIEW When a Lithium pack is connected to the charger, the balancer screen shows the balance statistics for the pack and allows the user to read off the individual cell voltages. Press the ‘Inc’ or ‘Dec’ button to select a specific cell to view. Number of cells and total pack voltage Highest and lowest voltage cells 3S=11.845V 33.95V 3 13.
ERROR MESSAGES The Emperor L702B Pro has a number of error and warning messages that are designed to advise the user of any problems. When applicable, pressing the ‘Esc’ button clears the message. SAFETY PRECAUTIONS • DO NOT attempt to charge incompatible types of rechargeable batteries. This charger is designed to only charge and discharge Nickel-Cadmium, Nickel-Metal Hydride, Lithium-Ion, Lithium-Polymer, LiFePO4 and Lead-Acid batteries.
• Lead-Acid batteries must be placed in a well ventilated area when charging. • DO NOT attempt to charge whilst the input 12 volt battery is being charged, as the voltage supplied to the charger may be too high. LITHIUM ION/POLYMER BATTERY - SAFETY WARNINGS Ensure that the charger and battery are placed on a non-flammable surface whilst charging. NEVER charge a Lithium ION/Polymer/Fe battery inside a vehicle whatever the circumstances.
unless the battery pack is severely mistreated, so in normal usage there is no likelihood of explosion or fire. Lithium Ion/Polymer battery packs must NEVER be discharged below 3 volts per cell (Li-Fe 2.0V) as this will result in damage to the cells.
www.logicrc.com Logic RC Limited 14 Hartham Lane Hertford SG14 1QN United Kingdom rev.