
Installation Instructions


15
INSTALLATION WARNING
1: Ensure the vehicle 12 volt lead is removed from the battery before any equipment is
connected.
2: Investigate the vehicle’s gas tanks, brake lines and electrical wiring locations before you
begin installation.
3: Attach the product securely to the vehicle to prevent damage in the event of an accident.
4: Ensure all wiring is protected to avoid damage or pinching of the cables.
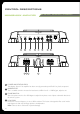
INSTALLATION
Before any wiring and installation is performed, FUSION recommends you first plan the complete
installation. Look at wiring routing, amplifier location and fitment. Please re-check the installation
at completion.
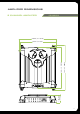
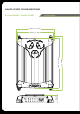
Appropriate mounting is very important for prolonged life expectancy of any amplifier. Select
a location that allows enough space so sufficient airflow is maintainable and a location that
provides protection from moisture. Keep in mind that an amplifier should never be mounted
upside down. Upside down mounting will compromise heat dissipation through the heatsink
and could engage the thermal protection circuit.
Excessive heat will shorten your amplifier’s life. To maximise heat dissipation, be sure to
leave at least 2.5 inches of clearance around the amplifier. If space is of the essence and the
amplifier must be mounted in an enclosed or restricted area, a small 3" fan should be used in
correspondence with a duct so the heat can flow past the heatsink.
WARNING: Do not mount any amplifier on a subwoofer enclosure, as extended exposure to
vibration may cause malfunction of the amplifier.
To avoid scratching your new FUSION Amplifier, pre-drill the mounting holes with either a 3mm
or 9/64" diameter drill bit and use the screws supplied in the accessory kit..