
Manual


9
9
Model memory number and model name
Model memory number and model name
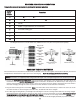
The Futaba T6EXAP stores model memories for six models. This means all the data (control throws, trims, end points, etc.)
for up to six different models can be stored in the transmitter and activated at any time (depending upon which model you
choose to fly that day). This eliminates the requirement for reconfiguring the transmitter each time you decide to fly a different
model with it! When the transmitter is turned on the model number
model number
, model
model
name
name
, modulation and the transmitter voltage will
be indicated on the LCD screen. Before every flight BE CERTAIN
BE CERTAIN
that the correct model number for the model you intend to
fly appears on the screen. If the transmitter is not operating the correct model, some (or all) of the controls could be reversed
and the travels and trims will be wrong.
Flying a model with the wrong program will result in a crash, so always be certain
be certain
the model number and model name in the
transmitter is correct. One way to ensure this is to write the corresponding model number directly on the airplane, or attach a
list to the bottom or back of the transmitter.
Transmitter battery voltage
Transmitter battery voltage
In addition to the model number, the LCD screen also displays the transmitter battery
transmitter battery
voltage
voltage
. When the voltage goes below approximately 8.5 Volts
8.5 Volts
the “battery” icon will flash and
the low-battery alarm will continuously
“beep” until the transmitter is turned off. When the low-
battery alarm sounds you will have approximately four minutes (or less) to land your model
before losing control. You should never allow the transmitter voltage to become this low while
flying, but if it does, land immediately
immediately
.
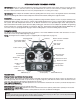
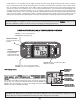
PROGRAMMING THE 6EXAP RADIO
PROGRAMMING THE 6EXAP RADIO
Anytime you wish to view
view
or change
change
any of the current settings in the transmitter, the programming mode must first be entered
by, of course, turning on the power, then by pressing the
“MODE
MODE
” and “SELECT
SELECT
” keys simultaneously and holding them down
for one second. Once
“in the program” the MODE key will be used to scroll through each of the ten or eleven(PCM) functions
(model number/ data reset/ modulation select/ model name, reversing, dual rates/ exponentials, end point adjustments, trim,
programmable mix,
“flaperon” mixing, “v-tail” mixing, “elevon” mixing, flap trim and failsafe) and the SELECT key will be used to
view the settings within the function. When a data change is actually required the
“DATA INPUT
DATA INPUT
” lever will be used to increase
or decrease the value of the item displayed, thus making the change.
You can return to the
“home” screen (where the model number and battery voltage is displayed) by pressing the MODE and
SELECT keys simultaneously and holding them down for one second.
Note:
Note:
The functions are listed and described in the order that they appear in the transmitter. Read all the way through the
programming instructions before setting up your model (if you won’t be using any of the mixing functions for a while you can
read those instructions when ready). Refer to the FLOW CHART on page 19 as well.
Note:
Note:
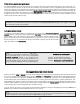
When the transmitter voltage reads 8.9 Volts
8.9 Volts
you
will still have approximately ten minutes (or less) before
losing operational range, so this is the recommended
absolute minimum
absolute minimum
voltage. If the transmitter ever
reaches 8.9 Volts, land as soon as safely possible. A more
reasonable margin of safety would be to quit flying for the
day (or recharge the batteries) when the transmitter battery.
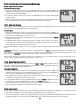
SUGGESTED GUIDELINES
SUGGESTED GUIDELINES
9.4 Volts - No more flying until recharge.
8.9 Volts - Land as soon as safely possible.
8.5 Volts - Emergency- Land immediately!
Emergency- Land immediately!
“Battery
Battery
” icon
icon