
Owner's manual
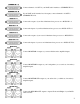


INSERT PROCESSORS EXAMPLE
Here is an example of how we set up our db. You can think of this as a starting point.
Obviously, your hardware requirements and/or uses may differ.
First you will notice we have stereo preamps for inserts 1 and 2.
If you are going to be doing any audio summing from your DAW, you will need a preamp for makeup gain.
Preamps in these locations will also be useful when tracking mics and instruments to get the optimum signal
level for further processing and recording.
Having two preamps is nice, as you can choose different “colors” of amplification for different sources. You
may choose one for “clean” precise work and another for “color” or adding mojo to your sound.
TIP: Activating both preamps simultaneously in the first two insert locations can also be used to generate
overdrive and distortion if “clean” just isn’t your thing.
On insert 3 we have placed a parametric EQ that can then be used on the MID/SIDE process or as normal for
stereo material. EQ is probably the most useful effect to use on the MID/SIDE process to really focus the low-
frequency spectrum to the center channel while enhancing the high-frequency spectrum in the sides.
TIP: If more processors are required on the MID/SIDE insert, you can always daisy-chain the desired number
of effects on BUSS 3 IN/OUT.
For insert 4 we placed a compressor to help tame peaks from the EQ on insert 3, or for general transient
control.
For Insert 5 we use another EQ/sonic enhancement device. Sometimes you may prefer to EQ after
compression occurs, or simply use a different “color” EQ than is setup for insert 3.
Insert 6 is another compressor, there simply for more tonal options. For instance the compressor on insert 4 in
our case is tube-based, while the compressor on insert 6 is solid state optical for two totally different results.
For insert 7 we use a multi-effects processor. By setting the effects processor to have a 100 percent wet
output, and then using the Pre/Post MIX control, we can vary the amount of effect mixed into our audio.
Insert 8 is a great place for a limiter. In this way you always maintain control over audio levels before they hit
your DAW’s A/D converters. In addition, since the limiter is after the PRE/POST MIX process, it is easier to
monitor a more constant level when checking the pre/post mix.
Keep in mind that some of the insert effects you use may be ideal for tracking purposes, while others are
intended more for the mastering process. The nice thing about the db is that you have them all in one place so
you can quickly check to see what works best for the task at hand.
9