Written and produced by Jered Flickinger Copyright 2004 Future Retro Synthesizers
TABLE OF CONTENTS INTRODUCTION 2. Welcome Overview Philosophy MAINTENANCE 3. Power Care Backup Battery Fuse Warranty Support GETTING STARTED 4. I want to play it now! Basic system setup CONNECTIONS 5. Back panel connections ANALOG SECTION 6. Introduction to analog Waveform select Overdrive off/on 7. Tune Cutoff Resonance Envelope Envelope decay 8. Accent Accent decay CV mod Volume 9. Blank patch sheet DSP EFFECTS 10. Effect descriptions 11. Selecting effects Setting the amount of an effect SEQUENCER 12.
INTRODUCTION WELCOME TO THE REVOLUTION! Thank you for purchasing the Revolution. OVERVIEW The Revolution is a true monophonic analog synthesizer, which includes analog and DSP effects, along with a programmable digital sequencer section and multiple interfacing features. We’ve gone to great lengths to ensure that the Revolution is fully capable of the most accurate reproduction of the original TB303’s sound, and in many ways surpasses its signature liquid tones and capabilities.
MAINTENANCE POWER Use only the 12 volt AC/AC 1 Amp output power supply provided with this unit. If you should ever lose this power supply, please contact us for a replacement. CARE Avoid exposing the unit to smoke, damp, dusty, or extreme hot and cold environments. To clean the unit, use a soft damp cloth. Do not use any abrasive cleaners, as these may harm the surfaces and finish of the unit. BACKUP BATTERY The Revolution does contain an internal 3.6 volt backup battery for the sequencer’s RAM.
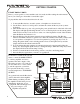
GETTING STARTED I WANT TO PLAY NOW! I know, you just got this cool new machine and don’t really feel like reading the entire manual before you at least get to hear what it sounds like, right? To play the Revolution follow these directions in order. 1. Connect the Revolution to an audio system, or headphones as shown below. 2. Set the Tune control to it’s mid position, and turn the volume all the way down (counter clockwise). 3.
CONNECTIONS Always remember to turn the power off before making new connections. 12V AC Connect the power supply provided with your unit here. Use only 12V AC output power supplies rated at 1 Amp to power the unit. POWER ON/OFF This is the main power switch. Push this to turn the unit On and Off. DIN SYNC OUT Use a MIDI cable to connect this output to the Din Sync Input of other devices to sync their playback with the Revolution.
INTRODUCTION TO ANALOG The Revolution is a true analog monophonic synthesizer, designed to accurately recreate the classic sounds of the original TB303 Bassline and more. All of the elements of a sound can be changed instantly by the dedicated control knobs and switches. These controls are not digitized in any way for the storing of sound patches or transmitting knob movements as MIDI CC messages. Instead we have chosen to keep these controls true analog just as the original TB303.
ANALOG CONTROLS TUNE This is a fine tune control for the pitch of the oscillator. It has approximately a +/- 1 semitone range. When this control is in the mid-position, the oscillator should generate the correct pitch programmed into the sequencer. Use this control to fine tune the Revolution with other equipment. If larger changes in frequency are required, you can transpose the patterns within the sequencer.
ANALOG CONTROLS ACCENT The accent control adjusts the amount of affect the filter’s envelope will have on both the filter’s cutoff frequency and the amplitude of the sound when notes are programmed with an accent in the sequencer. When this control is turned clockwise, the filter’s cutoff frequency will sweep up for the duration of the accent decay, and the overall amplitude for accented notes will increase accordingly with the setting of this control and the accent decay time.
9 PATCH SHEET PATCH NAME: Here is a blank patch sheet which you can photocopy and use to record knob and switch settings, make notes, and document how the Revolution is connected with other equipment.
DSP EFFECTS The Revolution provides 16 preset stereo 24 bit DSP effects for processing both internal and external sounds. Although the internal sound section of the Revolution is mono, these stereo effects can be used to widen the stereo field of the sound as well as provide more depth. CH+RM1 This effect provides chorus with reverb creating a nice smooth and spatial sound. CH+RM2 This effect provides an auto-wah guitar effect with reverb for lead type instrument sounds.
DSP EFFECTS 11 The Revolution provides 16 preset stereo 24 bit DSP effects for processing both internal and external sounds. SELECTING EFFECTS To select an effect, rotate the center control switch to the desired effect. MIX L This is the dry/wet control for the left output channel. Turning this control clockwise will increase the amount of processed signal heard on the left output channel.
SEQUENCER INTRODUCTION The Revolution contains a programmable digital sequencer for recording and playing back musical patterns and songs. All the information for a pattern can be edited while the sequencer is either playing or stopped. The sequencer automatically saves all changes made to patterns and songs. This allows users to create and manipulate patterns live and hear the changes as they are made.
SEQUENCER OPERATIONS 13 USING THE SEQUENCER The Revolution’s sequencer has two main modes in which you will work with. This is what we call the Pattern mode and Song mode. When the Song key indicator is on, the machine is in Song mode. When the Song key indicator is off, the machine is in the Pattern mode. To change from one mode to the other, the sequencer must first be stopped, then by pressing the Song key you can change modes.
SEQUENCER OPERATIONS SELECTING PATTERNS Patterns are arranged as 16 banks of 16 patterns for a total of 256 patterns in all. Before selecting a pattern, you must first make sure you are in the Pattern mode. This is shown by the Song key indicator being off. To enter the Pattern Select mode, press the Pattern key so that its indicator turns on. The main display (in the center of the unit) will now show the bank number 1-16 which is currently selected.
SEQUENCER OPERATIONS 15 EDITING PATTERNS Pattern Edit mode is where one measure of music can be recorded or edited for each pattern. These patterns can later be arranged into a song. Each pattern records the note durations and their pitches, accents, glides, loop point, time signature, and swing amount. Every time a pattern is edited, the changes are automatically saved by the sequencer. You must make sure not to change a pattern you wish to keep.
SEQUENCER OPERATIONS ENTERING NOTES When in the Pattern Edit mode the 16 Step key indicators will be used to display where notes are placed in that pattern. The brightness of the indicators will determine where notes start, the length of their duration, and where rests occur. 1. A note-on (where a note begins) will be shown by a Step key indicator being on at full brightness. 2. The sustained portion for a note will be shown by the Step key indicator being on, but only half as bright as a note-on. 3.
SEQUENCER OPERATIONS CLEARING NOTES There are two ways to clear previous note data that exists within a pattern. You can either clear all the notes at once or individual notes one at a time. To clear all notes from a pattern, first make sure you are in the Pattern Select mode (Pattern key indicator on). Select and hold the pattern’s Step key you wish to clear all the notes from, and then press the Shift/Clear key.
SEQUENCER OPERATIONS RECORDING ACCENTS Accents written into the sequencer are used to modify the cutoff frequency of the filter, and Increase the amplitude of a step’s volume. To record or place accents for notes, first select the pattern you want to edit and enter the Pattern Edit mode. One of the Step key indicators will be flashing to show the current step selected to be edited. Select any note by pressing the Step key where that note starts.
SEQUENCER OPERATIONS 19 SELECTING THE AMOUNT OF SWING The Revolution’s Swing function will delay the playback of all even numbered steps. This can be used to add a more human feel to patterns. To change the swing amount, first select the pattern you want to edit and enter the Pattern Edit mode. Press and hold the Swing/Tempo key and the display will show a value ranging from 0-3. While holding the Swing/Tempo key, use the Up/Down keys to select a new value of swing.
SEQUENCER OPERATIONS SHIFTING PATTERNS It is possible to shift all the contents of a pattern forward or backwards in time from where they currently are. This is a useful feature if you have already created a pattern, but need to offset the notes so that they are aligned with the beat correctly. To shift a pattern, first select the desired pattern to be edited and enter the Pattern Edit mode.
PATTERN SHEET 21
SEQUENCER OPERATIONS REMIXING PATTERNS The remix feature provides 256 variations for playing patterns. This is not just some randomization of the original patterns either. It is a mathematical process which creates new ways of stepping through a pattern’s information to create variations of that pattern. When the remix feature is used, you may want to consider the information programmed into the steps of a pattern as possibilities. Remix can use any of the 16 steps of a pattern to create new patterns.
SEQUENCER OPERATIONS 23 SELECTING SONGS Selecting a song is done in the same way patterns are selected, except you must be in the Song mode. To enter the Song mode, first stop the playback of the unit and press the Song key. The Song key indicator will turn on showing Song mode is currently selected. To select a song, press the Step key indicator (1-16) to select one of the 16 songs locations.
SEQUENCER OPERATIONS TRANSPOSING A SONG STEP The pattern for each song step can be transposed up or down 36 half-steps in pitch from the notes originally programmed into that pattern. To transpose a song step, select the song step and then press the Xpose/Paste key. While holding the Xpose/Paste key, the display will show the current transpose setting for that step’s pattern. Use the Up/Down keys to change the transpose setting for that song step.
SEQUENCER OPERATIONS 25 ADVANCED SONG EDITING It is possible to jump from the currently selected song step to the Pattern Edit mode and edit the pattern used for that song step. If a song is at any point other than the first step and you exit the Song mode, the pattern used for the current song step will automatically be selected with all its song parameters, for editing in the Pattern mode.
MIDI MODES 27 USING THE REVOLUTION AS A MASTER CLOCK Using the Revolution as a master clock allows other sequencers and drum machines to synchronize their playback to the Revolution. In this configuration the Revolution acts as the master device which allows it to control the start, stop, and tempo for all the sequencers connected. For this setup, connect the MIDI OUT of the Revolution to the MIDI IN of the devices you wish to synchronize.
MIDI MODES SYNCING THE REVOLUTION TO AN EXTERNAL CLOCK The Revolution can synchronize its playback to any other MIDI sequencer. In this setup the Revolution acts as a slave where the start, stop, and tempo are all controlled by another MIDI device. For this setup, connect the MIDI OUT of the master sequencer to the MIDI IN of the Revolution. To set up the MIDI mode of the Revolution, first press the Song key (Song key indicator should be on) to enter the Song mode.
MIDI MODES 29 PLAYING THE REVOLUTION WITH A MIDI KEYBOARD You can play the sound section of the Revolution with a MIDI keyboard or external MIDI sequencer. For this setup, connect the MIDI OUT of the MIDI keyboard or external sequencer to the MIDI IN of the Revolution. To set up the MIDI mode of the Revolution, first press the Song key (Song key indicator should be on) to enter the Song mode. Now press the Accent/MIDI key to enter the MIDI mode.
MIDI MODES PLAYING AN EXTERNAL MIDI SOUND MODULE WITH THE REVOLUTION You can play external MIDI sound modules with the Revolution’s sequencer. This allows you to take advantage of the Revolution’s real-time editing and remixing of patterns, which other sequencers might not offer. For this setup, connect the MIDI OUT of the Revolution to the MIDI IN of the external MIDI sound module. To set up the MIDI mode of the Revolution, press the Song key (Song key indicator should be on) to enter Song mode.
MIDI MODES 31 PLAYING VOLTAGE CONTROLLED SYNTHESIZERS The Revolution provides a CV (control voltage) output, along with a Gate output for playing preMIDI and modular synthesizers. The CV the Revolution generates is the most widely used 1 volt per octave standard. The Gate signal the Revolution generates is a positive polarity type gate ranging from 0 volts (note off) to +12 volts (note on).
MIDI MODES USING DIN SYNC DIN sync is a pre-MIDI standard that sends both clock and start/stop messages, to control early Roland devices with sequencers. This clock signal is equal to 24 pulses per quarter note or PPQ. With the DIN sync feature, the Revolution will be able to start and stop the playback, as well as control the tempo of a DIN sync device. These DIN sync messages are sent whenever the Revolution’s sequencer is playing.
MIDI PROGRAM CHANGE 33 The Revolution does support MIDI program change messages. These messages allow other MIDI sequencers to remotely select patterns to play within the Revolution, or the Revolution can select patterns remotely in other MIDI sequencers which support program change messages. The program change messages sent by the Revolution can also be used to select different sound patches in an external MIDI sound module.
SYSTEM EXCLUSIVE The Revolution does support MIDI system exclusive messages (sysex), for saving and loading your patterns and songs to other MIDI sequencers or computer programs. To do a sysex dump, you will need to connect the MIDI OUT of the Revolution to the MIDI IN of the computer or another Revolution you are transferring to, and the MIDI OUT of that device connected to the MIDI IN of the Revolution.
35 SYSTEM EXCLUSIVE SYSEX INFORMATION MFG ID=07 CHANNEL#=01 MODEL#=77 RAW DATA TRANSFER/PACKET=512 BYTES PACKET SIZE ENCODED=604 BYTES GENERAL HEADER INFORMATION SIZE=11 BYTES General header is sent once to identify packets to follow.
OTHER CAPABILITIES PROCESSING EXTERNAL AUDIO The Revolution provides an audio input for processing external sounds through the internal filter, amplifier, analog overdrive stage, and the DSP effects section. Here we are going to filter audio coming from a MIDI sound module which is being played by the Revolution’s sequencer. However you can process any external line level audio signal in the same way.
ADDITIONAL NOTES 37 This section covers a deeper perspective of the Revolution’s features and capabilities. ACC DECAY SETTINGS As discussed earlier in the analog controls section, the Accent Decay time control now provides both shorter and longer decay times than the original TB303 was capable of. Please note however that when longer than normal Accent Decay times are used, and the overdrive stage is not turned on and the effects are set to dry, you may hear a slight click as the accent circuit turns off.
ADDITIONAL NOTES CREATING A DEFAULT PATTERN As stated earlier in the sequencer operations section, clearing patterns only removes note-on and duration information. You might want to create your own default pattern and save it to a special pattern location such as bank 16 pattern 16. This pattern could then be programmed however you wish, perhaps with all 16th notes written at the pitch of C3. Something which you would consider a nice starting point for creating your other patterns.
ADDITIONAL NOTES 39 REMIXING PATTERNS When patterns are remixed, if the sustained portion of a note is selected to play, nothing will be heard. This is because the Revolution stores all of a notes information in the step that represents the note-on or beginning of a sustained note. The sustained portion of a note is just there to represent the duration of that note.
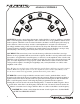
CALIBRATIONS TUNING AND CALIBRATING THE REVOLUTION The Revolution provides three access holes on its front panel for calibrating the CV output and tuning the oscillator. These trimmers are set at the factory but may need to be adjusted over time. To make adjustments to these trimmers, we recommend using a 5/64” flat-blade screwdriver. Before making any adjustments, turn the unit’s power on and let it warm up for at least 15 minutes.
CALIBRATIONS The following diagram shows the locations of the three trimmers used to calibrate and tune the Revolution.
SPECIFICATIONS ANALOG CONTROLS • • • • • • • • • • • • OSCILLATOR WAVEFORM SELECT: Sawtooth, Square wave TUNE CONTROL: +/- 1 semitone FILTER: 3 pole, 18db lowpass resonant filter CUTOFF: Filter frequency RESONANCE: Amount control CV MOD: Amount of filter modulation ENVELOPE: Amount control for sweeping filter ENV DECAY: Envelope decay time for filter ACCENT: Amount of signal to modulate the filter and amplifier ACC DECAY: Accent decay time VOLUME: Master/headphone output level control OVERDRIVE SWITCH: Off
SPECIFICATIONS 43 SEQUENCER • • • • • • • • • • • • • • • • • • • NUMBER OF PATTERNS: 256 patterns (16 banks x 16 patterns) RECORDED PATTERN CONTENT: note duration, pitch, accent, glide, loop point, time signature, swing amount NUMBER OF STEPS PER PATTERN: 3/4 time=12 steps max, 4/4 time=16 steps max NOTE PITCH RANGE: C1 to D#6 LOOP POINT: 1 to 16 notes per pattern to loop PATTERN TRANSPOSE: from -36 to +36 notes OTHER PATTERN FEATURES: pattern remixing, play patterns forwards or backwards, copy and pas