
User's Manual


Manual: Calf Monitoring System (2021/06) Page 5 of 11
E N G L I S H 1 / 3 E N G L I S H 1 / 3
System Description, Intended Use
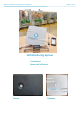
The system consists of a gateway (CMG-4-NA) and the sensors (CMS-4-NA). The sensors are mounted on the calf housing within radio range of the
gateway. Each sensor measures the behavior pattern of the calf assigned to it. The data is transmitted to the gateway via radio communication. An
algorithm evaluates the behavioral patterns of the calves and detects abnormalities in the calves' behavior according to pre -existing disease patterns.
These abnormalities are displayed in the Calf Monitoring app. The system provides support in animal monitoring and offers the farmer information
on behavioral abnormalities or possible outbreaks of disease in his calves in individual housing. Depending on the incubation period of the disease,
a prediction is possible up to 3 days before the outbreak of the disease. Please note that the system is only an assistance system and cannot replace
a veterinarian.
Setup
1. Plug the Gateway into main Socket
First, plug the gateway with the included power supply into a 230V mains socked (120V in North America) (permanently). The ga teway is to be
plugged into a socket which is electrically faultless and where it can be ensured that e.g. rain or similar external influences do not l ead to damage.
The gateway can be screwed to a wooden beam, for example, an angle bracket can be used for this purpose. Make sure t hat the gateway achieves
a good radio connection to the sensors. At best, fix the antenna in an elevated position and ensure that the distance between sensors and gateway
remains less than 50m. (The antenna has a magnetic foot). If the radio connection is not good enough for all calf areas, use multiple gateways.
2. Mount Sensors onto Calf Hutches/Boxes
A sensor is to be attached to each calf hutch or calf box (individual housing) as centrally as possible on the pole or fence using the metal mounting
plates. The sensor must have visual contact with exactly 1 calf, max. distance sensor-calf 3-4m (10 - 13 feet). A mounting plate set consists of 2
identical stainless-steel plates that use 2-4 M6 carriage bolts and 2-4 wing nuts to press the sensor to the calf hutch fence. The sensor is screwed to
a stainless-steel plate using 2 M4x10 Torx screws and a cordless screwdriver with a T20 Torx bit. (Take care not to overwind the screws. Be careful
with the screwing power and torque!) Then the mounting plates are attached to the calf hutch front so that the carriage bolts are tightened strongly
enough by the wing nuts to prevent slippage. Locate the carriage bolts so that they are as close to the rods as possible.
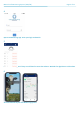
3. Installing the Calf Monitoring App
After mounting the gateway and sensor, download and open the Calf Monitoring App, login with your username and password. Then you should see
the start page of the app. Under "Sensors" in the drop-down menu, you can see the sensors that have connected to your gateway. As soon as the
sensor system recognizes that calves are in the individual housings where the sensors are attached to, the calves will appear in the dashboard. The
name will be according to the sensor name (e.g. a Mac address like 49 -67-77). You can rename and edit the calves by editing the calf entries. You
can rename the sensors and change their alias name so that the alias name will show up instead of a mac address for the next new calf registering.
The last 3 or 5 digits of the ear tag, for example, can be entered in the "Ear tag" field. It takes 24h till the first predictions arrive (initialization period).
According to a traffic light logic, predictions appear as green if no behavioral abnormalities are prevalent in the respectiv e calf, yellow if individual
abnormalities were detected by the algorithm, or red if very significant abnormalities were identified. Please check yellow a nd red forecasts and
report calves sick accordingly via the "Report disease" field. The data is not transmitted to any other parties and, depending on your configuration,
its anonymous and cannot be assigned to your farm. Reporting diseases allow the algorithm to be influenced by your feedback, i.e. you train the
algorithm, which improves its prediction accuracy.
4. Ongoing Usage
In order to use the ear tags in the documentation, the ear tag or a 3-digit or 5-digit number should be added for each incoming calf. Sick calves should
be entered into the app to increase the accuracy of forecasts. Instant notifications should be turned on in order to provide the earliest warning.
Using the individual view of a calf, a temporal assessment of the calf's disease risk can be conducted. The early warnings ar e always to be used in the
overall context of your calf management. Manipulations on the calf, special external influences or even peculiarities of certain calv es must be taken
into account.
5. Cleaning and Maintenance
The sensors can remain mounted on the calf hutch during cleaning, but care must be taken that the jet of a high-pressure cleaner is not directed
directly at a sensor lens. This can lead to damage or malfunctions in individual cases. It is recommended to clean the sensor with a wet cloth
depending on the contamination (dust, dirt, milk, …). The lens of the sensor must always be free of contamination. The gateway can be cleaned with
a damp cloth.
Learn More
www.futurofarming.com/support