
General Instruction Book

10
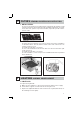
Step 2
- Hook the range hood to the support bar (Fig. 2).
- Adjust the alignment of the range hood using the screws on the brack-ets
(Fig. 2). The top screw (B) adjust the distance from the wall, the bottom
screw (C) adjust the height.
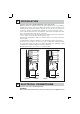
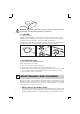
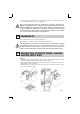
Step 3
- To prevent the range hood from detaching due to pressure from be-low,
fasten it to the wall using a screw anchor and screw, through the correspon-
ding hole (Fig. 3) on the rotor box or inside the mood.
- Insert the duct (E) on the ducting connection (D). Hood assembly instruc-
tions.
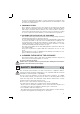
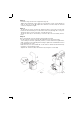
Step 4
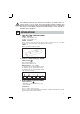
Place element (G) onto the chimney until is fully inserted.
- Fix the extension (H) to element (G), sliding it to the desired height.
- Once having found the optimum position, rest the bracket (L) against the
wall, check the hori-zontal alignment using a spirit level and mark the 2 holes
to be drilled at the ends.
- Drill the holes, insert 2 x 4mm dia. screw anchors and fasten the bracket (L)
using the corresponding screws.
- Tighten the extension (H) to the bracket (L) using the screws (M).
Fig. 3 Fig. 4