
User Manual


G-SP
E
8.2
1.
2.
3.
4.
8.3
1.
E
ED eS INST
A
Attaching G-
S
Attach one e
n
port located
o
Attach the ot
h
port) on the
G
Attach the p
o
connect the
o
Power on G-
S
Loading the
G
Double-click
o
“Manuals-Dri
v
below.
A
LLATION G
S
PEED eS to t
n
d of the suppl
i
o
n the back of
G
h
er end of the
G
-Tech RAID c
o
o
wer cord to th
e
o
ther end to A
C
S
PEED eS.
G
-Tech PCIe
R
o
n the G-SPEE
D
v
ers” folder on
UIDE
he G-TECH R
A
i
ed eSATA cabl
e
G
-SPEED eS.
eSA
T
A cable to
o
ntroller as sho
e
back of G-SP
E
C
power.
R
AID Controll
e
D
eS icon locat
e
the included C
A
ID Controlle
r
e
to the eSATA
Port 1 (leftmo
wn below.
E
ED eS and
e
r Software
e
d in the
D as shown
r
st
2
3
2
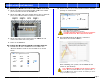
. Double-clic
k
package as
Check f
o
http://
w
If you
a
previo
u
3
. The followi
n
instructions
After restar
t
mount on y
o
Your G-
S
mode.
Th
10 and J
B
change the m
o
k
on the “G-
T
ec
shown below.
o
r software updat
e
w
ww.g-technology.
a
re upgrading s
o
u
s version first.
S
n
g window will
a
to load the so
f
t
ing your syste
o
ur desktop.
S
PEED eS is ship
p
h
e G-
T
ech RAID c
o
B
OD modes. Refer
o
de of operation.
h RAID Contro
l
e
s at
com/Support/
o
ftware you mus
t
S
ee section 8.4 f
o
a
ppear. Follow
f
tware.
m, the G-SPEE
p
ed from the fac
t
o
ntroller also supp
to Section 10 belo
w
Pa
g
l
ler” installer
t
un-install the
o
r details
the
D eS will
t
ory in RAID 0
orts RAID 1, 5,
w
if you wish to
g
e 7