G-RAID3 Product Guide G-RAID3™ Installation Guide TABLE OF CONTENTS 1. INTRODUCTION 2. SAFETY PRECAUTIONS 3. SYSTEM REQUIREMENTS 4. WHAT’S IN THE BOX 5. G-RAID3 OVERVIEW 6. INSTALLING G-RAID3 7. INITIALIZING G-RAID3 7.1 Mac OSX 7.2 Windows 2000/XP 7.3 Cross Platform use 8. UNMOUNTING/DISCONNECTING G-RAID3 8.1 Mac OSX 8.2 Windows 2000/XP 9. OPTIMIZING DATA TRANSFER RATES G-Technology Inc. 10. TECHNICAL SUPPORT Tel: (310) 449-4599 Fax: (310) 449-4670 support@g-technology.com 11.
G-RAID3 Product Guide Page 2
G-RAID3 Product Guide Page 3
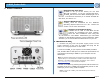
G-RAID3 Product Guide 1. INTRODUCTION Thank you for purchasing G-RAID3™ from G-Technology, Inc. G-RAID3 features a quad interface with 3 Gbit eSATA, FireWire 400, FireWire 800 and USB2.0 connectivity, and is available in storage capacities up to an amazing 3TB! When connected via eSATA, G-RAID3 provides data transfers rates in excess of 200 MB/second to support the most demanding professional content creation applications including Final Cut Studio. 2.
G-RAID3 Product Guide 5. G-RAID3 OVERVIEW Attention Mac OS X Users G-RAID3 is set up at the factory for use with Mac OS X systems. If you are running Mac OS X, G-RAID3 will mount on the OS X desktop right out of the box. If it becomes necessary to re-format G-RAID3 for Mac OS X, see section 7.1. Attention Windows Users G-RAID3 must be formatted for the Windows Operating System before use on a PC. Please see section 7.2 for more information.
G-RAID3 Product Guide 7. INITIALIZING G-RAID3 G-RAID3 is set up at the factory for use with Mac OS X systems. If you are running Mac OS X, G-RAID3 will mount on the desktop right out of the box. If it becomes necessary to re-format G-RAID3, follow the instructions below. 3. Select the Partition tab to view the partition options as shown below. • For Mac OS X installations, proceed to Section 7.1 • For Windows 2000/XP installations, proceed to Section 7.2 • For Cross-Platform use see section 7.3 7.
G-RAID3 Product Guide 5. Click on the button. The dialog box shown below will appear. Click on the button to continue. 7.2 Windows 2000/XP 1. Power on G-RAID3, wait 10 seconds, then power on your computer. 2. Open the Disk Management utility by right-clicking on the My Computer icon on the desktop and selecting “Manage” from the drop down menu as shown below. 6. When partitioning is complete, G-RAID3 will displayed in the left-hand panel as shown below. be 3.
G-RAID3 Product Guide 4. Click on the button to continue. 5. The following window will appear. G-RAID3 (Disk 1) is now identified as Basic and Online. 6. Right-click on the Disk 1 “Unallocated” bar entry and select New Partition… from the pull-down menu as shown below. 7. The window shown below will appear. button to continue.
G-RAID3 Product Guide 8. The following window will appear. Click on the button to continue. 9. The window shown below will appear. Click on the button to continue. This will create one large volume using all of the available space on G-RAID3. 10. Windows will automatically assign a drive letter, in this example “D”. Accept this assignment and click on the button to continue. 11.
G-RAID3 Product Guide 12. The following window will appear. Click on the button to continue. 14. G-RAID3 will now be displayed as an available hard disk drive under My Computer as shown below. 2 13. Windows will format the volume and then display the following window. Disk 1 is now identified as G-RAID3 (E:). Exit the Computer Management console G-RAID3 is now set up for use!! 7.3.
G-RAID3 Product Guide 2. Select G-RAID3 from the left-hand column, then select the “Erase” button at the top as shown. Select MS-DOS File System from the drop down menu and Enter “G-RAID3” in the Name field. WARNING: THIS WILL ERASE ALL DATA ON YOUR DRIVE. NOTE: The 'MS-DOS File System' cannot write files over 4 GB. If you are working with files over 4 GB, you may want to choose a software option like MacDrive. MacDrive is Windows software that enables the Windows OS to mount MAC formatted drives. (www.
G-RAID3 Product Guide 2. A box like the following will appear. Click on the entry. 10. TECHNICAL SUPPORT If you encounter any difficulties while installing G-RAID3, please contact G-Tech Technical Support via one of the following ways: Telephone: (310) 449-4599 Fax: (310) 449-4670 E-mail: support@g-technology.com Internet: http://www.g-technology.com 3. A balloon like the following will appear.
G-RAID3 Product Guide necessary to effectuate repair, replacement or refund under this warranty. All returned product must be shipped to G-Tech in the original shipping container. For more information on how to obtain warranty service, an RMA number or to acquire shipping materials, contact G-Tech at support@g-technology.com. IN THE EVENT A PRODUCT BECOMES DEFECTIVE DURING THE WARRANTY PERIOD, THE PURCHASER’S EXCLUSIVE REMEDY SHALL BE REPAIR OR REPLACEMENT AS PROVIDED ABOVE.