
User's Manual


PID2_UserManual.doc 8
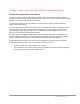
PATROL SUITE RF Monitoring Components
PATROL SUITE RF Monitoring Products consist of the following:
PID (Personal Transceiver)
PHMU (Personal Home Monitoring Unit)
PID Band
PID Retaining Pin
PID Sleeve
Installation & Removal Tools
PHMU Power Adaptor
Telephone Cord (Landline Monitoring Only)
PHMU Menu Key
OPID (Officer Identification Device)
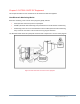
PID Descriptions & Features
The PID or Personal Transceiver is worn by the participant and can not only transmit signals, but also
receive signals from the PHMU, making monitoring results more
robust.
The PID can be worn on either the ankle or wrist.
The PID will only blink its LED when commanded by the
PHMU during range test or decommission.
The PID blinks its LED during range test allowing the
Officer to accompany the participant throughout the
residence.
While in the Enrollment Mode, the PID continues to blink
its LED for approximately 30 minutes. This gives the
Officer plenty of time to size and close the band properly
and an indication if there is an issue with band closure.
Each tamper is recorded and reported as a separate
event to alert the Officer of the frequency level.
The participant’s record will stay in the tamper status until the appropriate device has been reset
or replaced.
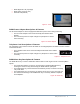
Figure 4: PID
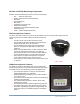
PHMU Descriptions & Features
The PHMU or Personal Home Monitoring Unit is installed in the
location the participant is to be monitored and records and reports
all related activity to our Monitoring Systems via telephone line.
The Setup Menu options can only be accessed with a
supplied PHMU Menu Key and OPID.
PHMU programming is guided by easy to follow prompts
on the LCD screen.
The PHMU can be enrolled after the PID has already been
installed on the participant.
The standard leave window is 5 minutes, but is easily
modified upon request.
The PHMU indicates RF signal strength during range test.
The length of the range test is determined by the Officer.
Information regarding the equipment’s programming and
monitoring statuses is available through the Setup Menu
options.
Figure 5: PHMU