Application Instructions Sienna TM Lifetime Designer Shingles Updated: 1/13 Quality You Can Trust… From North America’s Largest Roofing Manufacturer!™ www.gaf.
Quality You Can Trust…From North America’s Largest Roofing Manufacturer!™ ¡Calidad En La Que Usted Puede Confiar...Del Fabricante De Techos Más Grande De Norteamérica!™ Une Qualité À Laquelle Vous Pouvez Vous Fier... Du Plus Gros Fabricant De Toitures En Amérique Du Nord! MC INSTALLATION INSTRUCTIONS · INSTRUCCIONES DE INSTALACIÓN · INSTRUCTIONS D’INSTALLATION GENERAL INSTRUCTIONS • MATERIAL SAFETY DATA SHEETS: When using GAF products, e.g., shingles, underlayments, plastic cement, etc.
• SUJETADORES: Use únicamente clavos de techado de acero o aluminio galvanizados, de calibre 10-12, arponados, deformados o con espiga suave con cabezas de 3/8" (10 mm) a 7/16" (12 mm) de diámetro. Los sujetadores deben ser suficientemente largos como para penetrar al menos 3/4" (19 mm) en las plataformas base de techos o apenas a través de las plataformas base de madera terciada. Los sujetadores deben ser clavados a nivel con la superficie de la teja. Clavar en exceso puede dañar la teja.
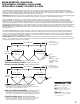
NAILING INSTRUCTIONS / HAND-SEALING INSTRUCCIONES DE CLAVADURA / SELLADO A MANO INSTRUCTIONS DE CLOUAGE / SCELLEMENT À LA MAIN These shingles MUST be nailed as shown. Nails must not be exposed.
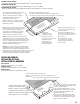
INSTALLING UNDERLAYMENT INSTALANDO LA CAPA BASE INSTALLATION DE LA MEMBRANE DE PROTECTION UNDERLAYMENT: FOR ROOF SLOPES 2:12 TO LESS THAN 4:12 Application of eave flashing: At eaves and where ice dams can be expected, use one layer of GAF Leak Barrier. Eave flashing must not overhang the eave edge by more than 1/4" (6 mm) and should extend 24" (610 mm) beyond the inside wall line. Where ice dams or debris dams are not expected, install 2 plies of GAF Roof Deck Protection.
UNDERLAYMENT: FOR ROOF SLOPES 4:12 OR MORE Application of eave flashing: At eaves and where ice dams can be expected, use one layer of GAF Leak Barrier. Eave flashing must extend 24" (610 mm) beyond the inside wall line. Application of underlayment: Cover deck with one layer of GAF Roof Deck Protection installed without wrinkles. Use only enough nails to hold underlayment in place until covered by shingles.
SECOND STARTER COURSE Use color-coordinated Grand Sequoia®/Grand CanyonTM Starter Strip Shingles. SEGUNDA HILADA INICIAL Use Tejas de Hilada Inicial Grand Sequoia®/Grand CanyonTM de color coordinado. SECOND RANG DE DÉPART Utiliser des Bardeaux de Bande de Départ Grand SequoiaMD/Grand CanyonMC de couleur coordonnée.
SECOND COURSE Position the bottom of the triangular tabs in the second and subsequent shingle courses flush with the tops of the wide cut-outs. For proper horizontal off-set, use alignment slit from underlying shingle as a guide. SEGUNDA HILADA Coloque la parte inferior de las lengüetas triangulares en la segunda fila de tejas y las subsecuentes, enrasadas con la parte superior de los recortes amplios.
INSTALLING ROOF ACCESSORIES AND DETAILS INSTALACIÓN DE ACCESORIOS Y DETALLES DE TECHO INSTALLATION DES PRODUITS ROOF ACCESSORIES ET DÉTAILS VENTILATION Install GAF Ventilation Products for optimal shingle life. See General Instructions and the “Through Ventilation” section. Follow the application instructions for the selected ventilation products. VENTILACIÓN Instale Productos de Ventilación de GAF para una óptima vida útil de la teja.
CHIMNEY FLASHING AND CRICKETS Cover deck around chimney and over wood crickets with GAF Roof Deck Protection. DO NOT run GAF Roof Deck Protection up sides of chimney. Install leak barrier over GAF Roof Deck Protection and up sides of chimney at least 5" (127 mm). Install shop fabricated metal cricket flashings (shown) after underlayments are installed. Seal shingles to the metal flanges (see drawing below).
VALLEY CONSTRUCTION – OPEN Use minimum 20" (508 mm) wide aluminum, galvanized steel, copper, or other non-corroding, non-staining metals (24 gauge minimum). Long valleys or local building codes may require wider metal. Nail the metal on the edges so the nail heads hold it in place. Do not puncture the metal. Nailing through the metal may cause leaking and buckling due to movement.
VALLEY CONSTRUCTION – CLOSED CUT CONSTRUCCIÓN DEL VALLE – CORTE CERRADO CONSTRUCTION DE NOUE FERMÉE – COUPE FERMÉE Extend end of shingle at least 12" (305mm) beyond valley center line. Before nailing, firmly press shingles down at valley center to conform to valley shape. Nail, putting extra fastener in top corner of shingle. Due to the extreme water volume in valleys, nails near the center can leak. Extienda la teja del extremo por los menos 12" (305 mm) más allá de la línea del centro del valle.
PRECAUTIONARY NOTES 1. These shingles are fiberglass, self-sealing asphalt shingles. Because of the natural characteristics of the high-quality waterproofing material used, these shingles will be stiff in cold weather and flexible in hot weather. 2. These shingles are particularly tough and may require additional effort to trim to fit on the roof. Curved blade utility knives are more effective than straight blade utility knives in cutting these shingles.