9001 182 565 (9602) Installation Instructions Notice d’installation
Important Safety Instructions To avoid possible injury or property damage, OBSERVE ALL WARNINGS AND CAUTIONS. 7KHVH LQVWUXFWLRQV DUH LQWHQGHG IRU XVH E\ TXDOL¿HG installers only. The dishwasher must be installed by a TXDOL¿HG VHUYLFH WHFKQLFLDQ RU LQVWDOOHU 1(: ,167$//$7,21 ,I WKH GLVKZDVKHU LV D QHZ installation, most of the work must be done before the dishwasher is moved into place.
WARNING Avoiding General Hazards Do not use the dishwasher until it is completely installed. When opening the door on an uninstalled dishwasher, carefully open the door while supporting the rear of the unit. Failure to follow this warning can cause the dishwasher to tip over and result in serious injury. Before installing the “L”-shaped supplied countertop mounting brackets (select models), decide which method will be used to secure the dishwasher into its opening.
Inspect the Dishwasher After unpacking the dishwasher and prior to installation, thoroughly inspect the dishwasher for possible freight or cosmetic damage. Report any damage immediately. Cosmetic defects must be reported within 30 days of installation. NOTE: Do not discard any bags or items that come with the original package until after the entire installation has been completed.
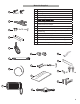
Materials Supplied A Ø 4x17 mm B C Ø 4x15 mm D A Toe panel screws B C D E F G H I J Mounting brackets K Installation Guide for fully integrated door panel (select models only) L Junction box/power supply M Wrench (wrench size 13) N Outer toe panel (3rd piece) (select models only) O Toe Panel caps and screws (select models only) P Toe Panel Mounting Brackets (select models only) Mounting bracket screws Toe panel (2 pieces) Screw clamp (for hose) Flexible edge protector for electrical w
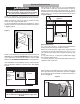
Enclosure Requirements WARNING Avoid Scalding or Electrical Shock Hazard! Make sure the water supply and electrical supply are shut off before installation or service. NOTE: This dishwasher is designed to be enclosed on the top and both sides by standard residential kitchen cabinetry. After locating the proper place for your new dishwasher, you will need to create any required openings to allow for passage of the water, drain and electrical line.
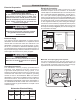
Electrical Preparation Electrical Preparation Electrical Connection WARNING Avoid Electrical Shock Hazard Do not work on an energized circuit. Doing so could result in serious injury or death. Only TXDOL¿HG HOHFWULFLDQV VKRXOG SHUIRUP HOHFWULFDO work. Do not attempt any work on the dishwasher electric supply circuit until you are certain the circuit is de-energized. WARNING Avoid Fire Hazard Make sure electrical work is properly installed. 2QO\ TXDOL¿HG HOHFWULFLDQV VKRXOG SHUIRUP electrical work.
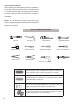
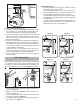
Method B - To permanently connect to household or ¿HOG ZLULQJ 1. Remove the dishwasher electrical supply junction box 3DUW / FRYHU DQG FRQQHFW WR WKH SRZHU VXSSO\ FRUG IURP the house installation. See Figure 6. Figure 6 L 5HPRYH Ǝ WR Ǝ PP RI WKH RXWHU FDVLQJ RI WKH KRXVHKROG RU ¿HOG VXSSO\ ZLULQJ DV VKRZQ LQ Figure 7. Remove 3/8Ǝ WR 1/2Ǝ PP RI WKH LQVXODWLRQ IURP HDFK wire as shown in Figure 7. 2" - 3" (51 mm - 76 mm) Figure 7 3/8" - 1/2" (10 mm - 13 mm) 3.
IMPORTANT NOTES: · If local ordinance require an air gap, install it according to the manufacturer’s instructions. · If the dishwasher drain hose is to be connected to a disposer dishwasher drain connection, remove the plug from the disposer’s dishwasher drain connection. · The dishwasher drain hose must have one place along LWV OHQJWK WKDW LV VHFXUHO\ DWWDFKHG Ǝ PP DERYH WKH FDELQHW ÀRRU · The drain hose length can be extended if necessary.
Installation of Rubber Drain Hose Adaptor For a large port, use the drain hose as it is. 1. For a small port, insert the rubber drain hose adaptor into the drain hose end. 2. Obtain the Rubber Drain Hose Adaptor (H) spring clamp from the Dishwasher Installation Kit (do not substitute). 3. Insert the drain hose adaptor into the end of the drain hose (see Figure 14). Be sure to fully insert the drain hose adaptor. 4. Use the clamp provided to attach the drain hose to the house plumbing as shown in Figure 15.
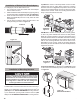
WARNING Avoid Tip Over Hazard Do not use the dishwasher until it is completely installed. When opening the door on an uninstalled dishwasher, carefully open the door while supporting the rear of the unit. Failure to follow this warning can result in serious injury. Drive the mounting screws through the holes in the mounting brackets as shown for Top (Figure 21 6LGH 0RXQW Figure 22 DQG $OWHUQDWH 6LGH 0RXQW Figure 23).
Figure 24 Attaching the Toe Panel Your dishwasher comes with either a two-piece or threepiece toe panel (model dependent) to allow height adjustment. 3RVLWLRQ WKH VORWWHG UHDU WRH SDQHO SDUW RI ' RQ WKH GLVKZDVKHU ¿UVW $OORZ LW WR UHVW RQ WKH ÀRRU 3RVLWLRQ WKH PDWLQJ IURQW WRH SDQHO SDUW RI ' RQ WRS of the rear toe panel allowing the angled edge to rest on the mating edge of the dishwasher. A D 3. Drive the two black screws (A) through the holes in the toe panel to secure.
Customer Service Your dishwasher requires no special care other than WKDW GHVFULEHG LQ WKH &DUH DQG 0DLQWHQDQFH VHFWLRQ RI WKH 8VH DQG &DUH 0DQXDO ,I \RX DUH KDYLQJ D SUREOHP with your dishwasher, before calling for service please refer to the Self Help section in the Use and Care 0DQXDO ,I VHUYLFH LV QHFHVVDU\ FRQWDFW \RXU GHDOHU RU installer or an authorized service center. Do not attempt to repair the appliance yourself. Any work performed by unauthorized personnel may void the warranty.
Consignes de sécurité importantes $¿Q G¶pYLWHU WRXWH SRVVLELOLWp GH EOHVVXUHV RX GH GRPPDJHV PDWpULHOV 9(8,//(= 2%6(59(5 7286 /(6 $9(57,66(0(176 (7 35e&$87,216 &HV LQVWUXFWLRQV VRQW GHVWLQpHV XQLTXHPHQW j O¶XVDJH GHV LQVWDOODWHXUV TXDOL¿pV /¶LQVWDOODWLRQ GX ODYH YDLVVHOOH GRLW rWUH HIIHFWXpH SDU XQ WHFKQLFLHQ GH PDLQWHQDQFH RX XQ LQVWDOODWHXU TXDOL¿p Outre ces instructions, l’installation du lave-linge GRLW rWUH HIIHFWXpH FRQIRUPpPHQW j WRXV OHV FRGHV et ordonnances nationaux et locaux en matière
AVERTISSEMENT WARNING Prévention des dangers d’ordre général Ne pas utiliser le lave-vaisselle tant que l’installation n’est SDV FRPSOqWHPHQW WHUPLQpH 3RXU RXYULU OD SRUWH G¶XQ ODYH YDLVVHOOH GRQW O¶LQVWDOODWLRQ Q¶HVW SDV WHUPLQpH DJLU DYHF prudence et en soutenant la partie arrière de l’appareil. Le non respect de cet avertissement peut entraîner le basculement du lave-vaisselle et provoquer de graves blessures.
Inspection du lave-vaisselle $SUqV DYRLU GpEDOOp OH ODYH YDLVVHOOH HW DYDQW VRQ LQVWDOODWLRQ H[DPLQH] OH DWWHQWLYHPHQW SRXU GpFHOHU G¶pYHQWXHOV GpJkWV HVWKpWLTXHV RX OLpV DX WUDQVSRUW 6LJQDOHU LPPpGLDWHPHQW WRXW GpJkW /HV GpIDXWV HVWKpWLTXHV GRLYHQW rWUH VLJQDOpV GDQV XQ GpODL GH MRXUV j FRPSWHU GH O¶LQVWDOODWLRQ REMARQUE : QH SDV MHWHU OHV VDFV RX OHV pOpPHQWV contenus dans l’emballage d’origine avant d’avoir FRPSOqWHPHQW WHUPLQp O¶LQVWDOODWLRQ GX ODYH YDLVVHOOH Outils et piè
Matériel fourni A Ø 4x17mm B A Vis pour panneau de plinthe B C D E F Panneau de plinthe (2 pièces) G H I Adaptateur de tuyau de vidange en caoutchouc Raccord d’adaptateur d’alimentation d’eau Répartiteur de poussée pour montage latéral (montage latéral alternatif uniquement) J C Ø 4x15mm K Guide d’installation pour un panneau de porte pleinement intégré L Boîte de jonction M Clé (taille 13) N Panneau de plinthe extérieur (3ème pièce) (certains modèles uniquement) O Couvercles pour pan
Exigences d’encastrement AVERTISSEMENT WARNING Évitez les brûlures ou les risques de secousse électrique ! S’assurer que l’alimentation d’eau et l’alimentation électrique sont mises à l’arrêt avant toute installation ou réparation. Figure 1 32-341/2” (815-875 mm) REMARQUE : ce lave-vaisselle est conçu pour être encastré sous XQ FRPSWRLU HW HQWUH GHX[ DUPRLUHV DGMDFHQWHV VWDQGDUG G¶XQH cuisine résidentielle.
Préparation de l’installation électrique /D ERvWH GH MRQFWLRQ GH O¶DOLPHQWDWLRQ pOHFWULTXH GX ODYH Préparation de l’installation électrique AVERTISSEMENT WARNING Évitez les risques de décharge électrique et d’incendie. Ne pas tenter d’intervenir sur un circuit sous tension. Vous risquez autrement des blessures graves, voire la mort. Seuls les électriciens quali¿pV GRLYHQW HIIHFWXHU GHV WUDYDX[ VXU O¶LQVWDOODWLRQ électrique.
Méthode B - Pour effectuer le branchement au câblage domestique ou in-situ de manière permanente : (QOHYHU OH FRXYHUFOH GH OD ERvWH GH MRQFWLRQ pOHFWULTXH du lave-vaisselle et la brancher au cordon d’alimentation pOHFWULTXH GHSXLV O¶LQVWDOODWLRQ UpVLGHQWLHOOH YRLU Figure 6). L Figure 6 (QOHYHU j SR j PP GH OD JDLQH H[WpULHXUH GX FkEOH G¶DOLPHQWDWLRQ UpVLGHQWLHO RX LQ VLWX FRPPH LQGLTXp sur la Figure 8.
Raccordement de l’alimentation d’eau chaude 9RXV WURXYHUH] GHX[ WX\DX[ HQ SODVWLTXH RQGXOp TXL VRUWHQW GH O¶DUULqUH GX ODYH YDLVVHOOH /H SOXV JURV WX\DX GRWp G¶XQ UDFFRUG HQ ODLWRQ j O¶H[WUpPLWp HVW OH WX\DX G¶DOLPHQWDWLRQ G¶HDX TXL HVW UHOLp DX ODYH YDLVVHOOH O¶DXWUH HVW OH WX\DX de vidange du lave-vaisselle).
Installation de l’adaptateur de tuyau de vidange en caoutchouc 3RXU XQ SRUW ODUJH XWLOLVHU OH WX\DX G¶pYDFXDWLRQ WHO TX¶LO HVW 1. 3RXU XQ SRUW SOXV SHWLW LQVpUHU O¶DGDSWDWHXU GH WX\DX GH YLGDQJH HQ FDRXWFKRXF VXU O¶H[WUpPLWp GX WX\DX G¶pYDFXDWLRQ 2. 8WLOLVHU OD EULGH j UHVVRUW GH O¶DGDSWDWHXU + GH WX\DX GH YLGDQJH HQ FDRXWFKRXF TXL VH WURXYH GDQV OH QpFHVsaire d’installation du lave-vaisselle (ne pas utiliser des pièces de substitution). 3.
AVERTISSEMENT WARNING Éviter les dangers de basculement. Ne pas utiliser le lave-vaisselle tant que l’installation n’est pas complètement terminée. Pour ouvrir la porte d’un lave-vaisselle dont l’installation n’est pas terminée, agir avec prudence et en soutenant la partie arrière de l’appareil. Le non respect de cet avertissement risque d’entraîner de graves blessures.
Figure 24 Fixation du panneau de plinthe 9RWUH ODYH YDLVVHOOH HVW OLYUp DYHF XQ SDQQHDX GH SOLQWKH qui se compose de trois pièces (certains modèles) pour SHUPHWWUH GH UpJOHU OD KDXWHXU GH O¶DSSDUHLO 3RVLWLRQQHU WRXW G¶DERUG OH SDQQHDX GH SOLQWKH SDUWLH GH ' j IHQWHV DUULqUH VXU OH ODYH YDLVVHOOH /H ODLVVHU reposer sur le sol.
Service après-vente 9RWUH ODYH YDLVVHOOH QH QpFHVVLWH DXFXQ HQWUHWLHQ SDUWLFXOLHU DXWUH TXH FHOXL GpFULW GDQV OD VHFWLRQ © Nettoyage et entretien » du Guide d’Utilisation et d’Entretien.