
Use and Care Manual

16
en-us Operating the appliance
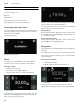
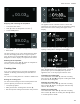
Setting the date format
The three possible formats D.M.Y, D/M/Y and M/D/Y
appear in the display. The D.M.Y is the default.
1. Set the required format with the rotary selector.
2. Confirm with ™.
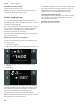
Setting the date
The default date appears in the display. The day setting is
already active.
1. Set the required day with the rotary selector.
2. Switch to the month setting with the C symbol.
3. Set the month with the rotary selector.
4. Switch to the year setting with the C symbol.
5. Set the year with the rotary selector.
6. Confirm with ™.
Setting the temperature unit
The two possible units °C and °F will appear on the
display. The default unit is °C.
1. Use the rotary selector to select the unit you require.
2. Press ™ to confirm.
Completing initial set-up
"Initial set-up complete" will appear on the display.
Press ™ to confirm.
The appliance will switch to standby mode and the
standby display will appear. The appliance is now ready
to use.
Heating up the oven
Make sure that there is no leftover packaging in the
cooking compartment.
To eliminate the new-appliance smell, heat up the oven
with it empty and the door closed. One hour with hot
air H at 200 °C is ideal for this.
Cleaning accessories
Before using accessories for the first time, thoroughly
clean them with hot soapy water and a soft dish cloth.
1
Operating the appliance
Operati ng the appliance
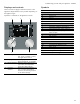
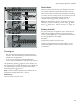
Oven interior
The oven interior has four insertion levels. These are
counted from the bottom up.
9 CAUTION
Do not place anything on the cooking compartment
floor. Do not cover it with aluminium foil. A build-up
of heat could damage the appliance or cause
injury.
9 CAUTION
Do not slide any accessories between the shelf
positions, or they may tip.
Inserting the rack
The accessories feature a rack stop function. The rack
stop function prevents tilting of accessories when pulling
them out. You must insert accessories in the oven interior
correctly so that tilt protection will work.
Inserting the rack
1. Tilt the rack to guide the rack stop in between the rails
of the rack holders ¨. The rack stop has to face
downwards.
2. Lower the rack and slide it into the oven, so that the
rack stop can engage ©. Make sure the rack’s safety
rod is at the rear and top ª.