
Use and Care Manual
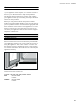


Table Of Contents
- BO 450/451 612
- Table of Contents
- Use and care manual
- IMPORTANT SAFETY INSTRUCTIONS 4
- ]Causes of damage 9
- 7Environmental protection 9
- *Familiarizing yourself with your appliance 10
- KBefore using the appliance for the first time 15
- 1Operating the appliance 16
- OTimer functions 18
- FSabbath mode and Yom Tov mode 21
- nAutomatic programs 22
- ŽPersonal recipes 24
- @Core temperature probe 26
- vRoasting function 29
- AChildproof lock 30
- oHome Connect 30
- QBasic settings 34
- DCleaning and maintenance 37
- .Pyrolysis (self-cleaning) 39
- 3Troubleshooting 41
- 4Customer service 43
- JTables and tips 44
- 9 Safety Definitions
- IMPORTANT SAFETY INSTRUCTIONS
- READ AND SAVE THESE INSTRUCTIONS
- 9 WARNING
- Proper Installation and Maintenance
- Fire Safety
- 9 WARNING
- 9 WARNING
- 9 WARNING
- 1. SMOTHER FLAMES with a close- fitting lid, cookie sheet, or metal tray, then turn off the burner. BE CAREFUL TO PREVENT BURNS. If the flames do not go out immediately, EVACUATE AND CALL THE FIRE DEPARTMENT.
- 2. NEVER PICK UP A FLAMING PAN – You may be burned.
- 3. DO NOT USE WATER, including wet dishcloths or towels – a violent steam explosion will result.
- 4. Use an extinguisher ONLY if:
- Burn Prevention
- Child Safety
- Cleaning Safety
- Cookware Safety
- Proposition 65 Warning:
- ]Causes of damage
- 7Environmental protection
- *Familiarizing yourself with your appliance
- KBefore using the appliance for the first time
- 1Operating the appliance
- OTimer functions
- FSabbath mode and Yom Tov mode
- Sabbath mode and Yom Tov mode
- Sabbath mode
- Note:
- Follow these steps:
- 2. Select "Factory setting" with the rotary selector.
- 3. Confirm by touching the ™ symbol.
- 4. Rotate the selector to Sabbath mode :.
- 5. Confirm by touching the ™ symbol.
- 6. Rotate the selector to “activate”.
- 7. Corfirm by touching the ™ symbol.
- 8. Turn the oven off.
- 2. Touch the / symbol.
- 3. Changing the cooking time 6 : Touch the $ symbol. Set the preferred cooking time with the rotary selector. You can set up to 74 hours. Confirm by touching the ™ symbol. Then changing the temperature becomes an option.
- 4. Changing the temperature: Set the required temperature with the rotary selector.
- 5. Start with I .
- Note:
- Yom Tov mode
- Setting the Yom Tov mode
- 2. Touch the / symbol.
- 2. Set the desired Stage 2 cooking time with the rotary selector.
- 3. Touch the C symbol to adjust the end of Stage 2 cooking time 5 .
- 4. Select the end time with the rotary selector.
- 5. Change the date if needed by touching the C symbol to V .
- 6. Rotate the selector to the desired date.
- 7. Confirm settings by touching the ™ symbol.
- 2. Start with I .
- nAutomatic programs
- Automatic programs
- Information on the settings
- Selecting a dish
- Applying settings for dishes
- 1. Set the function selector to ž.
- 2. Touch the i symbol. Press ™ to confirm.
- 3. Use the rotary selector to select the category and press ™ to confirm.
- 4. Use the rotary selector to select the required dish and press ™ to confirm.
- 5. Press ™ to confirm the required settings. Follow the directions on the display.
- 2. Select a single or double cooking time, depending on requirements.
- 3. Press I to start.
- 4. If the "Continue cooking" function has ended, turn the function selector to 0.
- Calling up the last automatic programs used
- ŽPersonal recipes
- Personal recipes
- Recording a recipe
- 1. Set the function selector to ž.
- 2. Touch the i symbol.
- 3. Use the rotary selector to select "Individual recipes" and press ™ to confirm.
- 4. Use the rotary selector to select a free memory location.
- 5. Touch the g symbol.
- 6. Set the desired temperature with the rotary selector.
- 7. The cooking time is recorded.
- 8. Recording another phase:
- 9. Once the appliance has achieved the desired cooking result, touch the & symbol to end the recipe.
- 10. Enter the name under "ABC". ~ "Entering a name" on page 25
- Programming a recipe
- 1. Set the function selector to ž.
- 2. Touch the i symbol.
- 3. Use the rotary selector to select "Individual recipes" and press ™ to confirm.
- 4. Choose a free storage location with the rotary selector.
- 5. Touch the % symbol.
- 6. Enter the name under "ABC". ~ "Entering a name" on page 25
- 7. Choose the first phase with the C symbol.
- 8. Choose the time setting with the C symbol.
- 9. Set the required cooking time with the rotary selector.
- 10. Choose the next phase with the C symbol.
- 11. Save with ™.
- Note:
- Entering a name
- Starting a recipe
- Change recipe
- Deleting a recipe
- @Core temperature probe
- Core temperature probe
- 9 WARNING
- 9 WARNING
- Inserting the core temperature probe into the food
- Setting the core temperature
- 9 CAUTION
- 9 CAUTION
- 2. Turn the function selector to the desired heating type.
- 3. Use the rotary selector to set the oven cavity temperature.
- 4. Touch the + symbol. Use the rotary selector to change the set core temperature for the food and confirm with +.
- 5. The appliance heats with the set heating type.
- Core temperature guidelines
- vRoasting function
- AChildproof lock
- oHome Connect
- Home Connect
- Notes
- Setting Up
- Note:
- Installing the app
- 2. Enter the search term "Home Connect".
- 3. Select the Home Connect app and install it on your mobile device.
- 4. Launch the app and set up Home Connect access.
- 2. Touch the % symbol.
- 3. Turn the rotary selector to "Wi-Fi".
- 4. Confirm by touching the ™ symbol.
- 5. Touch the ™ symbol to continue.
- 6. Turn the rotary selector to "Automatic (WPS)".
- 7. Touch the ™ symbol to start the connection process.
- 8. Press the WPS button on the router within the next 2 minutes.
- 2. Touch the % symbol.
- 3. Turn the rotary selector to "Wi-Fi".
- 4. Confirm by touching the ™ symbol.
- 5. Touch the ™ symbol to continue.
- 6. Turn the rotary selector to "Manual".
- 7. Touch the ™ symbol to start the connection process.
- 8. Follow the instructions in the app.
- 2. Use the rotary selector to select "Connect to app".
- 3. Touch the % symbol and start the connection process with ™.
- 4. Follow the instructions in the app.
- Note:
- Remote Start
- Remote Diagnostics
- Information on Data Protection
- Declaration of Conformity
- Wi-Fi® Module
- QBasic settings
- Basic settings
- 2. Select "General setting" with the rotary selector.
- 3. Touch the ™ symbol.
- 4. Set the required general setting with the rotary selector.
- 5. Touch the % symbol.
- 6. Set the general setting with the rotary selector.
- 7. Save with ™ or cancel with ' and quit the current general setting.
- 8. Turn the program selector to 0 to quit the general setting menu.
- DCleaning and maintenance
- .Pyrolysis (self-cleaning)
- Pyrolysis (self-cleaning)
- 9 WARNING
- 9 WARNING
- 9 WARNING
- 9 WARNING
- 9 WARNING
- Preparing the pyrolytic self-cleaning feature
- Starting the pyrolytic self-cleaning function
- 1. Set function selector to S.
- 2. The œ symbol is displayed. Press ™ to confirm.
- 3. The switch-off time at which the pyrolytic self-cleaning function will be finished is displayed. If desired, change the switch-off time with the rotary selector. Press ™ to confirm.
- 4. Remove all accessories from the oven cavity and remove any coarse dirt. Press ™ to confirm.
- 5. Press I to start. The cleaning time counts down on the display. If the switch-off time has been delayed, the time until the pyrolytic self-cleaning function starts counts down in the display. The light in the oven cavity remains switched off.
- Cleaning the Accessories with the Pyrolytic Self-cleaning Feature
- 3Troubleshooting
- Troubleshooting
- 9 WARNING
- --------
- Power cut
- Demo mode
- Replacing the oven lamp
- 9 WARNING
- 9 WARNING
- Note:
- Replacing the top oven lamp
- 2. Take out the halogen lamp. Insert the new halogen lamp.
- 3. Fold up and screw down the lamp cover.
- 4. Switch on the fuse in the fuse box again.
- 2. Undo the knurled screws on the slide-in rack. Remove the slide-in rack.
- 3. Press the top retaining spring to the side. Remove the glass cover.
- 4. Take out the halogen lamp. Insert the new halogen lamp.
- 5. Insert the glass cover at the bottom into the retaining spring and latch it at the top. The beveled side of the glass cover must point toward the oven.
- 6. Remove the dishcloth from the oven.
- 7. Switch on the fuse in the fuse box again.
- 4Customer service
- JTables and tips
- Use and care manual

45
Tables and tips en-us
Vegetables
▯ Vegetables from the oven are a good alternative to
vegetables from the pan. The flavors are concentrated
and the roasting aromas make them very aromatic.
Furthermore, very little fat is required for preparation.
▯ Wash the vegetables and mix them in a bowl with a
little oil. Place in a heat-resistant pan or distribute
evenly in the glass/grill tray.
▯ During cooking, stir at least once. After cooking,
adjust the spices and flavor to taste with fresh herbs.
▯ Vegetables are suitable as warm or cold appetizers or
vegetarian main dishes, or also as side dishes to be
served with fish and meat.
▯ For small portions (for 2-3 people), use an ovenproof
dish and place it on the wire rack. Otherwise the food
will burn or dry out in the glass/wire tray.
▯ Always follow the manufacturer's instructions for pre-
cooked and frozen products.
Dish Accessories Level Temperature
in °F (°C)
Type of
heating
Cooking
time
in min.
Comments
Vegetable skew-
ers
Wire rack +
Grill tray
3 (4) 430 (220) Q 24* Cut wooden skewers short or soak in
water overnight so they do not burn.
Recipe tip: Peppers, onions, corn (pre-
cooked), cherry tomatoes, zucchini
Green asparagus,
grilled
Glass/grill
tray
3 (4) 430 (220) Q 6–10* Recipe tip: Season with onions, oil, vin-
egar, salt, and pepper.
Root vegetables Glass/grill
tray
3 (4) 390 (200) H 30* Recipe tip: Season carrots, celery,
rutabagas and red beets with oil, salt,
and pepper.
3 (4) 480 (250) Q 15–20*
Pumpkin pieces Glass/grill
tray
3 (4) 390 (200) H 20 - 30* Recipe tip: Season with oil, garlic, gin-
ger, cumin, salt, and pepper.
Antipasti Glass/grill
tray
3 (4) 390 (200) H 30* Recipe tip: Drizzle balsamic vinegar
over the vegetables while they are still
hot, and season them.
3 (4) 480 (250) Q 15–20*
Escalivada
(Mediterranean
oven-roasted veg-
etables)
Ovenproof
dish
4 (5) 480 (250) Q 15* Recipe tip: Aubergines, onions, toma-
toes, peppers, oil. Delicious hot or
cold.
Ratatouille Glass/grill
tray
3 (4) 390 (200) N 30–40* Recipe tip: Sprinkle with parmesan just
before serving.
Oven-roasted
tomatoes
Ovenproof
dish
2 (3) 250 (120) H 60 Recipe tip: Place cherry tomatoes or
sliced tomatoes, rosemary, and garlic
into the baking dish and drizzle with oil
and a little honey.
If you wish, you can blanch the toma-
toes and peel them beforehand.
Chicory Ovenproof
dish
2 (3) 355 (180) H 25–30 Recipe tip: Halve, season, wrap in
boiled ham, pour cream or béchamel
sauce over the top and sprinkle with
cheese.
2 (3) 375 (190) I 45–50 No need to preheat; do not open appli-
ance door.
Stuffed pep-
pers,Stuffed pep-
pers,
vegetarian
Ovenproof
dish/roast-
ing dish
2 (3) 375 (190) N 50 Recipe tip: Stuff with boiled rice, soft
wheat or lentils and onions, cheese,
herbs and seasoning/spices.
* Turn the food halfway through the cooking time.