
Use & Care Manual
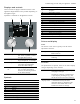
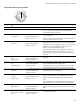
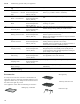

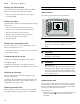
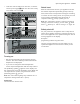
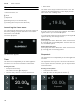
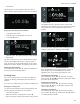
Table Of Contents
- BO 480/481 613
- Table of Contents
- Use and care manual
- IMPORTANT SAFETY INSTRUCTIONS 4
- ]Causes of damage 9
- 7Environmental protection 9
- *Familiarizing yourself with your appliance 10
- KBefore using the appliance for the first time 15
- 1Operating the appliance 16
- OTimer functions 18
- FSabbath mode and Yom Tov mode 21
- nAutomatic programs 22
- ŽPersonal recipes 24
- @Core temperature probe 26
- :Rotisserie spit 29
- vRoasting function 31
- AChildproof lock 31
- oHome Connect 32
- QBasic settings 36
- DCleaning and maintenance 39
- .Pyrolysis (self-cleaning) 40
- 3Troubleshooting 42
- 4Customer service 44
- JTables and tips 45
- 9 Safety Definitions
- IMPORTANT SAFETY INSTRUCTIONS
- Proper Installation and Maintenance
- Fire Safety
- 9 WARNING
- 9 WARNING
- 9 WARNING
- 1. SMOTHER FLAMES with a close- fitting lid, cookie sheet, or metal tray, then turn off the burner. BE CAREFUL TO PREVENT BURNS. If the flames do not go out immediately, EVACUATE AND CALL THE FIRE DEPARTMENT.
- 2. NEVER PICK UP A FLAMING PAN – You may be burned.
- 3. DO NOT USE WATER, including wet dishcloths or towels – a violent steam explosion will result.
- 4. Use an extinguisher ONLY if:
- Burn Prevention
- Child Safety
- Cleaning Safety
- Cookware Safety
- Proposition 65 Warning:
- ]Causes of damage
- 7Environmental protection
- *Familiarizing yourself with your appliance
- KBefore using the appliance for the first time
- 1Operating the appliance
- OTimer functions
- FSabbath mode and Yom Tov mode
- Sabbath mode and Yom Tov mode
- Sabbath mode
- Note:
- Follow these steps:
- 2. Select "Factory setting" with the rotary selector.
- 3. Confirm by touching the ™ symbol.
- 4. Rotate the selector to Sabbath mode :.
- 5. Confirm by touching the ™ symbol.
- 6. Rotate the selector to “activate”.
- 7. Corfirm by touching the ™ symbol.
- 8. Turn the oven off.
- 2. Touch the / symbol.
- 3. Changing the cooking time 6 : Touch the $ symbol. Set the preferred cooking time with the rotary selector. You can set up to 74 hours. Confirm by touching the ™ symbol. Then changing the temperature becomes an option.
- 4. Changing the temperature: Set the required temperature with the rotary selector.
- 5. Start with I .
- Note:
- Yom Tov mode
- Setting the Yom Tov mode
- 2. Touch the / symbol.
- 2. Set the desired Stage 2 cooking time with the rotary selector.
- 3. Touch the C symbol to adjust the end of Stage 2 cooking time 5 .
- 4. Select the end time with the rotary selector.
- 5. Change the date if needed by touching the C symbol to V .
- 6. Rotate the selector to the desired date.
- 7. Confirm settings by touching the ™ symbol.
- 2. Start with I .
- nAutomatic programs
- Automatic programs
- Information on the settings
- Selecting a dish
- Applying settings for dishes
- 1. Set the function selector to ž.
- 2. Touch the i symbol. Press ™ to confirm.
- 3. Use the rotary selector to select the category and press ™ to confirm.
- 4. Use the rotary selector to select the required dish and press ™ to confirm.
- 5. Press ™ to confirm the required settings. Follow the directions on the display.
- Adding extra cooking time
- Changing and canceling
- Calling up the last automatic programs used
- ŽPersonal recipes
- Personal recipes
- Recording a recipe
- 1. Set the function selector to ž.
- 2. Touch the i symbol.
- 3. Use the rotary selector to select "Individual recipes" and press ™ to confirm.
- 4. Use the rotary selector to select a free memory location.
- 5. Touch the g symbol.
- 6. Set the desired temperature with the rotary selector.
- 7. The cooking time is recorded.
- 8. Recording another phase:
- 9. Once the appliance has achieved the desired cooking result, touch the & symbol to end the recipe.
- 10. Enter the name under "ABC". ~ "Entering a name" on page 25
- Programming a recipe
- 1. Set the function selector to ž.
- 2. Touch the i symbol.
- 3. Use the rotary selector to select "Individual recipes" and press ™ to confirm.
- 4. Choose a free storage location with the rotary selector.
- 5. Touch the % symbol.
- 6. Enter the name under "ABC". ~ "Entering a name" on page 25
- 7. Choose the first phase with the C symbol.
- 8. Choose the time setting with the C symbol.
- 9. Set the required cooking time with the rotary selector.
- 10. Choose the next phase with the C symbol.
- 11. Save with ™.
- Note:
- Entering a name
- Starting a recipe
- Change recipe
- Deleting a recipe
- @Core temperature probe
- Core temperature probe
- 9 WARNING
- 9 WARNING
- Inserting the core temperature probe into the food
- Setting the core temperature
- 9 CAUTION
- 9 CAUTION
- 2. Turn the function selector to the desired heating type.
- 3. Use the rotary selector to set the oven cavity temperature.
- 4. Touch the + symbol. Use the rotary selector to change the set core temperature for the food and confirm with +.
- 5. The appliance heats with the set heating type.
- Estimated cooking time
- Changing the set core temperature
- Deleting the set core temperature
- Core temperature guidelines
- :Rotisserie spit
- Rotisserie spit
- 9 CAUTION
- Preparation
- 1. Insert both supports in the sockets on the grill tray. The drive is on the left.
- 2. Plug the right retaining clip onto the rotisserie spit and screw it in firmly.
- 3. Place the food you want to cook on the rotisserie spit's center. Secure protruding parts (e.g. wings) to make sure they do not touch the grill heating element.
- 4. Plug the left retaining clip onto the rotisserie spit and screw it in firmly.
- 5. Place the rotisserie spit on the supports. Latch the square shaft into the drive section.
- 6. Insert the rotisserie spit in the lowest insertion level in the oven. The drive spindle must engage in the opening on the oven's rear wall.
- Switching on the rotisserie spit
- Switching off the rotisserie spit
- vRoasting function
- AChildproof lock
- oHome Connect
- Home Connect
- Notes
- Setting Up
- Note:
- Installing the app
- Connecting the appliance to your home network (LAN)
- Connecting the appliance to your home network (Wi-Fi with WPS)
- 1. In the basic settings, select ¯ "Home Connect".
- 2. Touch the % symbol.
- 3. Turn the rotary selector to "Wi-Fi".
- 4. Confirm by touching the ™ symbol.
- 5. Touch the ™ symbol to continue.
- 6. Turn the rotary selector to "Automatic (WPS)".
- 7. Touch the ™ symbol to start the connection process.
- 8. Press the WPS button on the router within the next 2 minutes.
- Connecting the appliance to your home network (Wi-Fi without WPS)
- 1. In the basic settings, select ¯ "Home Connect".
- 2. Touch the % symbol.
- 3. Turn the rotary selector to "Wi-Fi".
- 4. Confirm by touching the ™ symbol.
- 5. Touch the ™ symbol to continue.
- 6. Turn the rotary selector to "Manual".
- 7. Touch the ™ symbol to start the connection process.
- 8. Follow the instructions in the app.
- Connecting the appliance to the app
- Remote Start
- Remote Diagnostics
- Information on Data Protection
- Declaration of Conformity
- Wi-Fi® Module
- QBasic settings
- Basic settings
- 2. Select "General setting" with the rotary selector.
- 3. Touch the ™ symbol.
- 4. Set the required general setting with the rotary selector.
- 5. Touch the % symbol.
- 6. Set the general setting with the rotary selector.
- 7. Save with ™ or cancel with ' and quit the current general setting.
- 8. Turn the program selector to 0 to quit the general setting menu.
- DCleaning and maintenance
- .Pyrolysis (self-cleaning)
- Pyrolysis (self-cleaning)
- 9 WARNING
- 9 WARNING
- 9 WARNING
- 9 WARNING
- 9 WARNING
- Preparing the pyrolytic self-cleaning feature
- Starting the pyrolytic self-cleaning function
- 1. Set function selector to S.
- 2. The œ symbol is displayed. Press ™ to confirm.
- 3. The switch-off time at which the pyrolytic self-cleaning function will be finished is displayed. If desired, change the switch-off time with the rotary selector. Press ™ to confirm.
- 4. Remove all accessories from the oven cavity and remove any coarse dirt. Press ™ to confirm.
- 5. Press I to start. The cleaning time counts down on the display. If the switch-off time has been delayed, the time until the pyrolytic self-cleaning function starts counts down in the display. The light in the oven cavity remains switched off.
- Cleaning the Accessories with the Pyrolytic Self-cleaning Feature
- 4Customer service
- JTables and tips
- Use and care manual

13
Familiarizing yourself with your appliance en-us
Program selection positions
Position Function/type of heat-
ing
Temperature Application
0 Off position
ž Light Turn on the oven cavity light. Access to other func-
tions, e.g. automatic programs, individual recipes,
remote start (Home Connect).
2 H
Convection
120 - 550°F (50 - 300°C)
Default temperature
340°F (170°C)
Convection: For cakes, cookies and baked casseroles
on several levels.
The fan in the rear wall of the oven distributes the heat
evenly throughout the oven cavity.
3 I
Economy
120 - 550°F (50 - 300°C)
Default temperature
340°F (170°C)
Energy-saving convection mode for cakes, meat,
baked casseroles, and gratins. The convenience fea-
tures (e.g. the oven lighting) remain off. The oven tem-
perature can only be displayed while the oven is
heating up. Do not preheat the oven.
Place the food into the cold, empty oven cavity and
start the stated cooking time. Keep the oven door
closed during cooking to prevent heat escaping from
the oven.
4 N
Top +
bottom heat
120 - 550°F (50 - 300°C)
Default temperature
340°F (170°C)
For cakes in pans or sheet cakes, baked casseroles,
roasting.
5 O
Top +
Y bottom heat
120 - 550°F (50 - 300°C)
Default temperature
340°F (170°C)
For sheet cakes, cookies, cakes with meringue, grill-
ing, and baked casseroles with gratin.
Very well-suited for a situation when the food should
be heated from above toward the end of preparation.
6 P
Top heat
120 - 550°F (50 - 300°C)
Default temperature
340°F (170°C)
Targeted heat from above, for example grilling cake
topped with fruit and meringue.
7 M
Y top +
bottom heat
120 - 550°F (50 - 300°C)
Default temperature
340°F (170°C)
For cheesecake, bread in loaf pans, dishes in a water
bath (e.g. egg custard, crème brûlée). For roasting
without a lid and warming up foods (foods dry out
less).
Very well-suited for a situation when the food should
be heated from above toward the end of preparation.
8 L
Bottom heat
120 - 550°F (50 - 300°C)
Default temperature
340°F (170°C)
For the final baking stage (such as for moist cakes
topped with fruit), for preserving, for dishes in a water
bath.
9 K
Convection + bottom
heat
120 - 550°F (50 - 300°C)
Default temperature
340°F (170°C)
Additional heat from below for moist cakes, such as
cake topped with fruit.