
Installation Instruction


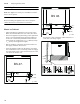
Table Of Contents
- BS 470/471 612 BS 474/475 612 BS 484/485 612
- Table of Contents
- Installation instructions
- 9 Safety Definitions
- IMPORTANT SAFETY INSTRUCTIONS
- READ AND SAVE THESE INSTRUCTIONS
- 9 WARNING
- 9 WARNING
- Appliance Handling Safety
- Safety Codes and Standards
- Electric Safety
- 9 WARNING
- If required by the National Electrical Code (or Canadian Electrical Code), this appliance must be installed on a separate branch circuit.
- Installer – show the owner the location of the circuit breaker or fuse. Mark it for easy reference.
- Installer: Leave these instructions with the appliance after installation is complete.
- Important: Save these instructions for the local electrical inspector's use.
- Before installing, turn power OFF at the service panel. Lock service panel to prevent power from being turned ON accidentally.
- Refer to data plate for more information. See “Data Plate” under “Service” for data plate location.
- Be sure your appliance is properly installed and grounded by a qualified technician. Installation, electrical connections and grounding must comply with all applicable codes.
- 9 WARNING
- Related Equipment Safety
- Remove all tape and packaging before using the appliance. Destroy the packaging after unpacking the appliance. Never allow children to play with packaging material
- Never modify or alter the construction of the appliance. For example, do not remove leveling legs, panels, wire covers or anti-tip brackets/screws.
- Before starting up the appliance, remove any packaging material and adhesive film from the cooking compartment and the door.
- Proposition 65 Warning:
- Transport
- Before you begin
- Before you begin
- Tools and Parts Needed
- Parts Included
- Power Requirements
- Planning Notes
- Door hinge not interchangeable.
- Distance from furniture body to door front 1.85” (47 mm).
- Pay attention to the front protrusion, possibly including the door handle, for opening drawers at the sides.
- When planning a corner solution, pay attention to the door opening angle of at least 90°.
- No other electrical appliance may be integrated into the cupboard above this appliance.
- Do not install the appliance version with the control panel on the bottom above a dishwasher. Ascending steam from the dishwasher can damage the appliance electronics.
- Preparing Kitchen Units
- Preparing Kitchen Units
- Units into which ovens are to be fitted must be heat- resistant up to 195°F (90°C) and adjacent cabinets up to 160°F (70°C).
- Connection box must be outside of the installation niche.
- Perform cut-out work on the furniture before inserting the appliance. Remove any shavings or the function of the electrical components may be impaired.
- Secure freestanding units to the wall using a standard bracket.
- Only fit the appliance up to a height that allows accessories to be removed easily.
- Dimensions and Cabinet Requirements
- Removing Packaging
- Connection to the home network (LAN)
- Water connection
- The appliance is backflow-proof (VDE tested). Connection valves with backflow preventers are not required. Follow the regulations of the local water utility.
- Install a suitable descaling system in front of the appliance if the water hardness exceeds 7 dH.
- Maximum rated water pressure: 1 MPa (10 bar)
- Only connect the appliance to a cold-water connection:
- Waste water connection
- Install Appliance
- Note:
- NOTICE
- Mount to Cabinet
- 1. Push the appliance fully into the kitchen unit. Route the Combi-steam oven's connecting cable and supply and drain water hoses to the connection points on the rear left in the kitchen unit.
- 2. Align the appliance in the center.
- 3. Use a spirit level to align the appliance exactly horizontally.
- 4. Fasten the appliance with the included screw. Remove the transportation lock from the door.
- Adjusting the door
- For precise alignment, the appliance door can be slightly adjusted.
- For this purpose, slightly pull out the appliance from the built-in cut-out. At the top of the appliance there is an oval opening located on the hinge side. Remove the cover cap. Slightly loosen both screws (Inbus 5 mm), but do not remove them!
- Align the door via the lateral screw (Torx 20). It might be necessary to open and close the door.
- Check the alignment and tighten both screws (Inbus 5 mm) again. Attach the cover cap again.
- Notes
- Three wire connection
- 1. Connect red wire from oven to red electrical supply wire (hot wire).
- 2. Connect black wire from oven to black electrical supply wire (hot wire).
- 3. Connect yellow/green ground oven wire to bare ground electrical supply wire.
- Attach flexible conduit to the junction box.
- To facilitate serviceability, the flex conduit must not be shortened and should be routed to allow for temporary removal of the oven.
- Means for disconnection must be incorporated in the fixed wiring in accordance with the wiring rules.
- Combination with an oven
- Fit the Combi-steam oven first and then the oven.
- For an installation depth of 21 5/8" (550 mm), position the water hoses and the connecting cable in the area of the housing cut-out.
- The rear of the BO 4.. ovens has a bevelled corner. Route the Combi-steam oven's supply and drain water hoses downwards to the connection points on the rear left in the kitchen unit.
- If the hoses are not routed in the corner on the rear left in the kitchen unit, when installing the appliance over an oven the kitchen unit's body must be pulled forward by at least 1 \" (35 mm) and side paneling or a trim must be inserted.
- Combination with warming drawer, width 24" (60 cm)
- Combination with warming drawer, width 30" (76 cm)
- Check the Installation
- Removal
- 4Customer service
- Customer service
- If your appliance needs repairs, our customer service is there for you. We work hard to help solve problems quickly and without unnecessary service calls, getting your appliance back up and running correctly in the least amount of time possible.
- When you call, please indicate the product number (E-Nr.) and serial number (FD-Nr.) so that we can support you in a qualified manner. You will find the type plate with these numbers on the bottom of the appliance. To avoid having to search for a lon...
- E-Nr.
- FD-Nr.
- Please read the use and care instructions provided with your appliance. Failure to do so may result in an error in using the appliance. This could result in a service call that instead of fixing a mechanical issue is only needed for customer educatio...
- Please find the contact data of all countries in the enclosed customer service list.
- To book a service visit and product advice
- Table des matières
- Notice de montage
- 9 Définitions de sécurité
- IMPORTANTES CONSIGNES DE SÉCURITÉ
- LIRE ET CONSERVER CES INSTRUCTIONS
- 9 AVERTISSEMENT
- 9 AVERTISSEMENT
- Sécurité de manutention des appareils
- Codes et normes de sécurité
- Sécurité électrique
- 9 AVERTISSEMENT
- S'il y a lieu, conformément au Code national de l'électricité (ou au Code canadien de l'électricité), cet appareil doit être installé sur un circuit de dérivation séparé.
- Installateur – Indiquer au propriétaire l’emplacement du disjoncteur ou du fusible. Identifier sa position pour pouvoir le retrouver facilement.
- INSTALLATEUR : LAISSEZ CES INSTRUCTIONS AVEC L'APPAREIL APRÈS UNE FOIS L'INSTALLATION TERMINÉE.
- Important : conserver ces instructions pour l'usage de l'inspecteur électrique local.
- Avant l'installation, mettre l'appareil hors service au panneau de service. Verrouiller le panneau d'entrée d'électricité pour éviter que le courant ne soit accidentellement rétabli.
- Pour plus d´informations, se reporter à la plaque signalétique. Pour connaître l´emplacement de la plaque signalétique, voir “Plaque signalétique“ sous “Entretien“.
- S'assurer que l'appareil est installé et mis à la terre par un technicien qualifié. L'installation, les connexions électriques et la mise à la terre doivent être conformes à tous les codes applicables.
- 9 AVERTISSEMENT
- Sécurité apparentée concernant l´équipement
- Retirer le ruban adhésif et l´emballage avant d´utiliser l´appareil. Détruiere l´emballage après avoir déballé l´appareil. Ne jamais laisser les enfants jouer avec les matériaux de conditonnement.
- Ne jamais modifier ni altérer la configuration de l´appareil. Par exemple, ne pas retirer les pieds de nivellement, les panneaux, les couvercles de câblage ou les fixations/vis antibasculement.
- Avant d'allumer l'appareil, retirez tout matériel d'emballage ou pellicule adhésive du compartiment de cuisson et de la porte.
- Avertissement issu de la proposition 65 :
- Transport
- Avant de commencer
- Avant de commencer
- Outils et pièces nécessaires
- Pièces comprises
- Exigences électriques
- Notes de planification
- Charnière de porte non interchangeable.
- Distance entre le corps d’ameublement et l'avant de la porte : 1,85" (47 mm).
- Pour l'ouverture latérale des tiroirs, faites attention au retrait avant, y compris éventuellement à la poignée de porte.
- Lors de la planification d'une solution d'angle, tenez compte de l'angle d'ouverture de la porte qui est d'au moins 90.
- Aucun autre appareil électrique ne peut être intégré dans l'armoire au-dessus de cet appareil.
- N'installez pas la version de l'appareil avec le panneau de commande au-dessus d'un lave-vaisselle. La vapeur ascendante du lave-vaisselle peut endommager les composants électroniques de l'appareil.
- Préparation des meubles
- Préparation des meubles
- Les meubles d'encastrement doivent résister à une température allant jusqu'à 90°C, la façade des meubles voisins jusqu'à 70°C.
- La prise de raccordement doit se trouver en dehors de la niche.
- Réaliser les travaux de découpe sur le meuble avant la mise en place de l'appareil. Retirer les copaux susceptibles de gêner le fonctionnement des composants électriques.
- Les meubles non fixés doivent être fixés au mur au moyen d'une équerre usuelle du commerce.
- Encastrer l'appareil à une hauteur qui permette de retirer sans problème les accessoires.
- Exigences en matière de dimensions et d'armoire
- Pour enlever l’emballage
- Connexion au réseau domestique (LAN)
- Raccordement de l’eau
- L'électroménager est anti-refoulement (testée par VDE). Les robinets de raccordement avec clapets antirefoulement ne sont pas nécessaires. Respectez les règlements du service public d'eau.
- Si la dureté de l'eau dépasse 7 dH, installez un système de détartrage approprié devant l'appareil.
- Pression d'eau nominale maximale : 1 MPa (10 bar)
- Branchez l'appareil uniquement à un raccordement d'eau froide :
- Raccord d'évacuation
- Installation de l’appareil
- Remarque :
- AVIS
- Fixation à l'armoire
- 1. Enfoncez complètement l'appareil dans le bloc cuisine. Faites passer le câble de raccordement et les tuyaux d'alimentation et de drain du four mixte jusqu'aux points de raccordement situés à l'arrière gauche de l'appareil de cuisine.
- 2. Alignez l'appareil au centre.
- 3. Utilisez un niveau à bulle pour positionner l'appareil de façon précise à l'horizontale.
- 4. Fixez l'appareil à l'aide de la vis fournie. Retirez le verrou de transport de la porte.
- Ajustement de la porte
- La porte de l'appareil peut être légèrement ajustée pour obtenir un alignement exact.
- Pour ce faire, extraire légèrement l'appareil de la niche d'encastrement. Une ouverture ovale se trouve sur le côté charnière du dessus de l'appareil. Retirez le capuchon de protection. Desserrez légèrement les vis (Inbus 5 mm), mais ne pas le...
- Ajustez la porte sur les vis latérales (Torx 20); il peut être nécessaire d'ouvrir et de refermer la porte.
- Vérifiez l'alignement puis resserrez les deux vis (Inbus 5 mm). Replacez le capuchon de protection.
- Remarques
- Connexion à trois fils
- 1. Branchez le fil rouge du four au fil d'alimentation électrique rouge (fil chaud).
- 2. Branchez le fil noir du four au fil d'alimentation électrique noir (fil chaud).
- 3. Branchez le fil de mise à la terre jaune/vert du four au fil de mise à la terre de l'alimentation électrique.
- Fixez le câble flexible au boîtier de raccordement.
- Pour faciliter l'entretien et la réparation, le conduit flexible ne doit pas être raccourci et doit être acheminé de façon à permettre la dépose temporaire du four.
- Des moyens de déconnexion doivent être incorporés dans le câblage fixe conformément aux règles de câblage.
- Association avec un four
- Poser d'abord le four à vapeur, puis le four classique.
- Pour une profondeur d'encastrement de 550 mm, positionner les tuyaux souples d'eau et le cordon d'alimentation électrique dans la zone où le boîtier est évidé.
- L'arrière des fours BO 4.. comporte un coin coupé. Faire entrer les tuyaux souples d'alimentation et d'évacuation du four à vapeur du côté arrière gauche dans le meuble et les faire descendre jusqu'aux points de branchement.
- Si les tuyaux souples ne passent pas par le coin arrière gauche du meuble, il faut, au moment de poser l'appareil au-dessus d'un four, avancer le corps du meuble d'au moins. 35 mm et installer un panneau latéral ou un cache.
- Combinaison avec un tiroir chauffant de largeur 24 po (60 cm)
- Combinaison avec un tiroir chauffant de largeur 30" (76 cm)
- Vérification de l'installation
- Dépose
- 4Service après-vente
- Service après-vente
- Si votre appareil doit être réparé, notre service après- vente est à votre disposition. Nous trouvons toujours une solution adaptée, y compris pour éviter les visites inutiles de techniciens.
- Lors de votre appel, indiquez le numéro du produit (n° E) et le numéro de série (n° FD) afin que nous puissions vous donner une réponse précise. La plaquette d'identification comportant ces numéros se trouve sur le dessous de l'appareil. Pour...
- N° E
- N° FD
- N'oubliez pas qu'en cas de fausse manœuvre, la visite d'un technicien d'après-vente n'est pas gratuite, même pendant la garantie.
- Vous trouverez les données de contact pour tous les pays dans l'annuaire ci-joint du service après-vente.
- Demande de réparation et conseils en cas de dysfonctionnement
- Índice
- Instrucciones de instalación
- INSTRUCCIONES DE SEGURIDAD IMPORTANTES 29
- Antes de empezar 32
- Preparar los muebles empotrables 32
- Dimensiones y requisitos del gabinete 33
- Quitar el embalaje 35
- Conexión a la red de internet doméstica (LAN) 35
- Toma de agua 35
- Conexión de aguas residuales 35
- Montaje del electrodoméstico 36
- 4Servicio de Atención al Cliente 40
- 9 Definiciones de seguridad
- INSTRUCCIONES DE SEGURIDAD IMPORTANTES
- LEA Y CONSERVE ESTAS INSTRUCCIONES
- 9 ADVERTENCIA
- 9 ADVERTENCIA
- Seguridad de manejo del electrodoméstico
- Códigos y normas de seguridad
- Seguridad eléctrica
- 9 ADVERTENCIA
- Si el Código Nacional Eléctrico (o el Código Eléctrico Canadiense) así lo requiere, este electrodoméstico debe instalarse en un circuito derivado por separado.
- El instalador debe mostrar al propietario la ubicación del disyuntor o el fusible. Márquela para recordarla más fácilmente.
- Instalador: deje estas instrucciones con el electrodoméstico cuando haya finalizado la instalación.
- Importante: Conserve estas instrucciones para uso del inspector de electricidad local.
- Antes de realizar la instalación, apague la alimentación eléctrica en el panel de servicio. Trabe el panel de servicio para impedir que se encienda accidentalmente la alimentación eléctrica.
- Para obtener más información, consulte la placa de datos. Para conocer la ubicación de la placa de datos, sonsulte la sección "Placa de datos" debajo de "Servicio tecnico".
- Asegúrese de que el electrodoméstico sea correctamente instalado y conectado a tierra por un técnico calificado. La instalación, las conexiones eléctricas y la conexión a tierra deben cumplir con todos los códigos correspondientes.
- 9 ADVERTENCIA
- Seguridad de los equipos relacionados
- Retire toda la cinta y el embalaje antes de usar el electrodoméstico. Destruya el embalaje después de desembalar el electrodoméstico. Nunca deje que los niños jueguen con el material de embalaje.
- Nunca modifique ni altere la construcción del electrodoméstico. Por ejemplo, no retire las patas niveladoras, paneles, cubiertas para cables ni soportes/ tornillos antivuelco.
- Antes de encender el electrodoméstico, retirar cualquier material de embalaje o lámina adhesiva del compartimento de cocción y de la puerta.
- Advertencia en virtud de la Proposición 65:
- Transporte
- Antes de empezar
- Antes de empezar
- Herramientas y piezas necesarias
- Piezas incluidas
- Requisitos de electricidad
- Notas para la planificación
- Bisagra de la puerta no intercambiable.
- Distancia desde el cuerpo de los muebles hasta el frente de la puerta: 1.85” (47 mm).
- Poner atención a la protuberancia del frente, eventualmente incluyendo el asa de la puerta, para abrir los cajones laterales.
- Al planificar una solución en ángulo, poner atención a que el ángulo de apertura de la puerta sea al menos de 90 °.
- No se podrán integrar otros aparatos eléctricos en el gabinete encima de este aparato.
- No instalar la versión del aparato con el panel de control en la parte inferior sobre un lavavajillas. El vapor ascendente desde el lavavajillas puede dañar el sistema electrónico del aparato.
- Preparar los muebles empotrables
- Preparar los muebles empotrables
- Los muebles empotrados deben poder resistir una temperatura de hasta 195°F (90°C), y la parte frontal de los muebles adyacentes de hasta 160°F (70°C).
- La caja de conexión debe estar situada fuera del agujero para el montaje empotrado.
- Realizar los trabajos de corte en el mueble antes de colocar el aparato. Retirar las virutas, ya que el funcionamiento de los componentes eléctricos puede verse afectado.
- Fijar los muebles a la pared con una escuadra estándar.
- No montar el aparato demasiado alto a fin de poder retirar los accesorios sin problemas.
- Dimensiones y requisitos del gabinete
- Quitar el embalaje
- Conexión a la red de internet doméstica (LAN)
- Toma de agua
- El aparato está fabricado a prueba de flujos de retorno (probado por VDE). No se necesitan válvulas de conexión con inhibidores del flujo de retorno. Cumplir las regulaciones de la utilidad de agua local.
- Instalar un sistema de descalcificación adecuado en la parte anterior del aparato si la dureza del agua supera los 7 dH.
- Presión de agua máxima nominal: 1 MPa (10 bar)
- Conectar el aparato solamente a una toma de agua fría:
- Conexión de aguas residuales
- Montaje del electrodoméstico
- Nota:
- AVISO
- Monte el electrodoméstico en el gabinete
- 1. Empujar el aparato completamente dentro del mueble de la cocina. Guiar el cable de conexión y las mangueras de agua de entrada y salida del horno combinado de vapor a los puntos de conexión en la parte posterior izquierda del mueble de la cocina.
- 2. Alinear el aparato en el centro.
- 3. Utilizar un nivel de burbuja para nivelar el aparato de forma completamente horizontal.
- 4. Asegurar el aparato con el tornillo suministrado. Quitar el bloqueo de transporte de la puerta.
- Ajustar la puerta
- La puerta del electrodoméstico se puede ajustar para alinearla de forma exacta.
- Para ello, extraer el electrodoméstico ligeramente del hueco de encastre. En la parte superior del electrodoméstico, en el lado de las bisagras, se encuentra una abertura ovalada. Retirar la tapa. Aflojar los dos tornillos (Allen 5 mm) sin llegar a...
- Alinear la puerta mediante los tornillos laterales (Torx 20); para ello, puede ser necesario abrir y volver a cerrar la puerta.
- Comprobar la alineación y apretar los dos tornillos (Allen 5 mm). Volver a colocar la tapa.
- Notas
- Conexión a tres cables
- 1. Conecte el cable rojo del horno al cable rojo del suministro eléctrico (cable con corriente).
- 2. Conecte el cable negro del horno al cable negro del suministro eléctrico (cable con corriente).
- 3. Conecte el cable de conexión a tierra amarillo/verde del horno al cable de conexión a tierra desnudo del suministro eléctrico.
- Conecte el conducto flexible a la caja de empalme.
- Para facilitar las condiciones que permitan realizar un buen servicio técnico, el conducto flexible no debe acortarse y debe enrutarse de manera que permita retirar temporalmente el horno.
- Se deben incorporar medios de desconexión en el cableado fijo de acuerdo con la normativa de cableado.
- Combinación con horno
- Instale primero el horno de vapor y a continuación el horno.
- Coloque las mangueras de agua y el cable de conexión en el área del hueco para el gabinete del equipo, tomando en cuenta una profundidad de empotrado de 21 5/8" (550 mm).
- La parte posterior de los hornos BO 4. tiene una esquina biselada. Coloque las mangueras de alimentación de agua y de drenaje del horno de vapor por detrás a la izquierda en el armario para empotrar.
- Si las mangueras no se pueden colocar en la esquina por detrás a la izquierda en el mueble de empotrado, al instalar el equipo sobre un horno se tiene que mover el cuerpo del armario por lo menos 1 \" (35 mm) hacia adelante, y se debe instalar una c...
- Combinación con cajón calentador (anchura 24")
- Combinación con cajón calentador (anchura 30")
- Pruebe la instalación
- Desmontaje
- 4Servicio de Atención al Cliente
- Servicio de Atención al Cliente
- Si su aparato necesita una reparación, nuestro servicio de atención al cliente estará encantado de ayudarle. Siempre encontramos la solución adecuada, incluso para evitar visitas innecesarias de los técnicos.
- Cuando llame por teléfono, indique la referencia del producto (Nº E) y el número de fabricación (Nº FD) para que podamos ofrecerle un servicio cualificado. La placa de identificación con los números correspondientes los encontrará en la parte...
- Nº E.
- Nº FD.
- Tenga en cuenta que la visita del técnico del servicio de atención al cliente no es gratuito en caso de que el mal funcionamiento sea debido a un manejo incorrecto del aparato.
- Las señas de las delegaciones internacionales figuran en la lista adjunta de centros y delegaciones del Servicio de Asistencia Técnica Oficial.
- Solicitud de reparación y asesoramiento en caso de averías
- Instrucciones de instalación

9
Preparing Kitchen Units en-us
Removing Packaging
NOTICE
To prevent damage to your floor keep the unit in its
packaging base until ready to be placed in the cabinet
opening. Do not slide the unit across the flooring.
Different models use different packaging materials.
Actual brackets may look differently. Bracket remains in
packaging base.
1. Cut straps on outside of box.
2. Remove cardboard box.
3. Remove all top and side cardboard and Styrofoam
braces.
4. Place oven in front of cabinets where it is to be
installed.
Connection to the home network (LAN)
This appliance is network-compatible and can be
connected to the home network using a LAN cable (LAN
cable not included). Before installation, plug the LAN
cable into the socket on the rear of the appliance and
secure it using the strain relief. Connect the LAN cable
to a network socket.
Water connection
The appliance is backflow-proof (VDE tested).
Connection valves with backflow preventers are not
required. Follow the regulations of the local water utility.
Install a suitable descaling system in front of the
appliance if the water hardness exceeds 7 dH.
Maximum rated water pressure: 1 MPa (10 bar)
Only connect the appliance to a cold-water
connection:
▯ Connection ¾" (26.4 mm)
▯ Maximum inlet water pressure: 1 MPa (10 bar)
▯ Minimum inlet water pressure: 0.2 MPa (2 bar)
▯ Min. 2.6 gal (10 liters)/minute
Note: The water connection for the supply hose must
always be accessible (not directly behind the appliance).
Waste water connection
Provide for an odor trap on the drain connection. The
connection on the odor trap must always be accessible
(not directly behind the appliance).
Important notes on the drain hose
▯ Do not fit the drain hose at any point higher than the
bottom edge of the appliance
▯ Drain: at least ø1½" (38 mm) inner diameter
▯ Drain connection: at least 4" (100 mm) lower than the
appliance drain
▯ Do not kink the drain hose
▯ Do not shorten the included drain hose
▯ Drain hose: no more than 5.5 yards (5 m) long