
Installation Instruction


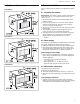


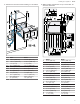

Table Of Contents
- Combi steam oven
- en-us
- fr-ca
- 1 IMPORTANTES CONSIGNES DE SÉCURITÉ
- 2 Avant de commencer
- 3 Retirer l'emballage
- 4 Exigences d'installation
- 5 Dimensions de l’électroménager
- 6 Avant l'installation
- 7 Raccordement électrique
- 8 Installation de l'appareil
- 9 Opération d’essai
- 10 Retirer de l'appareil
- 11 Service à la clientèle
- es-mx

en-us Before you begin
4
Before you begin
2 Before you begin
Before you begin
Read these instructions before you begin to install your
appliance.
2.1 Parts included
After unpacking all the parts, check for any damage in
transit and for completeness of delivery.
¡ Combi steam oven
¡ Star head screw (1)
2.2 Tools and parts needed
Prepare these tools and accessories before you start to in-
stall your appliance.
¡ Pencil
¡ Measuring tape
¡ Cross head screwdriver
¡ Drill with bit 1/8"
2.3 Power requirements and grounding
The outlet must be properly grounded in accordance with
all applicable codes.
Removing the packaging
3 Removing the packaging
Removing the packaging
NOTICE:
To prevent damage to your floor keep the unit in its pack-
aging base until ready to be placed in the cabinet opening.
Do not slide the unit across the flooring.
1. Cut the straps on the outside of the box.
2. Remove the cardboard box.
3. Remove all top and side cardboard and Styrofoam
braces.
4. Place the oven in front of the cabinet where it is to be
installed.
Note:The packaging brackets remain in the packaging
base.
Installation requirements
4 Installation requirements
Installation requirements
Read these instructions to prepare the installation space
for your appliance.
4.1 Appliance weight
The cabinet base must support the weight of your oven as
stated in this table.
Oven type Weight
24" steam ovens 102lbs
(46kg)
30" steam ovens 115lbs
(52kg)
4.2 Planning notes
Observe the following planning notes before installing the
appliance.
¡ The door hinge side cannot be changed.
¡ The distance from the cabinet front edge to the door
panel front is 1⅞" (47mm).
¡ Pay attention to the front protrusion for the opening of
drawers next to the appliance.
¡ Do not install the appliance version with the control
panel on the bottom above a dishwasher. Steam rising
from the dishwasher may damage the appliance elec-
tronics.
¡ Do not install any other electrical appliance in the cabi-
net above this steam oven.
¡ When planning a corner solution, consider a door open-
ing angle of at least 90°.
WARNING
Overheating of the appliance may cause a fire.
▶ Do not install the appliance behind a decorative door or
the door of a kitchen cabinet.
4.3 Position of connections
Here, you can find the position of the connections on the
appliance.
BS470 / BS471 / BS474 / BS475
BS484 / BS485