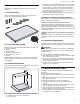
Gaggenau en-us Installation Instructions fr-ca Instructions d’installation 2 12 CI282602, CI292602 Cooktop Surface de cuisson
Table of contents 1 IMPORTANT SAFETY INSTRUCTIONS..................... 3 1.1 Safety definitions........................................................ 3 1.2 General information.................................................... 3 1.3 General safety instructions......................................... 3 1.4 Appliance handling safety .......................................... 4 1.5 Safety codes and standards....................................... 4 1.6 Electrical safety.....................................
en-us IMPORTANT SAFETY INSTRUCTIONS READ AND SAVE THESE INSTRUCTIONS Read all instructions carefully before use. These precautions will reduce the risk of electrical shock, fire and injury to persons. When using kitchen appliances, basic safety precautions must be followed including those in the following pages. 1.1 Safety definitions Here you can find explanations of the safety signal words used in this manual.
en-us IMPORTANT SAFETY INSTRUCTIONS READ AND SAVE THESE INSTRUCTIONS 1.4 Appliance handling safety WARNING Hidden surfaces may have sharp edges. ▶ Use caution when reaching behind or under appliance. 1.5 Safety codes and standards This appliance complies with the latest version of one or more of the following standards: ¡ UL 858 - Household Electric Ranges ¡ CAN/CSA-E60335-2-6, The Standard for the Safety of Household and similar electrical appliances.
Before you begin 2 Before you begin Before you begin Read these instructions before you begin to install your appliance. Before you begin 2.1 Parts included After unpacking all the parts, check for any damage in transit and for completeness of delivery. en-us ¡ This distance can be reduced to A=24" (610 mm) when the bottom of the wood or metal cabinet is protected by not less than ¼" (6.35 mm) flame-retardant millboard covered with not less than no. 28 gauge sheet metal, 0.015" (0.
en-us Prepare installation space ¡ If the thickness of the countertop into which the cooktop is installed does not comply with the specifications, reinforce the worktop using a fire- and water-resistant material until it reaches the minimum thickness. Otherwise, sufficient stability cannot be assured. ¡ The countertop into which the cooktop is installed should withstand loads of approx. 133 lbs (60 kg). ¡ Confirm the cooktop is level only after it has been installed. 3.
Prepare installation space en-us Notes ¡ A minimum clearance between the rear of the cabinet and the kitchen wall, and between the surface of the countertop and the upper area of the drawer. ¡ An opening at the top to the rear of the cabinet. ¡ If the minimum clearance of 13/16" (20 mm) is not provided at the rear of the cabinet, you must create an opening on the underside. 3.4 Cabinet ventilation requirements To assure that the appliance works correctly, the cooktop MUST be sufficiently ventilated.
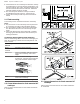
en-us Installation procedure ¡ If the inside of the cabinet is no wider than 29 ½" (750 mm), make cutouts in the side panels. ▶ For shipping, the heat shield is screwed to the bottom of the cooktop. Unscrew the fastening screw on heat shield. min. 3¾" (95) ¡ If the appliance is installed in an island unit or another installation that is not described here, you must ensure that the cooktop is sufficiently ventilated. a The heat shield will be able to rotate freely.
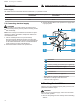
Electrical connection 4.3 Securing the cooktop to the countertop en-us 7. Only for flush mount installation: ‒ The cooktop must be secured from below using the holddown brackets provided, so it does not slip. 1. Place the cooktop face down on a soft underground. 2. Attach the hold-down brackets to the underside of the cooktop with the provided short screws . Do not tighten the screws. ‒ ‒ ‒ Carry out the installation test before carrying out this step.
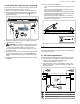
en-us Checking the installation junction box flexible conduit approx. 3 ft. (900 mm) Power supply All models must be connected with the included 39" (1 m) flexible conduit. Models CI 482 602 CI 492 602 240 V AC, 3-wire, 60 Hz system: circuit breaker 30 A 50 A 5.2 Connecting electrical supply 208 V AC, 3-wire, 60 Hz system: circuit breaker 30 A 50 A 3. Connect the lead wires to the junction box supply wires in proper phase. WARNING Before installing, turn power OFF at the service panel.
Removing the appliance en-us 2. Clean the cooktop surface with cooktop cleaning cream. 3. Switch on the circuit breaker. 4. Verify that all cooking zones function properly. 7 Removing the appliance Removing the appliance 1. Disconnect the appliance from the power supply. 2. For flush-mounted appliances, remove the silicone joint. 3. NOTICE: Do not lever the appliance out from above at Removing the appliance the frame. Push out the appliance from below.
fr-ca Table des matières 1 IMPORTANTES CONSIGNES DE SÉCURITÉ ......... 13 1.1 Définitions des termes de sécurité ........................... 13 1.2 Indications générales ............................................... 13 1.3 Consignes générales de sécurité ............................. 13 1.4 Manipulation sécuritaire des appareils ..................... 14 1.5 Codes et normes de sécurité ................................... 14 1.6 Sécurité électrique ................................................... 14 1.
fr-ca IMPORTANTES CONSIGNES DE SÉCURITÉ LIRE ET CONSERVER CES INSTRUCTIONS Lisez toutes les instructions attentivement avant l’utilisation. Ces précautions réduiront le risque d’électrocution, d’incendie et de blessure pour les personnes utilisant l’appareil. Lorsque vous utilisez des appareils électroménagers, il importe de suivre les précautions de sécurité de base, y compris celles indiquées dans les pages suivantes. 1.
fr-ca IMPORTANTES CONSIGNES DE SÉCURITÉ LIRE ET CONSERVER CES INSTRUCTIONS AVERTISSEMENT Retirer tout le ruban adhésif et l'emballage avant d'utiliser l'électroménager. ▶ Jetez l'emballage après avoir déballé l'électroménager. ▶ Éliminez l'emballage d'une manière respectueuse de l'environnement. ▶ Ne laissez jamais les enfants jouer avec le matériel d’emballage. 1.4 Manipulation sécuritaire des appareils AVERTISSEMENT Certaines surfaces cachées peuvent avoir des rebords tranchants.
Avant de commencer 2 Avant de commencer Avant de commencer Lisez ces instructions avant de commencer l'installation de votre appareil. Avant de commencer 2.1 Pièces incluses Après avoir déballé le produit, inspectez toutes les pièces pour détecter d’éventuels dégâts dus au transport et pour vous assurer de l'intégralité de la livraison. fr-ca ¡ La distance entre le haut de la table de cuisson et le bas des armoires ci-dessus doit être d'au moins A = 30 po (762 mm).
fr-ca Préparation préalable au montage ¡ Le comptoir qui accueillera la table de cuisson doit résister à des températures allant jusqu'à 90 °C (140° F). ¡ Le comptoir dans lequel la table de cuisson est installée doit avoir au moins ¹³/₁₆ po (20 mm) d'épaisseur. ¡ Si l'épaisseur du comptoir qui accueillera la table de cuisson ne respecte pas les spécifications, renforcez-le à l'aide d'un matériau résistant à l'eau et au feu jusqu'à atteindre l'épaisseur minimale.
Préparation préalable au montage fr-ca Remarques ¡ Un dégagement minimum entre l'arrière de l'armoire et le mur de la cuisine, et entre la surface du comptoir et la partie supérieure du tiroir. ¡ Une ouverture en haut à l'arrière de l'armoire. ¡ Si le dégagement minimum de 13/16 po (20 mm) est absent à l’arrière de l’armoire, vous devez pratiquer une ouverture sur le dessous. 3.
fr-ca Procédure d’installation ¡ Si l'intérieur de l'armoire n'est pas plus large que 750 mm (29 1/2 po), pratiquez des découpes dans les panneaux latéraux. ▶ Pour le transport, l'écran thermique est vissé au bas de la table de cuisson. Dévissez la vis de fixation de l'écran thermique. min.
Raccordement électrique 4.3 Fixation de la table de cuisson au comptoir fr-ca 7. Uniquement pour une installation encastrée : ‒ ‒ La table de cuisson doit être fixée par le bas à l'aide des supports de fixation fournis pour qu'elle ne glisse pas. 1. Placez la table de cuisson face vers le bas sur un soussol mou. 2. Fixez les supports de fixation au dessous de la table de cuisson à l'aide des vis courtes fournies . Ne serrez pas les vis.
fr-ca Raccordement électrique min. 1 po (25 mm) d'un tronçon d'air libre environ 12 po (300 mm) boîte de jonction conduit flexible env. 3 ft. (900 mm) Alimentation Tous les modèles doivent être connectés avec le conduit flexible de 39 po (1 m) inclus. Modèles CI 482 602 CI 492 602 240 V CA, 3 fils, système 60 Hz : disjoncteur 30 A 50 A 5.2 Connexion de l'alimentation électrique 208 V CA, 3 fils, système 60 Hz : disjoncteur 30 A 50 A 3.
Inspecter l’installation 6 Inspecter l’installation Inspecter l’installation Vérifiez si votre appareil fonctionne correctement après avoir terminé les étapes d'installation. Inspecter l’installation AVERTISSEMENT Avant de mettre sous tension la source d'alimentation, vérifiez que toutes les commandes sont à la position OFF (Arrêt). 1.
(011109) en-us, fr-ca 9001444983 *9001444983* BSH Home Appliances Corporation 1901 Main Street, Suite 600 Irvine, CA 92614 USA www.gaggenau.