
Instructions for Use
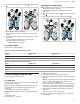


Table Of Contents
- Dishwasher
- en-us
- Table of contents
- 1 IMPORTANT SAFETY INSTRUCTIONS
- 2 Preventing material damage
- 3 Childproof lock
- 4 Environmental protection and energy-saving
- 5 Familiarizing yourself with your appliance
- 6 Dishwasher Cycles
- 7 Options
- 8 Features
- 9 Before using for the first time
- 10 Water softening system
- 11 Rinse aid system
- 12 Detergent
- 13 Dishware
- 14 Basic Operation
- 14.1 Protection against unintentional operation
- 14.2 Opening the appliance door
- 14.3 Switching on the appliance
- 14.4 Setting a cycle
- 14.5 Setting options
- 14.6 Setting the electronic delay time
- 14.7 Starting the wash cycle
- 14.8 Interrupting the wash cycle
- 14.9 Terminating the wash cycle
- 14.10 Displaying wash cycle information
- 14.11 Switching off the appliance
- 15 Basic settings
- 16 Home Connect™
- 17 Cleaning and maintenance
- 18 Troubleshooting
- 19 Transportation, storage and disposal
- 20 Customer service
- 21 Technical specifications
- 22 Statement of Limited Product Warranty

Before using for the first time en-us
21
4. Turn the rotating fixing arm clockwise and push down
.
a The fixing arm clicks into position.
a The stemware is securely positioned in the stemware
basket.
5. Lift the stemware basket by the handle and place in the
lower rack.
To stop the stemware falling out, make sure the
stemware basket cannot tip over.
→
"Loading dishware", Page25
Unloading the stemware basket
Note:Observe the information on how to unload dishware.
→
"Removing dishware", Page26
1. Take the stemware basket by the handle out of the
lower rack.
2. Pull up the rotating fixing arms and turn counterclock-
wise .
3. Take the stemware out of the stemware basket .
8.10 Rack heights
Set the racks at the right height.
Appliance height 34" with silverware basket
Level Upper rack Lower rack
1 max. ø 9.5" 13"
2 max. ø 10.5" 12"
3 max. ø 11.5" 11"
Appliance height 34" with silverware drawer
Level Upper rack Lower rack
1 max. ø 7" 13"
2 max. ø 8" 12"
3 max. ø 9" 11"
Before using for the first time
9 Before using for the first time
Before using for the first time
Apply the settings for the first use.
9.1 Initial use
Before the first use, or after a factory reset, you will need
to configure the settings.
Tip:Connect your appliance to a mobile device. You can
conveniently change all settings using the HomeCon-
nect™ app.
→
"HomeConnect™ quick start", Page30
Requirement:The appliance has been installed and con-
nected.
1. Add special salt.
2.
Add rinse aid. →
Page23
3. Switch on the appliance.
a The display shows the settings for initial use.
4. Press repeatedly until the display shows the required
setting.
Note:If you select HomeConnect™ with the setting Ini-
tial use , make further settings using the HomeCon-
nect™ app on your mobile device.
You can change the settings for initial use and other Ba-
sic settings →
Page29
on the appliance at any time or
using the HomeConnect™ app on your mobile device.
5. Press or repeatedly until the display shows the
right value.
You can change one or more settings.
6. To save the settings, press for approx. 3seconds.
7. Add detergent.