
Installation Instructions
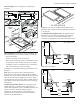
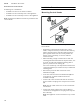
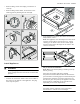
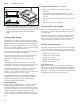
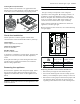
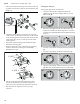

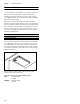
Table Of Contents
- VG 415 211 CA
- Table of Contents
- Installation instructions
- Additional information on products, accessories, replacement parts and services can be found at www.gaggenau.com and in the online shop www.gaggenau.com/zz/store
- IMPORTANT SAFETY INSTRUCTIONS
- READ AND SAVE THESE INSTRUCTIONS
- important: the appliance MUst be installed by a qualified installer.
- INSTALLER: LEAVE THESE INSTRUCTIONS WITH THE APPLIANCE AFTER INSTALLATION IS COMPLETE. IMPORTANT: SAVE FOR THE LOCAL INSPECTOR’S USE.
- Improper installation is not covered by the warranty.
- This appliance complies with one or more of the following Standards:
- It is the responsibility of the owner and the installer to determine if additional requirements and/or standards apply to specific installations.
- Installation must conform with local codes or, in the absence of local codes, with the National Fuel Gas Code, ANSI Z223.1/NFPA 54 or, in Canada, the Natural Gas and Propane Installation Code, CSA B149.1.
- The appliance must be electrically grounded in accordance with local codes or, in the absence of local codes, with the National Electrical Code, NFPA 70 latest edition or, in Canada, the Canadian Electric Code, CSA C22.1-02.
- For appliances equipped with a cord and plug, do not cut or remove the ground prong. It must be plugged into a matching grounding type receptacle to avoid electrical shock. If there is any doubt as to whether the wall receptacle is properly grounded,...
- Do not use an extension cord.
- Do not use an adapter.
- If required by the National Electrical Code (or Canadian Electrical Code), this appliance must be installed on a separate branch circuit.
- The circuit breaker should have a contact separation of at least 3 mm on all poles.
- Be sure your appliance is properly installed and grounded by a qualified technician. Installation, electrical connections and grounding must comply with all applicable codes.
- Before installing, turn power OFF at the service panel. Lock service panel to prevent power from being turned ON accidentally.
- Installer – show the owner the location of the circuit breaker or fuse. Mark it for easy reference.
- Install a gas shutoff valve near the appliance. It must be easily accessible in an emergency.
- Leak testing must be conducted by the installer according to the instructions in this manual.
- The appliance and its individual shutoff valve must be disconnected from the gas supply piping system during any pressure testing at pressures in excess of ½ psi (3.5 kPa).
- The appliance must be isolated from the gas supply piping system by closing its individual manual shutoff valve during any pressure testing of the gas supply piping system at test pressures equal to or less than ½ psi (3.5 kPa).
- The minimum supply pressure must be 1" water column above the manifold pressure printed on the rating label. The maximum supply pressure must not exceed 14.0 inches water column (34.9 Millibars).
- A metal flex line or fixed metal pipe shall be used to connect gas to the appliance. If a metal gas line cannot be used, consult your local certified electrician or local electric codes for proper grounding.
- IMPORTANT SAFETY NOTICE: Burning gas cooking fuel generates some by- products which are on the list of substances which are known by the State of California to cause cancer or reproductive harm. To minimize exposure to these substances, always operat...
- This product may contain a chemical known to the State of California, which can cause cancer or reproductive harm. Therefore, the packaging of your product may bear the following label as required by California:
- The propane gas tank must be equipped with its own high pressure regulator. In addition, the regulator supplied with this unit must also be used.
- The appliance is shipped from the factory for use with natural gas. It must be converted for use with propane. A qualified technician or installer must do the conversion.
- This appliance has been certified for safe operation up to a height of 10,000 ft without any modifications. Exception: For use with propane the appliance must be converted per the LP conversion instructions.
- Installer - show the owner where the gas shut-off valve is located.
- The appliance should only be used if installed by a qualified technician in accordance with these installation instructions. The manufacturer is not responsible for any damage resulting from incorrect installation.
- Remove all tape and packaging before using the appliance. Destroy the packaging after unpacking the appliance. Never allow children to play with packaging material.
- Never modify or alter the construction of the appliance. For example, do not remove leveling legs, panels, wire covers or anti-tip brackets/screws.
- To eliminate the risk of burns or fire by reaching over heated surface units, cabinet storage space located above the surface units should be avoided. If cabinet storage is to be provided, the risk can be reduced by installing a hood that projects ho...
- Verify that cabinets above the cooktop are a maximum of 13" (330 mm) deep.
- When installing a cooktop over a single oven, be sure to follow both the oven’s and cooktop’s installation manuals.
- Ventilation Recommendations
- We strongly recommend the installation of a ventilation hood above this appliance. The hood must be installed according to instructions furnished with the hood.
- Tools and Parts Needed
- Parts Included
- Installation accessories
- Cabinet Requirements
- The minimum spaces that must be maintained when installing the gas cooktop shall be:
- The distance from the top of the cooktop to the bottom of cabinets above can be reduced to 26" when the bottom of the wood or metal cabinet is protected by not less than ¼" (6.35 mm)-thick flame-retardant millboard covered with not less than No. 28 ...
- Countertop Requirements
- 9 WARNING
- The countertop must be level and horizontal. The stability of the countertop must be maintained after the cut-out has been made.
- Solid surface countertops often require special installations. For example, heat-reflective tape and rounded corners may be necessary. Contact the countertop manufacturer for instructions specific to your countertop.
- Technical Data
- 25 VA
- 18,800 BTU/h (5.5 kW)
- 17,000 BTU/h (5.0 kW)
- Prepare Installation Space
- The kitchen unit must be heat-resistant to at least 200° F (90°C). The stability of the unit must be maintained after producing the cut-out.
- Produce the cut-out in the countertop for one or more Vario appliances as shown in the installation sketch. The angle between the cut surface and the countertop must be 90°.
- The cut edges at the sides must be flat to ensure a good fit of the retaining springs on the appliance. In laminated worktops, it may be necessary to fit strips at the sides of the cut-out.
- Remove shavings after cutting. Seal cut surfaces for resistance to heat and so they are watertight.
- Pay attention to a minimum gap of 3/8“ (10 mm) from the underside of the appliance to kitchen units.
- Use suitable base constructions to ensure load-carrying capacity and stability, especially in the case of thin countertops. Pay attention to the weight of the appliance, including any payload. Reinforcement material used must be resistant to heat and...
- Cutting out countertop
- Flush mounting: Flush mounting into a countertop is possible.
- Installation in countertops made of particleboard is not possible.
- Combining several Vario devices: The connecting strip VA 420 000/010 is required for the combination of several Vario appliances. This is available separately as a special accessory. Consider additional space requirement for the connecting strip betw...
- Appliances can also be installed in individual cut-outs, bearing in mind a minimum distance between the devices of 2" (51 mm).
- In combination with appliance cover: The appliance cover VA 440 010 can be ordered separately as an optional accessory. Take into account the additional space required for the appliance cover when making the cutout.
- Flush mount installation:
- Mounting Control Knobs
- Note:
- 2. When installing a single control knob or when the retaining plate has been broken at the perforation, use 2 screws to hold each individual retaining plate in place to prevent it from rotating (C).
- 3. Remove the protective film on the back of the illuminated ring (A).
- 4. Insert the control knob into the drilled hole (B) and screw the nut on the back with the enclosed installation aid (D).
- 5. Connect all of the control knobs with the enclosed shorter cables. The plugs must snap into the sockets (E).
- 6. Connect the longer cable to the control cable for connection to the appliance. The plug must snap into the socket (F).
- 7. After installing, check that all plug connections fit correctly.
- 8. After installing all the cables, secure them to the retaining plate by bending the tab down (E).
- Install Appliance
- 9 WARNING
- 2. Insert appliance evenly into the cutout. Push it down firmly into the cutout.
- 3. Only for flush mount installation:
- 4. Connect the appliance to the mains and check that it works correctly. If the appliance is turned off, air may be present in the gas line. Turn control knob to 0 and reignite. Repeat the process until the appliance ignites.
- Connect Gas Supply
- The appliance is shipped from the factory for use with natural gas. It must be converted for use with propane. A qualified technician or installer must do the conversion.
- Before connecting the appliance, please check whether the local connection conditions such as gas type and gas pressure match the appliance settings.
- Make sure the gas supply is turned off at the manual shut- off valve before connecting the appliance.
- The gas connection must be in a location that permits access to the manual shut-off valve and which, if applicable, is visible after opening the door of the cabinet.
- The flexible gas line must not come into contact with moving parts of the fitted unit (e.g. drawers) or be laid in areas where it could become trapped or damaged.
- The flexible gas line must not come into contact with a cooktop, oven, dishwasher, refrigerator, washing machine, hot water pipe, radiator or any other appliance installed in the vicinity of the gas cooktop.
- The flexible gas line must not be subject to rubbing, vibrations, kinking or any other kind of deformation. It should be checked along its entire length with the cooktop in the installation position.
- SERVICER INFO ONLY Connect the gas supply using the ½" U.S.A. elbow and the fiber gasket supplied with the unit. The shorter, nontapered thread fits into the threaded nut on the hob. The longer, tapered U.S.A. thread is for the incoming gas supply. ...
- Connect Electrical Supply
- Before connecting supply cord to wall receptacle, make certain that gas shutoff valve and all burner controls are in OFF position.
- Electrical connection (AC 110-127 V) is established by means of a connecting cord with a grounding contact plug connected to a grounded socket, which must also be accessible after installation of the gas cooktop.
- Burner Cap Placement
- The burner parts must be properly placed for the cooktop to function properly. If the burner parts are not properly placed, one or more of the following problems may occur:
- Placing Burner Parts After electrical connection is complete, assemble the burner parts correctly and evenly. When assembling the burner parts, make sure that the burner head is placed on the base in such a way that the prongs of the burner cap fit s...
- Checking Burner Cap Placement Check to make sure that there is no gap between the burner parts. You may gently try to move the burner parts from side to side to check if they are properly placed.
- Check the Installation
- Check operation of electric igniters. Check flame characteristics. Flame should be blue with no yellow tip.
- Yellow Flames: Further adjustment is required.
- Yellow Tips on Outer Cones: Normal for LPG Gas.
- Soft Blue Flames: Normal for Natural Gas.
- If the flame is completely or mostly yellow, verify that the regulator is set for the correct fuel. After adjustment, retest.
- Some yellow streaking is normal during the initial start- up. Allow unit to operate 4-5 minutes and re-evaluate before making adjustments.
- Removing the appliance
- Disconnect the appliance from the power supply. Close the gas shut-off valve. Remove the silicone joint from appliances installed flush. Push out the appliance from below.
- This gas stovetop corresponds to the categories specified on the rating plate. By changing nozzles, it is possible to convert the appliance to any of the gases listed on the plate. The conversion kit can be obtained from our customer service. With so...
- Only a licensed specialist is authorized to switch the appliance to another gas type.
- Before carrying out the conversion, turn off the electricity and gas supply.
- Replacing the Main Control Nozzles: Wok Burner
- 1. Remove the pan supports and all burner parts.
- 2. Unscrew the fastening nuts from the cooktop (3 nuts – WAF 7), and carefully lift up the cooktop to remove it.
- 3. Remove the securing clips from the burner pipes. Pull out the burner pipes. Unscrew the screw in the air regulating sleeve. Remove the nozzle retaining head.
- 4. Pull off the nozzle and O-ring for the inner burner ring by hand. Unscrew the nozzle for the outer burner ring (WAF 10).
- 5. Check that the O-ring fits correctly in the new main control nozzle for the inner burner ring. Fit the nozzle to the burner pipe. Screw the new main nozzle for the outer burner ring as far as it will go into the nozzle retaining head.
- 6. Attach the nozzle retaining head and burner pipes. Attach the securing clips.
- 7. After loosening the screw, adjust the air regulating sleeve to the correct setting (see nozzle table). Retighten the screw.
- 8. Put the cooktop in place and tighten the screws evenly. Put the burner parts and pan supports in place, and ensure that they are positioned correctly.
- 9. Set the pressure regulator to the correct gas pressure.
- Setting the Gas Type
- 1. Turn the control knob to 0 (A). Disconnect the appliance from the power supply. Wait for at least 30 seconds (B).
- 2. Reconnect the appliance (C). The illuminated ring around the control knob will turn green for a second and then turn yellow (D). Wait until the illuminated ring goes out.
- 3. Turn the control knob counterclockwise to position 12 (E).
- 4. Turn the control knob clockwise to position 1 (F).
- 5. Turn the control knob counterclockwise to position 0 (G). Wait until the illuminated ring turns yellow (H).
- 6. Set the gas type on the control knob (I), the currently selected position will turn green:
- 7. Keep the control knob at the desired setting for at least 5 seconds. The illuminated ring around the control knob will turn green (I).
- 8. To save the setting, it is necessary to exit the menu as follows: Turn the control knob to position 0 (J). Then turn the control knob counterclockwise to position 12 (K).
- Replacing the Main Control Nozzles: Wok Burner
- Checking functions after the conversion: The flames are adjusted correctly if no yellow tips are visible. They must not go out when switching over swiftly from the high to the low setting.
- If your appliance needs repairs, our customer service is there for you. We work hard to help solve problems quickly and without unnecessary service calls, getting your appliance back up and running correctly in the least amount of time possible.
- When you call, please indicate the product number (E-Nr.) and serial number (FD-Nr.) so that we can support you in a qualified manner. You will find the type plate with these numbers on the bottom of the appliance. To avoid having to search for a lon...
- E-Nr.
- FD-Nr.
- Please read the use and care instructions provided with your appliance. Failure to do so may result in an error in using the appliance. This could result in a service call that instead of fixing a mechanical issue is only needed for customer educatio...
- Please find the contact data of all countries in the enclosed customer service list.
- Table des matières
- Notice de montage
- Vous trouverez des informations supplémentaires concernant les produits, accessoires, pièces de rechange et services sur Internet sous : www.gaggenau.com et la boutique en ligne : www.gaggenau.com/zz/store
- CONSIGNES DE SÉCURITÉ IMPORTANTES
- LIRE ET CONSERVER CES INSTRUCTIONS
- important : il faut faire poser l'appareil par un installateur qualifié.
- INSTALLATEUR : LAISSEZ CES INSTRUCTIONS AVEC L'APPAREIL APRÈS UNE FOIS L'INSTALLATION TERMINÉE. IMPORTANT : À CONSERVER POUR L'USAGE DE L'INSPECTEUR LOCAL.
- La garantie ne couvre pas une mauvaise installation.
- Cet appareil est conforme à une ou plusieurs des normes suivantes :
- Il incombe au propriétaire et à l’installateur de déterminer si des exigences et/ou normes additionnelles s’appliquent pour des installations spécifiques.
- L’installation doit être conforme aux codes locaux ou, en l’absence de tels codes, au National Fuel Gas Code ANSI Z223.1/NFPA 54 ou, au Canada, au code national CSA B149.1 d’installation du gaz naturel et du propane.
- L’appareil doit être mise à la terre en conformité aux codes locaux, ou en l’absence de tels codes, à la dernière version du National Electric Code NFPA 70 ou, au Canada, au code canadien de l’électricité CSA C22.1-02.
- Pour les appareils dotés d'un cordon et d'une fiche, ne pas couper ou enlever la broche de mise à la terre. Le cordon doit être branché dans une prise de courant adaptée de type mise à la terre pour éviter tout risque d'électrocution. S'il y ...
- N'utilisez pas de rallonge.
- N'utilisez pas d’adaptateur.
- S'il y a lieu, conformément au Code national de l'électricité (ou au Code canadien de l'électricité), cet appareil doit être installé sur un circuit de dérivation séparé.
- Le disjoncteur doit avoir une séparation de contact de 3 mm. minimum pour tous les pôles.
- S'assurer que l'appareil est installé et mis à la terre par un technicien qualifié. L'installation, les connexions électriques et la mise à la terre doivent être conformes à tous les codes applicables.
- Avant l'installation, mettre l'appareil hors service au panneau de service. Verrouiller le panneau d'entrée d'électricité pour éviter que le courant ne soit accidentellement rétabli.
- Installateur – Indiquer au propriétaire l’emplacement du disjoncteur ou du fusible. Identifier sa position pour pouvoir le retrouver facilement.
- Installer un robinet d'arrêt de gaz à proximité de l'appareil. Celui-ci doit être facilement accessible en cas d'urgence.
- Les essais d'étanchéité doivent être effectués par l'installateur conformément aux instructions du présent manuel.
- L'appareil et le robinet individuel de fermeture à commande manuelle dont il est muni doivent être déconnectés du système de canalisations de gaz lors de tout contrôle de pression où la pression d'essai est supérieure à ½ psi (3,5 kPa).
- L'appareil doit être isolé du système de canalisations de gaz en fermant le robinet individuel de fermeture à commande manuelle dont il est muni pendant tout contrôle de pression du système de canalisations de gaz à des pressions d'essai infé...
- La pression minimale d'alimentation doit être de 1 po CE au-dessus de la pression du distributeur, tel qu'indiqué sur la plaque signalétique. La pression maximale d'alimentation ne pas dépasser 14 po CE (34,9 millibars).
- Une ligne de production métallique souple ou un tuyau métallique fixe doit être utilisé pour raccorder le gaz à l'appareil. Si une conduite de gaz en métal ne peut pas être utilisée, veuillez vous adresser à un électricien agréé local ou ...
- AVIS DE SÉCURITÉ IMPORTANT : l'incinération de combustible gazeux de cuisson peut générer des sous-produits qui figurent sur la liste des substances reconnues par l'État de Californie comme étant cancérigènes ou nuisibles à la reproduction....
- Ce produit pourrait contenir un produit chimique reconnu par l'État de la Californie comme cancérigène ou ayant des effets nocifs sur la reproduction. Par conséquent, l'emballage de votre produit pourrait porter l'étiquette suivante, comme requi...
- La bouteille de gaz propane doit comporter son propre régulateur haute pression. De plus, le régulateur fourni avec cet appareil doit également être utilisé.
- L'appareil est expédié depuis l'usine pour être utilisé avec du gaz naturel. S'il doit être utilisé avec du gaz propane, il doit être converti. Un technicien ou installateur qualifié devra se charger de la conversion.
- Cet appareil a été certifié comme étant conçu pour un fonctionnement sûr à une altitude de 10 000 pieds, sans aucune modification. Exception : si l'appareil doit être utilisé avec du gaz propane, il doit être converti conformément aux inst...
- Installateur - montrez au propriétaire où se trouve le robinet d'arrêt de gaz.
- Utilisez uniquement l’appareil électroménager s’il a été installé par un technicien qualifié conformément aux présentes instructions d’installation. Le fabricant ne peut pas être tenu responsable de tous dommages causés par une instal...
- Enlever le ruban adhésif et l’emballage avant d’utiliser l’appareil. Détruire l’emballage après avoir déballé l’appareil. Ne jamais laisser les enfants jouer avec les matériaux de conditionnement.
- Ne jamais modifier ni altérer la configuration de l'appareil. Par exemple, ne pas retirer les pieds de nivellement, les panneaux, les couvercles de câblage ou les fixations/vis antibasculement.
- Pour éliminer le risque de brûlures ou d’incendie lorsque l’on allonge le bras au- dessus des éléments de surface chauds, éviter d’installer des placards au-dessus des éléments de surface. Si l’installation de placards est prévue, le ...
- Vérifiez que la profondeur des armoires situées au-dessus de la table de cuisson ne dépasse pas 13 po (330 mm).
- Lors de l'installation de la table de cuisson sur un four simple, prendre bien soin de suivre les instructions des manuels d'installation du four et de la table de cuisson.
- Recommandations sur la ventilation
- Il est vivement recommandé d'installer une hotte aspirante au-dessus de cet appareil. La hotte aspirante doit être installée conformément aux instructions qui l'accompagnent.
- Outils et pièces nécessaires
- Pièces comprises
- Accessoires d'installation
- Exigences pour les placards
- Lors de la pose de la table de cuisson à gaz, les distances à respecter sont les suivantes :
- Le dégagement du haut de la table de cuisson au bas des armoires situées au-dessus peut être réduit à 26 po si les armoires en bois ou en métal sont protégées par une planche ignifuge d'une épaisseur d'au moins ¼ po (6,35 mm) couvert par pa...
- Exigences pour le plan de travail
- 9 AVERTISSEMENT
- Le plan de travail doit être de niveau et horizontal. Le plan de travail doit rester stable après la découpe.
- Certains plans de travail à haute résistance requièrent souvent des aménagements spéciaux. Par exemple, une bande thermoréfléchissante et des coins arrondis peuvent être nécessaires. Contacter le fabricant du plan de travail pour obtenir des...
- Caractéristiques techniques
- 25 VA
- 18 800 BTU/h (5,5 kWh)
- 17 000 BTU/h (5,0 kWh)
- Préparation des meubles
- Le meuble où la table de cuisson est encastrée doit résister à la chaleur jusqu'à une température de 200° F (90°C). La stabilité du meuble doit rester garantie après les opérations de découpe.
- Réaliser la découpe dans le plan de travail pour un ou plusieurs appareils Vario, conformément au schéma de pose. Le plan de coupe doit faire un angle de 90° avec le plan de travail.
- Les bords de coupe latéraux doivent être plans afin de garantir la fixation des ressorts de maintien sur l'appareil. Dans le cas de plans de travail multicouches, fixer éventuellement des baguettes sur les côtés de la découpe.
- Après les opérations de découpe, éliminer les copeaux. Sceller les plans de coupe de façon qu'ils résistent à la chaleur et soient étanches à l'eau.
- Respecter une distance minimale de 3/8“ (10 mm) entre le dessous de l'appareil et les éléments du meuble.
- En particulier si le plan de travail est peu épais, assurer sa capacité de résistance et sa stabilité en le renforçant au moyen de structures adaptées. Tenir compte du poids des appareils, sans oublier leur contenu et leurs accessoires. Le mat...
- Découper le plan de travail
- Pose en affleurement: L'appareil peut être posé en affleurement dans un plan de travail.
- La pose dans de plan de travail de panneaux de particules n'est pas autorisée.
- Association de plusieurs appareils Vario : Pour combiner plusieurs appareils Vario, il faut utiliser la barrette de jonction VA 420 000/010. Elle est disponible comme accessoire en option. Lors de la découpe, tenir compte de l'espace supplémentaire...
- Les appareils peuvent également être installés dans des découpes séparées, en respectant une distance minimale de 2" (51 mm).
- Combinaison avec couvercle : le couvercle VA 440 010 est disponible séparément en tant qu'accessoire spécial. Au moment de réaliser la découpe, veillez à ce qu'il y ait suffisamment de place pour le couvercle.
- Encastrement affleurant :
- Monter les boutons de commande
- Remarque :
- 2. Lors du montage d'un bouton de commande individuel ou lorsque la tôle de maintien a été brisée au niveau de la perforation, chaque tôle de maintien a été sécurisée contre toute torsion avec 2 vis (C).
- 3. Retirez le film protecteur à l'arrière de l'anneau lumineux (A).
- 4. Insérez le bouton de commande dans le perçage (B) et vissez à l'arrière l'écrou à l'aide de la notice d'installation fournie (D).
- 5. Connectez tous les boutons de commande avec les câbles raccourcis fournis. Les fiches doivent s'enclencher dans les orifices (E).
- 6. Enfichez le câble plus long pour la connexion à l'appareil à l'un des boutons de commande. La fiche doit s'encliqueter dans l'orifice (F).
- 7. Après l'installation, vérifiez si tous les connecteurs sont bien enfichés.
- 8. Après l'installation, fixez tous les câbles en repliant la patte sur la tôle de maintien (E).
- Pose de l'appareil
- 9 AVERTISSEMENT
- 2. Installez l'appareil de manière symétrique dans la découpe. Appuyez fermement du haut vers le bas dans la découpe.
- 3. Uniquement en cas d'encastrement affleurant :
- 4. Raccordez l'appareil au secteur et au gaz et vérifiez le fonctionnement. Si l'appareil s'arrête, de l'air peut se trouver dans la conduite de gaz. Tournez le bouton de commande sur 0 et allumez-le de nouveau. Répétez le processus jusqu'à ce q...
- Branchement du gaz
- L'appareil est expédié depuis l'usine pour être utilisé avec du gaz naturel. S'il doit être utilisé avec du gaz propane, il doit être converti. Un technicien ou installateur qualifié devra se charger de la conversion.
- Avant le branchement, assurez-vous que les conditions locales (type et pression de gaz) sont conformes aux réglages de l'appareil.
- Avant le branchement, assurez-vous que l'arrivée du gaz est fermée sur le robinet d'arrêt.
- Le branchement du gaz doit se trouver dans une pièce permettant un accès au robinet d'arrêt manuel et doit être visible après ouverture de la porte du meuble où il se trouve le cas échéant.
- Le tuyau de gaz sécurisé ne doit pas être en contact avec des pièces mobiles du meuble d'encastrement (par ex. un tiroir) ni être posé dans des endroits où il risque d'être coincé ou endommagé.
- Le tuyau de gaz sécurisé ne doit pas entrer en contact avec une table de cuisson, un lave-vaisselle, un four, un réfrigérateur, un lave-linge, des conduites d'eau chaude, une résistance de chauffe ni tout autre appareil installé à proximité d...
- Le tuyau de gaz sécurisé ne doit pas présenter des signes d'usure, des plis ou des déformations permanentes, ni être exposé à des vibrations. Il doit être contrôlé sur toute sa longueur tel qu'installé avec la table de cuisson.
- INFORMATION POUR LE SERVICE APRES-VENTE Raccorder l'alimentation du gaz au moyen du coude ½" U.S.A. et du joint d'étanchéité en fibre fournis avec l'appareil. Le filetage court non conique se visse dans l'écrou fileté. Le filetage conique long ...
- Marque Maxitrol, modèle RV 47 CL ½ PSIG
- 1. Enlever le couvercle en aluminium se trouvant sur le régulateur.
- 2. Enlever la tige en plastique jaune du bouchon en la poussant sur le côté jusqu'à ce qu'elle saute de la gorge qui se trouve dans le couvercle.
- 3. Retourner la tige et la remettre à l'intérieur de la découpe du couvercle
- 4. Remettre le couvercle sur le régulateur.
- Marque Maxitrol, modèle RV 47 CL ½ PSIG
- Brancher l'alimentation électrique
- Avant de brancher le cordon d'alimentation à la prise de courant murale, s'assurer que le robinet d'arrêt du gaz et toutes les commandes des brûleurs sont en position fermée (OFF).
- Le branchement électrique (CA 110-127 V) s'effectue au moyen d'un cordon d'alimentation doté d'une fiche à contact de terre venant se brancher dans une prise de courant à prise de terre, qui doit rester accessible même après l'installation de l...
- Montage des chapeaux de brûleur
- Pour que la table de cuisson fonctionne correctement, il faut s'assurer du positionnement correct des éléments des brûleurs. Si les éléments des brûleurs ne sont pas bien en place, un ou plusieurs des problèmes suivants peuvent se produire :
- Mise en place des éléments de brûleurs Une fois le branchement électrique fait, assembler correctement les éléments des brûleurs. Pendant l'assemblage, s'assurer que la tête de brûleur est montée sur le support de façon que les griffes des...
- Vérification du positionnement du chapeau de brûleur S'assurer qu'il n'y a pas d'espace vide entre les éléments du brûleur. Vous pouvez essayer de faire bouger en douceur les éléments du brûleur d'un côté à l'autre pour vérifier qu'ils so...
- Vérification de l'installation
- Vérifier le fonctionnement des allumeurs électriques. Observer les caractéristiques des flammes. Les flammes doivent être bleues sans pointes jaunes.
- Flammes jaunes : Il faut régler le brûleur.
- Pointes jaunes sur cônes extérieurs : Normal pour le gaz GPL.
- Flammes bleutées Normal pour le gaz naturel.
- Si la flamme est entièrement ou majoritairement jaune, vérifier que le régulateur est bien réglé pour le type de gaz utilisé. Refaire un essai après réglage.
- Durant la phase d'allumage, des rayures jaunes sont normales. Faire fonctionner l'appareil pendant 4 à 5 minutes et réévaluer la qualité des flammes avant de modifier les réglages.
- Dépose de l'appareil
- Mettre l'appareil hors tension. Fermer le robinet d'arrêt du gaz. Si les appareils sont posés en affleurement, enlever le joint en silicone. Faire sortir l'appareil en le poussant par le bas.
- Cette table de cuisson à gaz est conforme aux catégories indiquées sur la plaquette d'identification. Le changement des injecteurs permet d'adapter l'appareil à chacun des gaz mentionnés. Des jeux d'injecteurs adéquats peuvent être obtenus aup...
- L'adaptation à un nouveau type de gaz doit être faite par un technicien agréé.
- Avant le changement d'injecteurs, couper l'alimentation électrique et l'arrivée du gaz.
- Échange des injecteurs principaux - brûleur pour wok
- 1. Enlevez les supports de casserole et toutes les parties des brûleurs.
- 2. Desserrez les écrous de fixation de la plaque de cuisson (3 écrous surplat 7) et enlevez prudemment la plaque par le haut.
- 3. Enlevez le circlip aux conduites des brûleurs. Retirez les conduites des brûleurs. Desserrez la vis à la douille de l'air primaire. Enlevez le porte-injecteur.
- 4. Retirez manuellement l'injecteur et le joint torique du brûleur de l'anneau intérieur. Dévissez l'injecteur du brûleur de l'anneau extérieur (surplat 10).
- 5. Vérifiez que le joint torique est correctement en place dans le nouvel injecteur principal du brûleur de l'anneau intérieur. Poussez l'injecteur sur la conduite du brûleur. Vissez le nouvel injecteur principal du brûleur de l'anneau extérieu...
- 6. Enfichez le porte-injecteur et les conduites. Fixez le circlip.
- 7. Réglez la douille de l'air primaire à la dimension correcte après avoir desserré la vis (voir le tableau des injecteurs). Resserrez la vis.
- 8. Reposez la plaque de cuisson et vissez-la uniformément. Remettez les pièces du brûleur et les supports de casserole en place, veillez à les positionner correctement.
- 9. Réglez le régulateur de pression sur la pression de gaz correcte.
- Réglage du type de gaz
- 1. Tournez le bouton de commande sur 0 (A). Débranchez l’appareil du réseau électrique. Patientez au moins 30 secondes (B).
- 2. Branchez de nouveau l'appareil (C). L’anneau lumineux du bouton de commande s'allume en vert pendant quelques secondes, puis en jaune (D). Patientez jusqu'à ce que l'anneau lumineux s'éteigne.
- 3. Tournez le bouton de commande vers la gauche sur la position 12 (E).
- 4. Tournez le bouton de commande vers la droite sur la position 1 (F).
- 5. Tournez le bouton de commande vers la gauche sur la position 0 (G). Patientez jusqu'à ce que l'anneau lumineux s'allume en jaune (H).
- 6. Réglez le type de gaz sur le bouton de commande (I), la position réglée momentanément s'allume en vert :
- 7. Laissez le bouton de commande sur le réglage souhaité pendant au moins 5 secondes. L'anneau lumineux du bouton de commande s'allume en vert (I).
- 8. Pour enregistrer le réglage, quittez impérativement le menu comme suit : tournez le bouton de commande sur 0 (J). Ensuite, tournez le bouton de commande vers la gauche, sur la position 12 (K).
- Échange des injecteurs principaux - brûleur pour wok
- Après la modification, vérifier le fonctionnement : Les flammes ne doivent pas avoir de pointes jaunes. Lors du passage rapide de la position plein feu à la position feu doux, la flamme ne doit pas s'éteindre.
- Si votre appareil doit être réparé, notre service après- vente est à votre disposition. Nous trouvons toujours une solution adaptée, y compris pour éviter les visites inutiles de techniciens.
- Lors de votre appel, indiquez le numéro du produit (n° E) et le numéro de série (n° FD) afin que nous puissions vous donner une réponse précise. La plaquette d'identification comportant ces numéros se trouve sur le dessous de l'appareil. Pour...
- N° E
- N° FD
- N'oubliez pas qu'en cas de fausse manœuvre, la visite d'un technicien d'après-vente n'est pas gratuite, même pendant la garantie.
- Vous trouverez les données de contact pour tous les pays dans l'annuaire ci-joint du service après-vente.
- Índice
- Instrucciones de instalación
- Encontrará más información sobre productos, accesorios, piezas de repuesto y servicios en internet: www.gaggenau.com y también en la tienda online: www.gaggenau.com/zz/store
- INSTRUCCIONES DE SEGURIDAD IMPORTANTES
- LEA Y CONSERVE ESTAS INSTRUCCIONES
- Importante: la instalación del aparato debe ser realizada por un instalador cualificado.
- INSTALADOR: DEJE ESTAS INSTRUCCIONES CON EL ELECTRODOMÉSTICO CUANDO HAYA FINALIZADO LA INSTALACIÓN. IMPORTANTE: CONSÉRVELAS PARA USO DEL INSPECTOR LOCAL.
- La garantía no cubre una instalación incorrecta.
- Este aparato cumple con una o varias de las siguientes normas:
- Es responsabilidad del propietario y del instalador determinar si se aplican otros requisitos o normas en instalaciones específicas.
- La instalación debe realizarse cumpliendo las normas locales o, en ausencia de éstas, conforme al Código Nacional de Combustibles Gaseosos (ANSI Z223.1/NFPA 54) o, si se lleva a cabo en Canadá, al Código de Instalación de Gas Natural y Propano ...
- El electrodoméstico debe conectarse a tierra conforme a la normativa local o, en ausencia de esta, conforme a la Código Eléctrico Nacional (última versión de la NFPA 70) o, si se lleva a cabo en Canadá, al Código Eléctrico de Canadá (CSA C22...
- Para los electrodomésticos equipados con cable y enchufe, no corte ni retire la espiga de conexión a tierra. Debe enchufarse en un receptáculo de conexión a tierra compatible para evitar descargas eléctricas. Si tiene alguna duda respecto de si ...
- No use un cable de extensión.
- No use un adaptador.
- Si el Código Nacional Eléctrico (o el Código Eléctrico Canadiense) así lo requiere, este electrodoméstico debe instalarse en un circuito derivado por separado.
- El disyuntor debe tener una separación de contacto de, al menos, 3 mm en todos los polos.
- Asegúrese de que el electrodoméstico sea correctamente instalado y conectado a tierra por un técnico calificado. La instalación, las conexiones eléctricas y la conexión a tierra deben cumplir con todos los códigos correspondientes.
- Antes de realizar la instalación, apague la alimentación eléctrica en el panel de servicio. Trabe el panel de servicio para impedir que se encienda accidentalmente la alimentación eléctrica.
- El instalador debe mostrar al propietario la ubicación del disyuntor o el fusible. Márquela para recordarla más fácilmente.
- Instale una válvula de paso de gas cerca del electrodoméstico. Debe ser de fácil acceso en una emergencia.
- La prueba de fuga debe ser realizada por el instalador según las instrucciones de este manual.
- El electrodoméstico y su válvula de paso individual deben estar desconectados del sistema de tuberías de alimentación de gas durante cualquier prueba de presión a presiones que exceden ½ psi (3.5 kPa).
- El electrodoméstico debe aislarse del sistema de tuberías de alimentación de gas cerrando su válvula de paso manual individual durante cualquier prueba de presión del sistema de tuberías de alimentación de gas, a presiones de prueba iguales o ...
- La presión de suministro mínima debe ser una columna de agua de 1 pulg. por encima de la presión de admisión impresa en la placa de datos. La presión de suministro máxima no debe exceder una columna de agua de 14.0 pulg. (34.9 milibares).
- Se debe usar una línea flexible de metal o una tubería de metal fija para conectar el gas al aparato. Si no se puede utilizar una línea de metal para el gas, se debe consultar a un electricista certificado local o los códigos eléctricos locales ...
- ADVERTENCIA DE SEGURIDAD IMPORTANTE: La combustión de gas como combustible para cocinar genera algunos subproductos que se encuentran en la lista de sustancias que el estado de California sabe causan cáncer o daños reproductivos. Para minimizar la...
- Este producto puede contener un químico que el Estado de California reconoce como potencialmente cancerígeno o causante de daños reproductivos. Por tanto, su producto debe llevar en su embalaje la siguiente etiqueta de conformidad con la legislaci...
- El tanque de gas propano debe estar equipado con su propio regulador de alta presión. Además, también debe utilizarse el regulador que se suministra con esta unidad.
- El electrodoméstico se envía desde la fábrica para uso con gas natural. Debe convertirse para uso con propano. Un técnico o instalador calificados deben realizar la conversión.
- Este electrodoméstico ha sido certificado para un funcionamiento seguro hasta una altura de 10,000 pies sin modificaciones. Excepción: Para uso con propano, el electrodoméstico debe convertirse de acuerdo con las instrucciones de conversión de pr...
- Instalador: muestre al propietario dónde está ubicada la válvula de paso de gas.
- El electrodoméstico solamente deberá usarse si lo ha instalado un técnico calificado, de acuerdo con estas instrucciones de instalación. El fabricante no es responsable de ningún daño causado por una instalación incorrecta.
- Retire toda la cinta y el embalaje antes de usar el electrodoméstico. Destruya el embalaje después de desembalar el electrodoméstico. Nunca deje que los niños jueguen con el material de embalaje.
- Nunca modifique ni altere la construcción del electrodoméstico. Por ejemplo, no retire las patas niveladoras, paneles, cubiertas para cables ni soportes/ tornillos antivuelco.
- Para eliminar el riesgo de quemaduras o incendio al tocar unidades de la superficie calentadas, se debe evitar dejar espacio de almacenamiento en gabinetes sobre las unidades de la superficie. En el caso de que haya almacenamiento en gabinetes, se pu...
- Verifique que los gabinetes que se encuentran sobre la placa tengan 13 pulg. (330 mm) de profundidad como máximo.
- Al instalar una placa sobre un horno individual, asegúrese de seguir las instrucciones de los Manuales de instalación del horno y de la placa.
- Recomendaciones
- Recomendamos categóricamente la instalación de una campana de ventilación arriba de este electrodoméstico. La campana debe instalarse según las instrucciones proporcionadas con la campana.
- Herramientas y piezas necesarias
- Piezas incluidas
- Accesorios para la instalación
- Requisitos de gabinetes
- Los espacios mínimos que se deben mantener al instalar la estufa de gas son:
- La distancia desde la parte superior de la placa hasta la parte inferior de los gabinetes que se encuentran arriba se puede reducir a 26" cuando la parte inferior del gabinete de madera o metal está protegida por un cartón ignífugo de ¼" (6,35 mm...
- Requisitos de la superficie de trabajo
- 9 ADVERTENCIA
- La superficie de trabajo debe ser horizontal y estar nivelada. La estabilidad de la superficie de trabajo debe estar garantizada incluso después de haber realizado el hueco.
- Por norma general, las encimeras de superficie sólida requieren instalaciones especiales. Por ejemplo, es posible que se deba utilizar cinta ignífuga y esquinas redondeadas. Póngase en contacto con el fabricante de su encimera para obtener instruc...
- Especificaciones técnicas
- 25 VA
- 18,800 BTU/h (5.5 kW)
- 17,000 BTU/h (5.0 kW)
- Preparación de los muebles de montaje
- El mueble de empotrado tiene que resistir una temperatura de hasta 200° F (90°C). La estabilidad del mueble de empotrado tiene que quedar garantizada también despues de los trabajos de corte para realizar un hueco.
- Realice el hueco para uno o varios equipos Vario en la placa de trabajo, de acuerdo con los planos de montaje. El ángulo de la superficie de corte respecto a la placa de trabajo tiene que ser de 90°.
- Los cantos laterales del corte tienen que ser planos, para garantizar una buena fijación de los resortes de sujeción en el equipo. En el caso de las placas de trabajo de varias capas, de ser necesario fije unos listones de madera a los lados del hueco
- Después de los trabajos de corte, retire las virutas Selle las superficies de corte de forma que resistan el calor y sean herméticas contra el agua.
- Respete la distancia mínima de 3/8“ (10 mm) de la parte inferior del equipo respecto a las partes del mueble.
- Es necesario asegurar la capacidad de carga y estabilidad a través de estructuras inferiores de apoyo adecuado, especialmente en placas de trabajo delgadas. Tome en cuenta el peso del equipo, incluyendo la carga adicional. El material de refuerzo ut...
- Recortar la encimera
- Montaje a ras de superficie: se puede realizar un montaje a ras de superficie de la encimera.
- No se puede realizar el montaje en encimeras de madera aglomerada.
- Combinar varios aparatos Vario: Para combinar varios aparatos Vario se requiere la barra de conexión VA 420 000/010. Esta está disponible por separado como accesorio especial. Considerar la necesidad adicional de espacio para la barra de conexión ...
- Los aparatos también se pueden montar en recortes independientes respetando las distancias mínimas de 2" (51 mm) entre aparatos.
- Combinación con una tapa para el aparato: La tapa del aparato VA 440 010 está disponible por separado como accesorio especial. Respetar el espacio adicional para la tapa del aparato al hacer el hueco.
- Instalación enrasada
- Colocar las perillas de control
- Nota:
- 2. Al colocar una única perilla de control o cuando la placa de sujeción se ha recortado por la perforación, asegurar cada una de las placas de sujeción con 2 tornillos para evitar que se muevan (C).
- 3. Retirar la película protectora de la parte trasera del anillo luminoso (A).
- 4. Introducir la perilla de control en el orificio (B) y atornillar en la parte posterior la tuerca con la ayuda para la instalación adjunta (D).
- 5. Conectar todas las perillas de control con los cables cortos adjuntos. Los conectores tienen que encajar en las tomas (E).
- 6. Introducir en una de las perillas de control el cable más largo para la conexión con el electrodoméstico. El conector tiene que encajar en la toma (F).
- 7. Después de la instalación, comprobar que todas las conexiones estén bien asentadas.
- 8. Una vez realizado el montaje, fijar todos los cables doblando la lengüeta en la placa de sujeción (E).
- Montaje del aparato
- 9 ADVERTENCIA
- 2. Introducir el aparato alineado en el hueco. Presionar firmemente en el hueco desde arriba.
- 3. Solo para la instalación enrasada:
- 4. Conectar el aparato a la red eléctrica y al gas y comprobar su funcionamiento. En caso de que el aparato se apague, puede quedar aire en la tubería de gas. Girar la perilla de control hasta 0 y volver a conectarlo. Repetir el proceso hasta que e...
- Conectar el suministro de gas
- El electrodoméstico se envía desde la fábrica para uso con gas natural. Debe convertirse para uso con propano. Un técnico o instalador calificados deben realizar la conversión.
- Antes de conectar el equipo, compruebe si las condiciones de conexión del lugar tales como el tipo de gas y la presión de gas coinciden con la configuración del equipo.
- Cerciórese de que el suministro de gas está desconectado en la válvula de cierre manual antes de proceder a la conexión del equipo.
- La conexión de gas debe hallarse en una ubicación que permita el acceso a la válvula de cierre manual y que, en caso dado, sea visible tras la apertura de la puerta del armario.
- La manguera de seguridad de gas no debe entrar en contacto con partes móviles del mueble donde está instalado el aparato (p. ej. un cajón) o colocarse en lugar donde pueda aplastarse o deteriorarse.
- La manguera de seguridad de gas no debe entrar en contacto con la placa de cocción, un horno, un lavavajillas, un refrigerador, una lavadora, las tuberías del agua caliente, un radiador o cualquier otro aparato instalado en la vecindad de una parri...
- La manguera de seguridad de gas no debe estar expuesta a abrasiones, vibraciones, dobleces o deformaciones permanentes y debe comprobarse en toda su longitud, con la placa de cocción en la posición de montaje.
- INFORMACIÓN SOLO PARA EL TÉCNICO DE SERVICIO Conectar el suministro de gas utilizando un tubo acodado EE.UU. de ½" y la junta de fibra suministrada con la unidad. La rosca más corta, no cónica encaja en la tuerca roscada de la placa de cocción....
- Versión Maxitrol modelo RV 47 CL ½ PSIG
- 1. Retirar la tapa de aluminio de la parte de arriba del regulador.
- 2. Retirar el eje de plástico amarillo de la tapa; para ello, presionarlo lateralmente hasta que salga de la ranura de la tapa.
- 3. Dar la vuelta al eje y presionarlo hasta que quede colocado en la sección de la tapa.
- 4. Sustituir la tapa del regulador.
- Versión Maxitrol modelo RV 47 CL ½ PSIG
- Conexión de la alimentación eléctrica
- Antes de conectar el cable de suministro a la toma de pared, asegúrese de que la válvula de cierre de gas y todos los controles de los quemadores se hallan en la posición OFF.
- La conexión eléctrica (AC 110-127 V) se establece mediante un cable de conexión provisto de una clavija de toma de tierra conectada a una toma de tierra. Dicha toma de tierra debe permanecer accesible después de la instalación de la placa de coc...
- Colocación de la tapa del quemador
- Las partes del quemador tienen que colocarse adecuadamente para que la parrilla funcione correctamente. Si no se colocan correctamente las partes del quemador, pueden presentarse uno o más de los siguientes problemas:
- Cómo colocar las partes del quemador Después de que quede completada la conexión eléctrica, arme las partes del quemador correcta y uniformemente. Cuando esté armando las partes del quemador, asegúrese de que la cabeza del quemador esté coloca...
- Verificar la colocación de la tapa del quemador Revise para asegurarse que no haya un hueco enre las partes del quemador. Puede tratar de mover con suavidad las partes del quemador de un lado al otro, para verificar si están colocadas adecuadamente.
- Pruebe la instalación
- Comprobar el funcionamiento de los encendedores eléctricos. Comprobar las características de la llama. La llama debe ser de color azul sin puntas de color amarillo.
- Llamas de color amarillo: Se requiere un ajuste adicional.
- Puntas amarillas en los conos exteriores: Normal para gas LPG.
- Llamas de color azul suave: Normal para gas natural.
- Si la llama presenta un color amarillo total o mayoritario, comprobar que el regulador presente un ajuste correcto para el gas correspondiente. Una vez realizado el ajuste correspondiente, vuelva a realizar una prueba de funcionamiento.
- La formación de ciertas franjas amarillas es normal durante la fase inicial de arranque. Deje que la unidad funcione 4 o 5 minutos y lleve a cabo a continuación una nueva evaluación antes de realizar los ajustes correspondientes.
- Desarmar el equipo
- Desconectar el equipo de la corriente. Cerrar la llave de bloqueo del gas. En equipos armados en una sola superficie, retirar la junta de silicón. Presionar el equipo desde abajo para sacarlo.
- Esta encimera de gas es apta para las categorías indicadas en la placa de características. Cambiando las boquillas, el aparato se puede adaptar para todos los gases especificados. El kit de conversión se puede solicitar por medio de nuestro servic...
- La conversión del aparato para otro tipo de gas únicamente puede ser realizada por un técnico autorizado.
- Antes de cambiar las boquillas se deben cerrar las alimentaciones eléctrica y de gas.
- Sustituir las boquillas principales del quemador Wok
- 1. Retirar el soporte para ollas y todos los componentes del quemador.
- 2. Aflojar las tuercas de sujeción de la placa (3 tuercas SW7) y retirar la placa con cuidado hacia arriba.
- 3. Retirar los clips de seguridad de los conductos del quemador. Retirar los conductos del quemador. Aflojar el tornillo del casquillo de regulación del aire. Retirar el soporte de la boquilla.
- 4. Extraer a mano la boquilla y la junta tórica del quemador del círculo interior. Desenroscar la boquilla del quemador del círculo exterior (SW10).
- 5. Comprobar que la junta tórica esté bien asentada en la nueva boquilla principal del quemador del círculo interior. Deslizar la boquilla sobre el conducto del quemador. Enroscar la nueva boquilla principal del quemador del círculo exterior en e...
- 6. Colocar el soporte de la boquilla y los conductos del quemador. Colocar los clips de seguridad.
- 7. Tras aflojar el tornillo, ajustar el casquillo de regulación del aire a la medida correcta (ver la tabla de inyectores). Volver a apretar el tornillo.
- 8. Colocar la placa y atornillar uniformemente. Colocar los componentes del quemador y el soporte para ollas en la posición correcta.
- 9. Ajustar el regulador de presión a la presión de gas adecuada.
- Ajuste del tipo de gas
- 1. Girar la perilla de control hasta 0 (A). Desconectar el aparato de la red eléctrica. Esperar al menos 30 segundos (B).
- 2. Conectar de nuevo el electrodoméstico a la red eléctrica (C). El anillo luminoso de la perilla de control se ilumina en color verde durante unos segundos y luego pasa a amarillo (D). Esperar a que el anillo luminoso se apague.
- 3. Girar la perilla de control hacia la izquierda, hasta la posición 12 (E).
- 4. Girar la perilla de control hacia la derecha, hasta la posición 1 (F).
- 5. Girar la perilla de control hacia la izquierda, hasta la posición 0 (G). Esperar a que el anillo luminoso se ilumine de color amarillo (H).
- 6. Ajustar el tipo de gas en la perilla de control (I); la posición ajustada en ese momento se ilumina en color verde:
- 7. Dejar la perilla de control en el ajuste deseado durante al menos 5 segundos. El anillo luminoso de la perilla de control se ilumina de color verde (I).
- 8. Para guardar el ajuste, es obligatorio salir del menú como se indica a continuación: girar la perilla de control hasta el 0 (J). Después, girar la perilla de control hacia la izquierda, hasta la posición 12 (K).
- Sustituir las boquillas principales del quemador Wok
- Después de la conversión, compruebe que funcione el aparato: La punta de las llamas no puede ser de color amarillo. La llama no debe apagarse al cambiar rápido de fuego grande a pequeño.
- Si su aparato necesita una reparación, nuestro servicio de atención al cliente estará encantado de ayudarle. Siempre encontramos la solución adecuada, incluso para evitar visitas innecesarias de los técnicos.
- Cuando llame por teléfono, indique la referencia del producto (Nº E) y el número de fabricación (Nº FD) para que podamos ofrecerle un servicio cualificado. La placa de identificación con los números correspondientes los encontrará en la parte...
- Nº E.
- Nº FD.
- Tenga en cuenta que la visita del técnico del servicio de atención al cliente no es gratuito en caso de que el mal funcionamiento sea debido a un manejo incorrecto del aparato.
- Las señas de las delegaciones internacionales figuran en la lista adjunta de centros y delegaciones del Servicio de Asistencia Técnica Oficial.

17
Conversion to another type of gas en-us
6. Set the gas type on the control knob (I), the currently
selected position will turn green:
7. Keep the control knob at the desired setting for at
least 5 seconds. The illuminated ring around the
control knob will turn green (I).
8. To save the setting, it is necessary to exit the menu as
follows: Turn the control knob to position 0 (J). Then
turn the control knob counterclockwise to position 12
(K).
Turn the control knob clockwise to position 1 (L). Turn
the control knob counterclockwise to position 0 (M).
Wait until the illuminated ring goes out (N).
The setting is saved. The illuminated ring around the
control knob will turn yellow for a second. Wait until the
illuminated ring goes out.
Checking functions after the conversion:
The flames are adjusted correctly if no yellow tips are
visible. They must not go out when switching over swiftly
from the high to the low setting.
Note: Stick the adhesive label included with the nozzle
set over the rating plate of the appliance to document the
changeover to a different gas type.
Control knob position Gas Type
7 NG A 6" WC
9 Propane 10" WC
3URSDQH:&
1*$:&
V
,
.-
1
0/