
Use and Care Manual


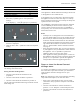


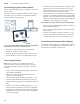
Table Of Contents
- VI 422 613
- Table of Contents
- Use and care manual
- IMPORTANT SAFETY INSTRUCTIONS 5
- Causes of Damage 11
- 7 Environmental protection 12
- Cooking with Induction 12
- * Getting to Know your Appliance 14
- _ Optional accessories 15
- 1 Operating the Appliance 16
- } Flexible cooking zone 17
- OTimer functions 18
- v PowerBoost Function 19
- x Frying Sensor 20
- A Locking the Control Panel for Cleaning 23
- Q Basic Settings 24
- oHome Connect 25
- eConnecting an extractor hood 29
- Cleaning and Maintenance 31
- FAQ 33
- What to Do in the Event of a Fault? 35
- Customer Service 37
- 9 Safety Definitions
- IMPORTANT SAFETY INSTRUCTIONS
- READ AND SAVE THESE INSTRUCTIONS
- 9 WARNING
- Fire Safety
- 9 WARNING
- 1. Never leave surface units unattended at high settings. Boilovers cause smoking and greasy spillovers that may ignite. Heat oils slowly on low or medium settings.
- 2. Always turn hood ON when cooking at high heat or when flambeing food (i.e. Crepes Suzette, Cherries Jubilee, Peppercorn Beef Flambé).
- 3. Clean Ventilating Hoods Frequently. Grease should not be allowed to accumulate on hood or filter.
- 4. Use proper pan size. Always use cookware appropriate for the size of the surface element.
- 9 WARNING
- 1. Do Not Use Water on Grease Fires - Smother fire or flame or use dry chemcial or foam-type extinguisher.
- 2. SMOTHER FLAMES with a close- fitting lid, cookie sheet, or metal tray, then turn off the burner. BE CAREFUL TO PREVENT BURNS. If the flames do not go out immediately, EVACUATE AND CALL THE FIRE DEPARTMENT.
- 3. NEVER PICK UP A FLAMING PAN – You may be burned.
- 4. DO NOT USE WATER, including wet dishcloths or towels – a violent steam explosion will result.
- 5. Use an extinguisher ONLY if:
- 9 WARNING
- Cooking Safety
- Burn Prevention
- Child Safety
- Cleaning Safety
- Cookware Safety
- Proper Installation and Maintenance
- Electromagnetic Interference
- Cooling Fan
- Proposition 65 Warning:
- Causes of Damage
- 7 Environmental protection
- Cooking with Induction
- * Getting to Know your Appliance
- Control Panel
- Controls
- Displays
- Controls
- _ Optional accessories
- 1 Operating the Appliance
- } Flexible cooking zone
- OTimer functions
- v PowerBoost Function
- x Frying Sensor
- Temperature Settings
- Frying Chart
- Temperature setting
- Total frying time after the signal tone sounds (min)
- Setting Procedure
- 1. Use the control knob to select the temperature setting you require. Temperature settings 1 to 5 are available for this function; see temperature settings table.
- 2. Touch the Ú symbol; it will be lit orange.
- 3. Once the frying temperature has been reached, add the fat and then the food to the pan.
- Notes
- Switching Off the Frying Sensor
- A Locking the Control Panel for Cleaning
- Q Basic Settings
- Basic settings
- Display
- Function
- Notes
- Access the Basic Settings
- 1. Carry out the following operating steps one after the other without interruption.
- 2. Push in one of the control knobs and turn it anti- clockwise to the Ž position.
- 3. Turn the control knob clockwise to position 1.
- 4. Turn the control knob anti-clockwise to position 0.
- 5. Touch the t symbol.
- Product information
- Display
- Exiting the Basic Settings Menu
- oHome Connect
- Home Connect
- Notes
- Open or close the Home Connect settings menu
- Setting Up
- Setting up the Home Connect app
- Note:
- 1. On your mobile device, go to the App Store (Apple devices) or to the Google Play Store (Android devices).
- 2. Enter "Home Connect" in the search field.
- 3. Select the Home Connect app and install it on your mobile device.
- 4. Start the app and create your Home Connect login details. The app will guide you through the registration process. Make a note of your e-mail address and password.
- Note:
- Connecting the appliance to your home network (Wi-Fi)
- 1. Carry out the following operating steps one after the other without interruption.
- 2. Push in any control knob and turn it anti-clockwise to the Ž position.
- 3. Turn the control knob clockwise to position ª or ¹.
- 4. Turn the control knob anti-clockwise to position 0.
- 5. Turn the control knob clockwise to position ª or ¹.
- Automatic Registration in the Home Network
- Manual Registration in the Home Network
- Note:
- 1. Wait for two minutes until the illuminated ring on the control knob flashes red once and ’‹¯ ƒ lights up on the control panel.
- 2. Switch to the general settings menu of your mobile device and call up the Wi-Fi settings.
- 3. Connect to the "Home Connect" (password: "HomeConnect") Wi-Fi connection.
- 4. Launch the app on your mobile device and follow the instructions for automatic network login.
- 5. The appliance is available in the app on the mobile device once Ö lights up on the control panel and the illuminated ring on the control knob lights up green.
- Note:
- Restarting the connection process
- Note:
- Exiting the Home Connect settings menu
- 1. Carry out the following operating steps one after the other without interruption.
- 2. Push in the control knob and turn it anti-clockwise to the Ž position.
- 3. Turn the control knob clockwise to position ª or ¹.
- 4. Turn the control knob anti-clockwise to position 0.
- Switching the Wi-Fi on/off
- 1. Carry out the following operating steps one after the other without interruption.
- 2. Push in any control knob and turn it anti-clockwise to the Ž position.
- 3. Turn the control knob clockwise to position ª or ¹.
- 4. Turn the control knob anti-clockwise to position 0.
- 5. Turn the control knob clockwise to position 1.
- Resetting the Connection
- 1. Carry out the following operating steps one after the other without interruption.
- 2. Push in any control knob and turn it anti-clockwise to the Ž position.
- 3. Turn the control knob clockwise to position ª or ¹.
- 4. Turn the control knob anti-clockwise to position 0.
- 5. Turn the control knob clockwise to position 2.
- Software Update
- Remote Diagnostics
- Information on Data Protection
- Declaration of Conformity
- Wi-Fi® Module
- FCC COMPLIANCE STATEMENT
- INDUSTRY CANADA STATEMENT
- eConnecting an extractor hood
- Connecting an extractor hood
- Notes
- Connecting via your home network
- Connecting Directly
- Note:
- 1. Carry out the following operating steps one after the other without interruption.
- 2. Push in one of the control knobs and turn it anti- clockwise to the Ž position.
- 3. Turn the control knob clockwise to position ª or ¹.
- 4. Turn the control knob anti-clockwise to position 0.
- 5. Turn the control knob clockwise to position ª or ¹.
- 6. You have two minutes to initiate the connection on the extractor hood. For more information, refer to the section entitled "Connecting to the cooktop" in the instruction manual for your extractor hood.
- Note:
- Saving the connection and exiting the settings menu
- 1. Carry out the following operating steps one after the other without interruption.
- 2. Push in the control knob and turn it anti-clockwise to the Ž position.
- 3. Turn the control knob clockwise to position ª or ¹.
- 4. Turn the control knob anti-clockwise to position 0.
- Controlling the Hood via the Cooktop
- Cleaning and Maintenance
- FAQ
- What to Do in the Event of a Fault?
- Display
- Possible cause
- Remedial action
- Notes
- Demo Mode
- Suitability Test of Cookware
- 1. Fill the pan with approx. 8 oz. (200 ml) of water, and place it at room temperature in the middle of the cooking zone that most closely matches the diameter of the pan base.
- 2. Go to the basic settings, and select the ™„ setting. The ‹”” indicator lights up.
- 3. Touch the @ or A symbol. The ‹¯ display will be lit. A signal tone will sound and the cooking zone indicators will be lit.
- Result
- Notes
- Customer Service
- Use and care manual

25
Home Connect en-us
6. Press the t symbol again to call up the basic
settings.
In the displays, ™‚ and ‹¯ light up as a presetting.
7. Touch the t symbol repeatedly until the required
function is displayed.
8. Then use the @ and A symbols to select the required
setting.
9. Touch the t symbol for at least 4 seconds.
The settings have been saved.
Exiting the Basic Settings Menu
1. Turn the control knob anti-clockwise to the
Ž position.
2. Turn the control knob clockwise to position 1.
3. Turn the control knob anti-clockwise to position 0.
The t symbol and the illuminated ring around the control
knob will go out.
o
Home Connect
Home Connect
This appliance is Wi-Fi enabled and settings can be sent
to the appliance via a mobile device.
If the appliance is not connected to the home network,
the appliance functions in the same way as a cooktop
with no network connection. The cooktop can always be
operated via the control panel.
The availability of the Home Connect function depends
on the availability of Home Connect services in your
country. Home Connect services are not available in
every country. You can find more information on this at
www.home-connect.com.
Notes
▯ Cooktops are not designed to be used unattended –
you must always keep an eye on the cooking process.
▯ Ensure that you follow the safety instructions in this
instruction manual and that these are also observed
when operating the appliance via the Home Connect
app. Follow the instructions in the Home Connect
app.~ "IMPORTANT SAFETY INSTRUCTIONS"
on page 5
▯ Using the Home Connect app, you can send settings
to your appliance, and you must then confirm these on
the appliance. It is not possible to operate the
appliance while you are away from home.
▯ If the appliance is being operated by the controls on
the appliance itself, this mode of operation always has
priority. It is not possible to operate the appliance
using the Home Connect app during this time.
Open or close the Home Connect
settings menu
To connect your appliance to Home Connect or establish
the connection to your home network, you will need to
open the Home Connect settings menu on your
appliance.
Note: It is important to carry out the following operating
steps without interruption, one after the other.
1. Push in any control knob and turn one notch anti-
clockwise to the Ž position. Keep the control knob
pressed in.
2. Turn the control knob two notches clockwise to
position ª or ¹. Keep the control knob pressed in.
3. Turn the control knob one notch anti-clockwise to
position 0.
Product information Display
Customer service index (CSI) ‹‚
Production number ”š
Production number 1 Š†.
Production number 2 ܠ