
Installation Instructions
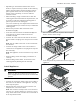
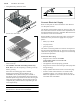
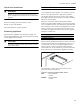
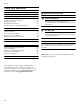


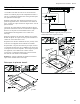

Table Of Contents
- VR 414 611
- Table of Contents
- Installation instructions
- Additional information on products, accessories, replacement parts and services, as well as the Use and care manual and the Installation instructions can be found at www.gaggenau.com and in the online shop www.gaggenau.com/zz/store
- 9 Safety Definitions
- IMPORTANT SAFETY INSTRUCTIONS
- READ AND SAVE THESE INSTRUCTIONS
- Installer: Leave these instructions with the appliance after installation is complete.
- Important: Save these instructions for the local electrical inspector's use.
- Appliance Handling Safety
- Safety Codes and Standards
- Electric Safety
- 9 WARNING
- If required by the National Electrical Code (or Canadian Electrical Code), this appliance must be installed on a separate branch circuit.
- Be sure your appliance is properly installed and grounded by a qualified technician. Installation, electrical connections and grounding must comply with all applicable codes.
- Before installing, turn power OFF at the service panel. Lock service panel to prevent power from being turned ON accidentally.
- Installer – show the owner the location of the circuit breaker or fuse. Mark it for easy reference.
- Related Equipment Safety
- The appliance should only be used if installed by a qualified technician in accordance with these installation instructions. The manufacturer is not responsible for any damage resulting from incorrect installation.
- Remove all tape and packaging before using the appliance. Destroy the packaging after unpacking the appliance. Never allow children to play with packaging material.
- Never modify or alter the construction of the appliance. For example, do not remove leveling legs, panels, wire covers or anti-tip brackets/screws.
- To eliminate the risk of burns or fire by reaching over heated surface units, cabinet storage space located above the surface units should be avoided. If cabinet storage is to be provided, the risk can be reduced by installing a hood that projects ho...
- Verify that cabinets above the cooktop are a maximum of 13" (330 mm) deep.
- When installing a cooktop over a single oven, be sure to follow both the oven’s and cooktop’s installation manuals.
- Ventilation Recommendations
- We strongly recommend the installation of a ventilation hood above this appliance. The hood must be installed according to instructions furnished with the hood.
- Proposition 65 Warning:
- Before you begin
- Before you begin
- Tools and Parts Needed
- Parts Included
- Installation accessories
- Cabinet Requirements
- Countertop Requirements
- 9 WARNING
- The countertop must be level and horizontal. The stability of the countertop must be maintained after the cut-out has been made.
- Solid surface countertops often require special installations. For example, heat-reflective tape and rounded corners may be necessary. Contact the countertop manufacturer for instructions specific to your countertop.
- Prepare Installation Space
- Prepare Installation Space
- The kitchen unit must be heat-resistant to at least 200° F (90°C). The stability of the unit must be maintained after producing the cut-out.
- Produce the cut-out in the countertop for one or more Vario appliances as shown in the installation sketch. The angle between the cut surface and the countertop must be 90°.
- The cut edges at the sides must be flat to ensure a good fit of the retaining springs on the appliance. In laminated worktops, it may be necessary to fit strips at the sides of the cut-out.
- Remove shavings after cutting. Seal cut surfaces for resistance to heat and so they are watertight.
- Pay attention to a minimum gap of 3/8“ (10 mm) from the underside of the appliance to kitchen units.
- Use suitable base constructions to ensure load-carrying capacity and stability, especially in the case of thin countertops. Pay attention to the weight of the appliance, including any payload. Reinforcement material used must be resistant to heat and...
- Cutting out countertop
- Flush mounting: Flush mounting into a countertop is possible.
- Installation in countertops made of particleboard is not possible.
- Combining several Vario devices: The connecting strip VA 420 000/010 is required for the combination of several Vario appliances. This is available separately as a special accessory. Consider additional space requirement for the connecting strip betw...
- Appliances can also be installed in individual cut-outs, bearing in mind a minimum distance between the devices of 2" (51 mm).
- In combination with appliance cover: The appliance cover VA 440 010 can be ordered separately as an optional accessory. Take into account the additional space required for the appliance cover when making the cutout.
- Flush mount installation:
- Installation Procedure
- Installation Procedure
- Mounting Control Knobs
- Note:
- 2. When installing a single control knob or when the retaining plate has been broken at the perforation, use 2 screws to hold each individual retaining plate in place to prevent it from rotating (C).
- 3. Remove the protective film on the back of the illuminated ring (A).
- 4. Insert the control knob into the drilled hole (B) and screw the nut on the back with the enclosed installation aid (D).
- 5. Connect all of the control knobs with the enclosed shorter cables. The plugs must snap into the sockets (E).
- 6. Connect the longer cable to the control cable for connection to the appliance. The plug must snap into the socket (F).
- 7. After installing, check that all plug connections fit correctly.
- 8. After installing all the cables, secure them to the retaining plate by bending the tab down (E).
- Install Appliance
- 9 WARNING
- 2. Evenly insert the unit in the cut-out. Press the unit firmly into the cut-out from above.
- 3. Remove lava stones from the plastic film and place them in the lava stone trough.
- 4. Insert the grease tray and the lava stone trough in the appliance.
- 5. Fold grill heating elements down.
- 6. Fit cast iron wire racks.
- 7. Connect the appliance to the mains and check that it works correctly.
- 8. For installation flush with surrounding surfaces only:
- Connect Electrical Supply
- Refer to data plate for more information. See "Service" for data plate location.
- The branch-circuit breakers ampacity, the wire sizes and the connections must be conform to the requirements of the National Electrical Code or Canadian Electrical Code and all local codes and ordinances.
- Attach flexible conduit to the junction box. Connect the lead wires to the junction box supply wires in proper phase:
- The mains connecting cable must at least correspond to the type SJTO 3x16 AWG 105°C. The mains connecting cable must only be purchased through and connected by an authorised specialist.
- Check the Installation
- Removing appliance
- Customer Service
- Customer Service
- If your appliance needs repairs, our customer service is there for you. We work hard to help solve problems quickly and without unnecessary service calls, getting your appliance back up and running correctly in the least amount of time possible.
- When you call, please indicate the product number (E-Nr.) and serial number (FD-Nr.) so that we can support you in a qualified manner. You will find the type plate with these numbers on the bottom of the appliance. To avoid having to search for a lon...
- E-Nr.
- FD-Nr.
- Please read the installation instructions and use and care instructions provided with your appliance. Failure to do so may result in an error in using the appliance. This could result in a service call that instead of fixing a mechanical issue is onl...
- Please find the contact data of all countries in the enclosed customer service list.
- Table des matières
- Notice de montage
- Vous trouverez des informations supplémentaires concernant les produits, accessoires, pièces de rechange et services, et les notices d’utilisation et de montage sur Internet sous : www.gaggenau.com et la boutique en ligne : www.gaggenau.com/zz/store
- 9 Définitions de sécurité
- CONSIGNES DE SÉCURITÉ IMPORTANTES
- LIRE ET CONSERVER CES INSTRUCTIONS
- INSTALLATEUR : LAISSEZ CES INSTRUCTIONS AVEC L'APPAREIL APRÈS UNE FOIS L'INSTALLATION TERMINÉE.
- Important : conserver ces instructions pour l'usage de l'inspecteur électrique local.
- Sécurité de manutention des appareils
- Codes et normes de sécurité
- Sécurité électrique
- 9 AVERTISSEMENT
- S'il y a lieu, conformément au Code national de l'électricité (ou au Code canadien de l'électricité), cet appareil doit être installé sur un circuit de dérivation séparé.
- 9 AVERTISSEMENT
- Risque de choc électrique ou d'incendie !
- 1. débrancher la liaison du neutre,
- 2. utiliser la borne de terre ou le fil pour mettre l'appareil à la terre,
- 3. brancher la borne neutre sur le fil neutre du circuit terminal de la façon habituelle (lorsque l'appareil doit être branché au moyen d'un nécessaire de cordon, utiliser un cordon à 4 fils homologué par l'Underwritters Laboratory prévu à ce...
- Risque de choc électrique ou d'incendie !
- 9 AVERTISSEMENT
- S'assurer que l'appareil est installé et mis à la terre par un technicien qualifié. L'installation, les connexions électriques et la mise à la terre doivent être conformes à tous les codes applicables.
- Avant l'installation, mettre l'appareil hors service au panneau de service. Verrouiller le panneau d'entrée d'électricité pour éviter que le courant ne soit accidentellement rétabli.
- Installateur – Indiquer au propriétaire l’emplacement du disjoncteur ou du fusible. Identifier sa position pour pouvoir le retrouver facilement.
- Équipement de sécurité
- Utilisez uniquement l’appareil électroménager s’il a été installé par un technicien qualifié conformément aux présentes instructions d’installation. Le fabricant ne peut pas être tenu responsable de tous dommages causés par une instal...
- Enlever le ruban adhésif et l’emballage avant d’utiliser l’appareil. Détruire l’emballage après avoir déballé l’appareil. Ne jamais laisser les enfants jouer avec les matériaux de conditionnement.
- Ne jamais modifier ni altérer la configuration de l'appareil. Par exemple, ne pas retirer les pieds de nivellement, les panneaux, les couvercles de câblage ou les fixations/vis antibasculement.
- Pour éliminer le risque de brûlures ou d’incendie lorsque l’on allonge le bras au- dessus des éléments de surface chauds, éviter d’installer des placards au-dessus des éléments de surface. Si l’installation de placards est prévue, le ...
- Vérifiez que la profondeur des armoires situées au-dessus de la table de cuisson ne dépasse pas 13 po (330 mm).
- Lors de l'installation de la table de cuisson sur un four simple, prendre bien soin de suivre les instructions des manuels d'installation du four et de la table de cuisson.
- Recommandations sur la ventilation
- Il est vivement recommandé d'installer une hotte aspirante au-dessus de cet appareil. La hotte aspirante doit être installée conformément aux instructions qui l'accompagnent.
- Avertissement issu de la proposition 65 :
- Avant de commencer
- Avant de commencer
- Outils et pièces nécessaires
- Pièces comprises
- Accessoires d'installation
- Exigences pour les placards
- Exigences pour le plan de travail
- 9 AVERTISSEMENT
- Le plan de travail doit être de niveau et horizontal. Le plan de travail doit rester stable après la découpe.
- Certains plans de travail à haute résistance requièrent souvent des aménagements spéciaux. Par exemple, une bande thermoréfléchissante et des coins arrondis peuvent être nécessaires. Contacter le fabricant du plan de travail pour obtenir des...
- Préparation des meubles
- Préparation des meubles
- Le meuble où la table de cuisson est encastrée doit résister à la chaleur jusqu'à une température de 200° F (90°C). La stabilité du meuble doit rester garantie après les opérations de découpe.
- Réaliser la découpe dans le plan de travail pour un ou plusieurs appareils Vario, conformément au schéma de pose. Le plan de coupe doit faire un angle de 90° avec le plan de travail.
- Les bords de coupe latéraux doivent être plans afin de garantir la fixation des ressorts de maintien sur l'appareil. Dans le cas de plans de travail multicouches, fixer éventuellement des baguettes sur les côtés de la découpe.
- Après les opérations de découpe, éliminer les copeaux. Sceller les plans de coupe de façon qu'ils résistent à la chaleur et soient étanches à l'eau.
- Respecter une distance minimale de 3/8“ (10 mm) entre le dessous de l'appareil et les éléments du meuble.
- En particulier si le plan de travail est peu épais, assurer sa capacité de résistance et sa stabilité en le renforçant au moyen de structures adaptées. Tenir compte du poids des appareils, sans oublier leur contenu et leurs accessoires. Le mat...
- Découper le plan de travail
- Pose en affleurement: L'appareil peut être posé en affleurement dans un plan de travail.
- La pose dans de plan de travail de panneaux de particules n'est pas autorisée.
- Association de plusieurs appareils Vario : Pour combiner plusieurs appareils Vario, il faut utiliser la barrette de jonction VA 420 000/010. Elle est disponible comme accessoire en option. Lors de la découpe, tenir compte de l'espace supplémentaire...
- Les appareils peuvent également être installés dans des découpes séparées, en respectant une distance minimale de 2" (51 mm).
- Combinaison avec couvercle : le couvercle VA 440 010 est disponible séparément en tant qu'accessoire spécial. Au moment de réaliser la découpe, veillez à ce qu'il y ait suffisamment de place pour le couvercle.
- Encastrement affleurant :
- Procédure d'installation
- Procédure d’installation
- Monter les boutons de commande
- Remarque :
- 2. Lors du montage d'un bouton de commande individuel ou lorsque la tôle de maintien a été brisée au niveau de la perforation, chaque tôle de maintien a été sécurisée contre toute torsion avec 2 vis (C).
- 3. Retirez le film protecteur à l'arrière de l'anneau lumineux (A).
- 4. Insérez le bouton de commande dans le perçage (B) et vissez à l'arrière l'écrou à l'aide de la notice d'installation fournie (D).
- 5. Connectez tous les boutons de commande avec les câbles raccourcis fournis. Les fiches doivent s'enclencher dans les orifices (E).
- 6. Enfichez le câble plus long pour la connexion à l'appareil à l'un des boutons de commande. La fiche doit s'encliqueter dans l'orifice (F).
- 7. Après l'installation, vérifiez si tous les connecteurs sont bien enfichés.
- 8. Après l'installation, fixez tous les câbles en repliant la patte sur la tôle de maintien (E).
- Pose de l'appareil
- 9 AVERTISSEMENT
- 2. Insérer l'appareil à plat dans la découpe. Appuyer fermement par le haut sur l'appareil pour bien le positionner dans la découpe.
- 3. Sortir les pierres de lave du film plastique et les mettre dans le bac.
- 4. Insérer dans l'appareil la lèchefrite et le bac à pierres de lave.
- 5. Rabattre la résistance chauffante du gril vers le bas.
- 6. Poser les grilles.
- 7. Raccordez l'appareil au secteur et vérifiez le fonctionnement.
- 8. Uniquement pour encastrement affleurant :
- Brancher l'alimentation électrique
- Consulter la plaque signalétique pour en savoir plus. Pour savoir où se trouve la plaque signalétique, se reporter à la rubrique "Service après-vente".
- Le courant admissible des disjoncteurs divisionnaires, la taille des câbles et les connexions doivent être conformes aux exigences du Code électrique national ou du Code électrique canadien ainsi qu'à tous les codes et règlements locaux.
- Brancher le conduit souple à la boîte de jonction. Brancher les fils de sortie aux fils d'alimentation de la boîte de jonction en respectant les phases :
- Le câble principal doit être au moins du type SJTO 3x16 AWG 105°C. Le câble principal doit être acheté auprès d'un spécialiste agréé et raccordé par un spécialiste agréé.
- Vérification de l'installation
- Dépose de l'appareil
- Service après-vente
- Service après-vente
- Si votre appareil doit être réparé, notre service après- vente est à votre disposition. Nous trouvons toujours une solution adaptée, y compris pour éviter les visites inutiles de techniciens.
- Lors de votre appel, indiquez le numéro du produit (n° E) et le numéro de série (n° FD) afin que nous puissions vous donner une réponse précise. La plaquette d'identification comportant ces numéros se trouve sur le dessous de l'appareil. Pour...
- N° E
- N° FD
- N'oubliez pas qu'en cas de fausse manœuvre, la visite d'un technicien d'après-vente n'est pas gratuite, même pendant la garantie.
- Vous trouverez les données de contact pour tous les pays dans l'annuaire ci-joint du service après-vente.
- Índice
- Instrucciones de instalación
- Encontrará más información sobre productos, accesorios, piezas de repuesto y servicios, el manual de instrucciones y las Instrucciones de instalación en internet: www.gaggenau.com y también en la tienda online: www.gaggenau.com/zz/store
- 9 Definiciones de seguridad
- INSTRUCCIONES DE SEGURIDAD IMPORTANTES
- LEA Y CONSERVE ESTAS INSTRUCCIONES
- Instalador: deje estas instrucciones con el electrodoméstico cuando haya finalizado la instalación.
- Importante: Conserve estas instrucciones para uso del inspector de electricidad local.
- Seguridad de manejo del electrodoméstico
- Códigos y normas de seguridad
- Seguridad eléctrica
- 9 ADVERTENCIA
- Si el Código Nacional Eléctrico (o el Código Eléctrico Canadiense) así lo requiere, este electrodoméstico debe instalarse en un circuito derivado por separado.
- 9 ADVERTENCIA
- ¡Riesgo de descarga eléctrica o incendio!
- 1. desconecte la conexión del conductor neutro,
- 2. use el borne de conexión a tierra o el hilo de conexión a tierra para conectar a tierra la unidad,
- 3. conecte el borne neutro al hilo neutro del circuito derivado como lo haría usualmente (cuando vaya a conectar el electrodoméstico a través de un conjunto de cables, use un cable de 4 conductores calificado por UL para este fin).
- ¡Riesgo de descarga eléctrica o incendio!
- 9 ADVERTENCIA
- Asegúrese de que el electrodoméstico sea correctamente instalado y conectado a tierra por un técnico calificado. La instalación, las conexiones eléctricas y la conexión a tierra deben cumplir con todos los códigos correspondientes.
- Antes de realizar la instalación, apague la alimentación eléctrica en el panel de servicio. Trabe el panel de servicio para impedir que se encienda accidentalmente la alimentación eléctrica.
- El instalador debe mostrar al propietario la ubicación del disyuntor o el fusible. Márquela para recordarla más fácilmente.
- Seguridad del equipo relacionado
- El electrodoméstico solamente deberá usarse si lo ha instalado un técnico calificado, de acuerdo con estas instrucciones de instalación. El fabricante no es responsable de ningún daño causado por una instalación incorrecta.
- Retire toda la cinta y el embalaje antes de usar el electrodoméstico. Destruya el embalaje después de desembalar el electrodoméstico. Nunca deje que los niños jueguen con el material de embalaje.
- Nunca modifique ni altere la construcción del electrodoméstico. Por ejemplo, no retire las patas niveladoras, paneles, cubiertas para cables ni soportes/ tornillos antivuelco.
- Para eliminar el riesgo de quemaduras o incendio al tocar unidades de la superficie calentadas, se debe evitar dejar espacio de almacenamiento en gabinetes sobre las unidades de la superficie. En el caso de que haya almacenamiento en gabinetes, se pu...
- Verifique que los gabinetes que se encuentran sobre la placa tengan 13 pulg. (330 mm) de profundidad como máximo.
- Al instalar una placa sobre un horno individual, asegúrese de seguir las instrucciones de los Manuales de instalación del horno y de la placa.
- Recomendaciones
- Recomendamos categóricamente la instalación de una campana de ventilación arriba de este electrodoméstico. La campana debe instalarse según las instrucciones proporcionadas con la campana.
- Advertencia en virtud de la Proposición 65:
- Antes de empezar
- Antes de empezar
- Herramientas y piezas necesarias
- Piezas incluidas
- Accesorios para la instalación
- Requisitos de gabinetes
- Requisitos de la superficie de trabajo
- 9 ADVERTENCIA
- La superficie de trabajo debe ser horizontal y estar nivelada. La estabilidad de la superficie de trabajo debe estar garantizada incluso después de haber realizado el hueco.
- Por norma general, las encimeras de superficie sólida requieren instalaciones especiales. Por ejemplo, es posible que se deba utilizar cinta ignífuga y esquinas redondeadas. Póngase en contacto con el fabricante de su encimera para obtener instruc...
- Preparación de los muebles de montaje
- Preparación de los muebles de montaje
- El mueble de empotrado tiene que resistir una temperatura de hasta 200° F (90°C). La estabilidad del mueble de empotrado tiene que quedar garantizada también despues de los trabajos de corte para realizar un hueco.
- Realice el hueco para uno o varios equipos Vario en la placa de trabajo, de acuerdo con los planos de montaje. El ángulo de la superficie de corte respecto a la placa de trabajo tiene que ser de 90°.
- Los cantos laterales del corte tienen que ser planos, para garantizar una buena fijación de los resortes de sujeción en el equipo. En el caso de las placas de trabajo de varias capas, de ser necesario fije unos listones de madera a los lados del hueco
- Después de los trabajos de corte, retire las virutas Selle las superficies de corte de forma que resistan el calor y sean herméticas contra el agua.
- Respete la distancia mínima de 3/8“ (10 mm) de la parte inferior del equipo respecto a las partes del mueble.
- Es necesario asegurar la capacidad de carga y estabilidad a través de estructuras inferiores de apoyo adecuado, especialmente en placas de trabajo delgadas. Tome en cuenta el peso del equipo, incluyendo la carga adicional. El material de refuerzo ut...
- Recortar la encimera
- Montaje a ras de superficie: se puede realizar un montaje a ras de superficie de la encimera.
- No se puede realizar el montaje en encimeras de madera aglomerada.
- Combinar varios aparatos Vario: Para combinar varios aparatos Vario se requiere la barra de conexión VA 420 000/010. Esta está disponible por separado como accesorio especial. Considerar la necesidad adicional de espacio para la barra de conexión ...
- Los aparatos también se pueden montar en recortes independientes respetando las distancias mínimas de 2" (51 mm) entre aparatos.
- Combinación con una tapa para el aparato: La tapa del aparato VA 440 010 está disponible por separado como accesorio especial. Respetar el espacio adicional para la tapa del aparato al hacer el hueco.
- Instalación enrasada
- Procedimiento de instalación
- Procedimiento de instalación
- Colocar las perillas de control
- Nota:
- 2. Al colocar una única perilla de control o cuando la placa de sujeción se ha recortado por la perforación, asegurar cada una de las placas de sujeción con 2 tornillos para evitar que se muevan (C).
- 3. Retirar la película protectora de la parte trasera del anillo luminoso (A).
- 4. Introducir la perilla de control en el orificio (B) y atornillar en la parte posterior la tuerca con la ayuda para la instalación adjunta (D).
- 5. Conectar todas las perillas de control con los cables cortos adjuntos. Los conectores tienen que encajar en las tomas (E).
- 6. Introducir en una de las perillas de control el cable más largo para la conexión con el electrodoméstico. El conector tiene que encajar en la toma (F).
- 7. Después de la instalación, comprobar que todas las conexiones estén bien asentadas.
- 8. Una vez realizado el montaje, fijar todos los cables doblando la lengüeta en la placa de sujeción (E).
- Montaje del aparato
- 9 ADVERTENCIA
- 2. Coloque el equipo de forma uniforme en el hueco. Presione firmemente desde arriba hacia dentro del hueco.
- 3. Saque las piedras volcánicas de su envoltura y colóquelas en la tina correspondiente.
- 4. Coloque en el equipo la bandeja para grasa y la tina para las piedras volcánicas.
- 5. Incline hacia abajo los radiadores.
- 6. Coloque las parrillas.
- 7. Conectar el aparato a la toma de electricidad y comprobar su funcionamiento.
- 8. Solo para montaje enrasado:
- Conexión de la alimentación eléctrica
- Para más información, véase la placa de características. Véase la ubicación de la placa de características en "Servicio".
- El amperaje máximo de los disyuntores derivados, la sección de los cables y las conexiones deben ser conformes con los requisitos del Reglamento electrotécnico nacional o el Reglamento eléctrico canadiense, así como con todos los demás reglamen...
- Conectar un conducto flexible a la caja de conexión. Conectar los cables a la fase correcta de los cables de alimentación de la caja de conexión:
- El cable de red debe corresponderse, como mínimo, con el tipo SJTO 3x16 AWG 105°C. La compra y la conexión del cable de red deben realizarse únicamente por medio de un especialista autorizado.
- Pruebe la instalación
- Desmontaje del aparato
- Servicio de atención al cliente
- Servicio de atención al cliente
- Si su aparato necesita una reparación, nuestro servicio de atención al cliente estará encantado de ayudarle. Siempre encontramos la solución adecuada, incluso para evitar visitas innecesarias de los técnicos.
- Cuando llame por teléfono, indique la referencia del producto (Nº E) y el número de fabricación (Nº FD) para que podamos ofrecerle un servicio cualificado. La placa de identificación con los números correspondientes los encontrará en la parte...
- Nº E.
- Nº FD.
- Tenga en cuenta que la visita del técnico del servicio de atención al cliente no es gratuito en caso de que el mal funcionamiento sea debido a un manejo incorrecto del aparato.
- Las señas de las delegaciones internacionales figuran en la lista adjunta de centros y delegaciones del Servicio de Asistencia Técnica Oficial.

12
en-us Installation Procedure
5. Fold grill heating elements down.
6. Fit cast iron wire racks.
7. Connect the appliance to the mains and check that it
works correctly.
8. For installation flush with surrounding surfaces only:
Note: Make sure that everything is working correctly
before grouting.
Grout the surrounding gap with a suitable
temperature-resistant silicone adhesive (e.g.,
OTTOSEAL
®
S 70). Smooth the joint seal with a
smoothing agent recommended by the manufacturer.
Heed the processing instructions for the silicone glue.
Only start up the appliance after the silicone glue is
completely dry (at least 24 hours, depending on the
room temperature).
NOTICE
Unsuitable silicone adhesive causes permanent
discoloration to natural stone countertops.
Connect Electrical Supply
Refer to data plate for more information. See "Service"
for data plate location.
The branch-circuit breakers ampacity, the wire sizes and
the connections must be conform to the requirements of
the National Electrical Code or Canadian Electrical Code
and all local codes and ordinances.
Attach flexible conduit to the junction box. Connect the
lead wires to the junction box supply wires in proper
phase:
▯ black (L1) to black
▯ red (L2) to blue
▯ green to ground
The mains connecting cable must at least correspond to
the type SJTO 3x16 AWG 105°C. The mains connecting
cable must only be purchased through and connected by
an authorised specialist.
Connection with a plug
▯ Plug has to be conform with NEMA
CONFIGURATIONS FOR PLUGS AND
RECEPTACLES.
▯ The appliance must be properly grounded.
▯ Plug must be rated not less than type 6-20 P (2-pole 3-
wire grounding).
▯ Only a qualified electrician should connect the plug.
▯ Install a socket outlet earthed in accordance with
regulations approx. 27" (700 mm) above the floor
behind the appliance. The socket outlet must still be
accessible after installation.