
Operation Manual

ENGLISH
• 14 •
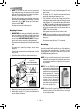
8 Place one or two espresso cups on the drip plate to line
up with the spouts of the fi lter holder. Depress hot water/
brew switch (2) to pos. “On”. Espresso will start to fl ow
into cups.
9 When cups are 3/4 full, release brew switch to “Off”.
Coffee will be as strong as the quantity of dispensed
water.
The more water you allow to fl ow, the weaker the coffee.
When properly made, the espresso will have a light brown
foam “crema” fl oating on the top.
If not, refer to “In the event of faulty function”.
10 Remove cups and serve.
11 To make more espresso, carefully and slowly remove the
fi lter holder by moving handle to the left. Be careful as
hot water will be on top of the coffee grinds in the holder.
Some water will continue to drip from brewing head as
fi lter holder is removed. That is normal and due to the
pump pressure in the system. Knock out used coffee
grinds from fi lter. For more espresso repeat steps 6 to
10 above
Using Coffee Pods
To use coffee pods, remember to only use the “Perfect crema”
pod fi lter (10).
N.B.: If present, remove the "Perfect crema" fi lter for ground
coffee (11).
1 Follow the procedure described in section “Prepara-
tion”.
2 Insert the frothing jet device (13) into the fi lter holder
(9). Then, insert the "Perfect crema" pod fi lter (10).
3 Insert the fi lter holder (9) into the brew group (14) from
the bottom and wait for it to heat up.
4 Place a container under the fi lter holder (9). Preheat the
fi lter holder by placing the hot water/brew button (2)
on “on” (this operation is only necessary for
the fi rst coffee).
Water will start coming out.
5 Once 150 cc of water have been dispensed, bring the hot
water/brew button (2) onto “off”.
6 After the warming phase, remove the fi lter holder (9) and
insert the pod; make sure the paper of the pod does not
overhang the fi lter holder.
7 Insert the fi lter holder into the machine with a 45°
movement towards the left.
8 Rotate it onto the right to tighten it into position. The fi lter
holder handle shall be perpendicular to the machine or
slightly tilted towards the right.
9 Place a cup under the fi lter holder. Place the hot water/
brew button (2) on “on”. Coffee will start coming out.
10 When the cup is 3/4 fi lled, bring the brew button onto
“off”.
Remove the cup and serve.
11 To brew more coffee, slowly remove the fi lter holder with
caution, moving it towards the left. Make sure to not get
burnt with the water from coffee grounds. Once the fi lter
holder has been removed, some water will still drop.
This is due to the water pressure in the system. Remove
the grounds from the fi lter. To brew more coffee, repeat
the procedure from step 6 to 10.
Important note: Filters should be kept clean to
guarantee perfect results. Clean daily after use.
If you experience a malfunction in the coffee brewing
process, leave the Filters in a metal container of hot
boiling water for 10 minutes, then rinse them in running
water and perform another brewing.
For a deeper cleaning of the fi lters, we recommend using
the cleaning tablets specifi cally designed to maintain the
effi ciency of the machine.