Microwave Oven Instructions Model: 5 7 D90D25MSLDV-HG 6 Please read these instructions carefully before installing and operating the oven. 4 2 3 技术要求: 欧盟 ROHS2.0 指令要求规定的 10 种有害物质的含量符合 ROHS2.
PRECAUTIONS TO AVOID POSSIBLE EXPOSURE TO EXCESSIVE MICROWAVE ENERGY 1. Do not attempt to operate this oven with the door open since open-door operation can result in harmful exposure to microwave energy. It is important not to defeat or tamper with the safety interlocks. 2. Do not place any object between the oven front face and the door or allow soil or cleaner residue to accumulate on sealing surfaces. 3. Do not operate the oven if it is damaged.
IMPORTANT SAFETY INSTRUCTIONS WARNING!--To reduce the risk of burns, electric shock, fire, injury to persons or exposure to excessive microwave energy: 1. Read all instructions before using the appliance. 2. Read and follow the specific "PRECAUTIONS TO AVOID POSSIBLE EXPOSURE TO EXCESSIVE MICROWAVE ENERGY" on page 1. 3. This appliance must be grounded. Connect only to properly grounded outlet. See "GROUNDING INSTRUCTIONS" on page 4. 4.
14. Do not operate this appliance if it has a damaged cord or a plug, if it is not working properly or if it has been damaged or dropped. 15. Do not immerse cord or plug in water. Keep cord away from heated surface. Do not let cord hang over edge of table or counter. 16. This appliance should be serviced only by qualified service personnel, contact nearest authorized service facility for examination, repair, or adjustment. 17.
GROUNDING INSTRUCTIONS This appliance must be grounded. In the event of an electrical short circuit, grounding reduces risk of electric shock by providing an escape wire for the electric current. This appliance is equipped with a cord having a grounding wire with a grounding plug. The plug must be plugged into an outlet that is properly installed and grounded. WARNING!-- Improper use of the grounding plug can result in a risk of electric shock.
COOKING UTENSILS GUIDE This section lists which utensils can be used in this microwave, which have limited use for short periods, and which should not be used in this microwave. RECOMMENDED Microwave browning dish — Use to brown the exterior of small items such as steaks, chops, or pancakes. Follow the directions provided with your browning dish. Microwaveable plastic wrap — Use to retain steam. Leave a small opening for some steam to escape and avoid placing it directly on the food.
SPECIFICATIONS Power Supply 120V/60Hz Power Consumption (Microwave) 1050W Power Consumption (Grill) 1500W(Double Grill) Rated Microwave Power Output 900W Operation Frequency 2450MHz Outside Dimensions 11 9/16 × 19 5/16 × 17 13/16 inches Oven Capacity 0.9 cu.ft. Net Weight Approx.24.5lbs PART NAMES 1. Door Safety Lock System 2. Oven Window 3. Glass Tray 4. Control Panel 5. Wave Guide (Please do not remove the mica plate covering the wave guide) 6. Gasket 7.
CONTROL PANEL ⚫ DISPLAY SCREEN Cooking time, power, indicators and present time are displayed. ⚫ ⚫ +30 SEC Press to add cooking time. ⚫ MICRO Press to set microwave cooking program. TOAST/BAGEL/PIZZA/POPCORN/ POTATO Use to cook toast, bagel, pizza, popcorn and potato. ⚫ DEFROST/TIME/WEIGHT Press to defrost food based on time. Press to defrost food based on weight. ⚫ BROIL/BAKE Use to broil and bake food. ⚫ SOFTEN/MELT Press to cook soft and melt food. ⚫ CLOCK/TIMER Press to set the clock time.
OPERATION INSTRUCTIONS ➢ When the oven is first plugged in, beep will sound and the display will show "12:00" (":" flashing). ➢ In the process of setting, broke about 20 seconds the oven will return to standby mode. ➢ During cooking, if press STOP/CANCEL button once, the program will be paused, then press START button or press MENU/TIME/WEIGHT dial to resume, but if press STOP/CANCEL button twice, the program will be canceled.
MICROWAVE COOKING 1. In standby mode, press MICRO button once. 2. Turn MENU/TIME/WEIGHT dial to select power level. 3. Press MENU/TIME/WEIGHT dial or START button. 4. Turn MENU/TIME/WEIGHT dial to enter cooking time. The longest time is 95 minutes. 5. Press MENU/TIME/WEIGHT dial or START to confirm.
.03 to .09 .10 to .15 .16 to .21 .22 to .27 .28 to .34 .35 to .40 .41 to .46 .47 to .53 1 2 3 4 5 6 7 8 .60 to .65 .66 to .71 .72 to .78 .79 to .84 .85 to .90 .91 to .97 above .97 10 11 12 13 14 15 go to next even During defrosting program, the system will pause and sound to remind you to turn over the food, after that, press MENU/TIME/WEIGHT dial START to resume. POPCORN 1. In standby mode, press POPCORN button once. 2. Turn MENU/TIME/WEIGHT dial to adjust cooking time. 3.
Ar-3 Salmon Filet 16oz 4oz 8oz 12oz 16oz 20oz 22:00 11:00 14:00 17:00 20:00 23:00 3. Press MENU/TIME/WEIGHT dial or START button once. 4. Turn MENU/TIME/WEIGHT dial to enter the food weight. 5. Press MENU/TIME/WEIGHT dial or START button once to start. For others food: 1. In standby mode, press BROIL button once. 2. Turn MENU/TIME/WEIGHT dial to select temperature (400℉→425℉→350℉→375℉). 3. Press MENU/TIME/WEIGHT dial or START button once. 4. Turn MENU/TIME/WEIGHT dial to enter cooking time. 5.
POTATO 1. 2. 3. In standby mode, press POTATO button once. Turn MENU/TIME/WEIGHT dial to enter food weight (8-24 oz). Press MENU/TIME/WEIGHT dial or START button to start. WARM 1. In standby mode, press WARM button once. 2. Turn MENU/TIME/WEIGHT dial to select temperature (160°F, 170°F, 180°F, 190°F, 200°F). 3. Press MENU/TIME/WEIGHT dial or START button once. 4. Turn MENU/TIME/WEIGHT dial to enter cooking time. The longest time is 95 minutes. 5. Press MENU/TIME/WEIGHT dial or START button to start.
AUTO REHEAT 1. In standby mode, press AUTO REHEAT button once. 2. Turn MENU/TIME/WEIGHT dial to select a food code. 3. Press MENU/TIME/WEIGHT dial or START once. 4. Turn MENU/TIME/WEIGHT dial to select food weight or servings. 5. Press MENU/TIME/WEIGHT or START to start.
4 oz 8 oz AH-7 12 oz Mashed Potatoes 16 oz 20 oz 24 oz 4 oz 8 oz 12 oz AH-8 Rice 16 oz 20 oz 24 oz 28 oz SOFTEN/MELT 1. 2. 3. 4. In standby mode, press SOFTEN/MELT button once or twice to select code "SF-1" or "SF-2". Press MENU/TIME/WEIGHT dial or START button once. Turn MENU/TIME/WEIGHT dial to enter food servings. Press MENU/TIME/WEIGHT dial or START button once to start.
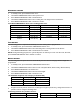
FAILURE DIAGNOSE Failures Possible reasons An error sign “Er10” display. High temperature alarm. An error sign “Er11” display. Low temperature alarm. An error sign “Er12” display. Open circuit alarm. An error sign “Er13” display. Short circuit alarm. An error sign “Er30” display. Inverter failure. An error sign “Er40” display. Inverter input under voltage. An error sign “Er41” display. Inverter input over voltage. An error sign “Er42” display. Over current protection.
CLEANING AND CARE 1. Turn off the oven and unplug the power cord from the wall when cleaning. 2. Keep the inside of the oven clean. When food splatters or spilled liquids adhere to oven walls, wipe with a damp cloth. Mild detergents may be used if the oven gets very dirty. Avoid using spray or other harsh cleaners. They may stain, streak or dull the door surface. 3. The outside of the oven should be cleaned with a damp cloth.