
Instruction Manual

GAM Product #VFGF
Rosco Product #300 62102 0050
PRODUCT INSTRUCTIONS
STORAGE
GAMFLOOR™ should not be stored in a horizontal position for long periods of time and is best stored in an upright posi-
tion. Storage in a horizontal position will cause the roll to get a flattened edge. Ideal storage temperature is between 65
and 80F (18 to 29C). GAMFLOOR™ should not be stored at temperatures above 120F (49C). GAMFLOOR™ should
not be stored near heat sources or in direct sunlight. Avoid extreme temperatures and humidity. Store in original container.
SURFACES
GAMFLOOR™ may be applied to wood, concrete, metal, vinyl, glass, painted surfaces and many other finishes and
surfaces. Surface should be clean and dry, with no dust, dirt or oils.
REMOVING GAMFLOOR™
To remove GAMFLOOR™ simply peel it up and throw it away. The low-tack adhesive will leave no residue.
INSTALLING GAMFLOOR™
Easy to install on a clean surface, it does require two or more people to handle the 48 inch wide material. With
its backing still in place, roll out GAMFLOOR™ in the area you wish to place it. Cut to the overall length required.
See figure 1.
With the backing side up, start to peel the backing sheet off. One person holds one end of the cut section of the
GAMFLOOR™ sheet, the second person carefully peels away the backing material and discards. See figure 2 .Once
the backing is removed, turn the GAMFLOOR™ over. This requires two installers at either end of the cut material grasp-
ing the four corners of the sheet. Carefully turn over holding one edge up. Be careful not to stick GAMFLOOR™ to itself,
should this occur, you can separate the low-tack adhesive.
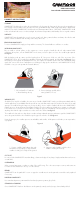
Figure 1
2. Remove backing carefully before
turning GamFloor™ over.
1. Roll out GamFloor™ and trim
to fit with backing side up
WRINKLES, ETC.
Should there be wrinkles or bubbles, they are easy to handle. GAMFLOOR™ can be peeled up immediately and the
wrinkles pulled out. Tiny air bubbles that are missed are easy to deflate: make a pin hole and smooth down. Use a small
squeegee for small finishing, the large size for step 4 above. At one end the installer holds down the GAMFLOOR™
making sure it is in the proper position and flat (no wrinkles). Then the installer runs a hand across, getting one edge stuck
to the surface to be covered. The other installer is holding the opposite end tautly up in the air, being sure not to allow
anything other than the edge secured at one end to stick to the surface. See figure 3.
The installer who has stuck one edge down now takes a large industrial squeegee and starts to push the GAMFLOOR™
across the ground while the other installer keeps the opposite end in the air. See figure 4.
Using the squeegee, the installer squeezes out air bubbles and wrinkles. A little practice will make you an expert at this
very quickly.
CUT TO FIT
It is easy to fit the GAMFLOOR™ around moldings, columns and edges of any shape. Simply mark and trim with scissors
or matte knife.
OVERLAPPING
When covering large areas, overlap one edge of the vinyl flooring. This is the easiest way to seam it, and seams are
not visible at a short distance to the eye or to the camera.
REPAIRS
GAMFLOOR™ can be patched if it is torn or ripped in a small area. It can be painted over and be easily replaced
if necessary.
PAINTING GAMFLOOR™
Use water based paints to paint matte finish and acrylic paints to paint a glossy finish.
CLEANING and WAXING
Once GAMFLOOR™ has been laid down it can be painted, waxed, washed, swept, cleaned and polished.
Figure 2
2. Squeegee out the bubbles while the other
installer is holding the sheet up.
1. Position carefully. Start leading edge with
hand before using squeegee, while assistant
installer is holding one end up off the ground.