
Installation Instructions


DE
EN
DE EN
DE EN
FR
FR
weiß
FR
DE
EN
DE EN
DE EN
FR
FR
weiß
FR
VB_GAT-SLR73xx--DE+EN_23
Gültig ab 5. Februar 2021
Technische Änderungen vorbehalten!
Seite 4
VB_GAT-SLR73xx--DE+EN_23
Valid as of 5
th
February 2021
Technical data subject to modification without notice!
Page 4
GANTNER Electronic GmbH
info@gantner.com
www.gantner.com/locations
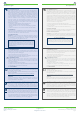
Aufstecken des Gehäuseoberteils
Nach Kabelanschluss und Montage wird das Geräteoberteil wie folgt auf das
Geräteunterteil aufgesteckt.
• Haken Sie die obere Kante des Geräteoberteils im Geräteunterteil ein.
• Schwenken Sie die Unterseite des Geräteoberteils nach hinten, bis es im
Geräteunterteil einrastet.
Abnehmen des Geräteoberteils
Wenn der GAT SLR 73xx z. B. im Falle von Servicearbeiten abmontiert werden
muss, muss zuerst das Geräteoberteil entfernt werden.
• Lösen Sie mit einem flachen Werkzeug (z. B. Schraubendreher) das Oberteil
an der Unterkante des Gehäuses, indem Sie das Werkzeug in den Schlitz
drücken.
• Schwenken Sie nun das Geräteoberteil auf der Unterseite nach vorne.
Attaching the device front part
After installing the device and completing the electrical connections, attach the
device front part to the rear part as shown in the diagram.
• Hook the top of the front part into the top of the rear part.
• Swing the bottom of the front part forward until it clicks into place in the rear
part.
Removing the device front part
To detach the GAT SLR 73xx, e.g., for maintenance work, the device front part
must be removed first.
• Use a flat tool such as a screwdriver to push the slot on the bottom of the
housing in.
• Carefully swing the device front part forward.