
Installation Instructions


GAT NET.Lock 7020 System
Configuration and Operation
www.gantner.com
HB_GAT-NETLOCK7020--EN_12
49
5.
CONFIGURATION AND OPERATION
NOTE! To ensure that all the latest features and functions are available after you install the system, GANTNER
recommends updating the firmware of the GAT NET.Lock 7020, GAT NET.Controller S 7020, and GAT NET.Lock
Controller M 7020 to the latest version. The latest firmware is available via the partner area of the GANTNER website
or from your GANTNER representative.
5.1
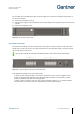
GAT NET.Lock 7020 Antenna Calibration
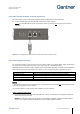
The antenna of the GAT NET.Lock 7020 must be calibrated so that an optimal reading range for the RFID data carriers
is obtained. The antenna calibration process for the GAT NET.Lock 7020 can be performed automatically via PC
software or by pressing the MODE button of the GAT NET.Controller 7020 sub controller as shown in Figure 5.1.
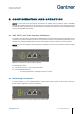
NOTE! The locker door must be locked during antenna calibration to ensure the test conditions meet the operating
conditions.
Figure 5.1 – MODE button for automatic antenna calibration
Proceed with these steps:
► Lock all locker doors, e.g., with a master data carrier.
► Press the MODE button once.
o The antenna adjustment is completed in less than 1 second.
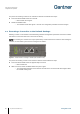
5.2
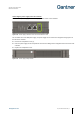
Restarting a Controller
In certain situations, e.g., after a network problem, it may be helpful to restart a master or sub controller. This means
that the software application in the device is restarted.
Figure 5.2 – RESET button for restarting a controller (sub controller shown)