
User Manual


Installation
16
|
Installation
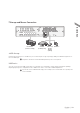
Connecting to an external device
Connecting to the monitor
This product supports 1080p 60 Hz HDMI monitors and regular monitors that support DVI and VGA inputs. Use the
switch on the product
’
s rear side to set it for HDMI or VGA monitor. Connect an HDMI cable to the port on the product
’
s rear bottom, or connect an HDMI-DVI converter cable to connect a DVI monitor. Or, use VGA cable to connect the
product with a VGA monitor.
~
Once the product is set for NTSC or PAL output, connect cameras of the corresponding video standard for
proper operations.
J
Make sure to connect the product to a monitor that supports 1920x1080 at 60Hz.
(HDMI, DVI, VGA)
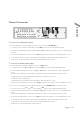
Power Connection
Connect the power cable supplied with the product into the power socket on the main unit
’
s rear side.
J
For stable operation of the product, it is recommended to use the adapter provided. (12V, 10A)
J
Make connection when the power is not applied yet.
J
Arrange up the cables and be careful not to peel off the cable coating.
J
Do not place the power cord under the carpet or rug. The power cord is usually earth-grounded. However, even if
it's not earth-grounded, do never modify it on your own for earth-grounding.
J
Do not insert multiple devices in a single power socket. Otherwise, it may cause a power overload.
J
For stable power supply, this product provides two separate adaptors and two corresponding AC cords by factory
default. Make sure all cables are connected properly.
HD
MONITOR
VGA
AUDIO
OUT
DC12V
WAN(UPLINK)
LAN(DOWNLINK)e-SATA
USB
SPOT
OUT
RS-485_1
ALARM OUT
RS-485_2
D+
D+
D-
D-
GND GND
RX TX
AO5 AO1
AO6 AO2
GND GND
AO7 AO3
AO8 AO4
RS-232
RELAY
NO7
NO5
COM7 COM5
COM8 COM6
NC8 NC6
IN13 IN9
IN14 IN10
GND GND
IN15 IN11
IN16 IN12
GND
PANIC
RELAY
NO3
NO1
COM3 COM1
COM4 COM2
NC4 NC2
IN5 IN1
IN6 IN2
GND GND
IN7 IN3
IN8 IN4
GND
ARI
1 3 5 7 9 11 13 15
2 4 6 8 10 12 14 16
VIDEO IN
AUDIO IN
9 11 13 157531
10 12 14 168642
DC12V
Power adaptor