
Instructions / Assembly


8
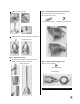
Leak Check
WARNING
• Perform all leak tests outdoors.
• Extinguish all open flames.
• NEVER leak test when smoking.
• Do not use the heater until all connections have been leak
tested and do not leak.
Hose / Regulator
Connection
Make 2-3 oz. of leak check solution (one part liquid
dishwashing detergent and three parts water).
Apply several drops of solution where hose attaches
to regulator.
Apply several drops of solution where regulator
connects to Natural gas Valve.
Make sure all Patio Heater & Light valves are OFF.
Turn Natural gas Valve ON.
If bubbles appear at any connection, there is a leak.
Turn Natural gas Valve OFF.
If leak is at Hose/Regulator connection: tighten
connection and perform another leak test. If bubbles
continue appearing should be returned to Hose’s place
of purchase.
If leak is at Regulator/Natural gas Valve connection:
disconnect, reconnect, and perform another leak
check. If you continue to see bubbles after several
attempts, Natural gas Valve is defective and should be
returned to cylinder’s place of purchase.
If NO bubbles appear at any connection, the
connections are secure.
.Turn Natural gas Valve OFF.
NOTE: Whenever gas connections are loosened or
removed, you must perform a complete leak test.
.Complete installation.
Operation
DANGER
• CARBON MONOXIDE HAZARD
• For outdoor use only. Never use inside house, or other
unventilated or enclosed areas. This heater consumes air
(oxygen). Do not use in unventilated or enclosed areas to
avoid endangering your life.
Caution: Do not attempt to operate until you have read
& understand all General Safety Information in this
manual and all assembly is complete & leak checks
have been performed.
The appliance must be isolated from the gas supply
piping system by closing its individual manual shoutoff
valve during any pressure testing of the gas supply
piping system at test pressures equal to or less than
1/2 psig (3.5kPa).